
The video experts blog
How to Broadcast Live Using Prerecorded Video

Most likely, those reading this already know how to broadcast live video. For example, you may already know how to stream live video on your website with an encoder, a streaming service, and one or more dedicated webcams or IP cameras.
Sometimes, however, streaming video content can get a bit more complicated. Sometimes you want to make use of prerecorded content as part of your “live” video. Maybe you are broadcasting a live speaker, and you have a recorded segment that offers an introduction. Or perhaps you have a commercial to transmit during a break in the live transmission. Maybe the recorded material is part of the live broadcast, to be cued at a particular time. It’s also desirable to include recorded material broadcast at the same time as the live streaming video. For example, including a voice-over or framing as you are broadcasting content live.
Regardless of the reason, let’s detail how to broadcast live using prerecorded video.
Software Encoders
 To stream live video on your website or elsewhere, you have the option to use free and open-source encoding software. Sadly, however, the free Adobe Flash Media Live Encoder is limited in its functionality. If you are doing a more complex broadcast, a more sophisticated encoder would be a better choice. Complex broadcasts include those that plan to incorporate recorded material. In those instances, Wirecast, vMix, Vidblaster, XSplit, and Discover Video Multimedia Encoder are most effective.
It should be noted that this can also be done using Adobe Flash Media Live Encoder. This is trickier, though, and involves the use of coded scripts, making it less user-friendly. For this article, we will focus on doing it with the Wirecast, vMix and Vidblaster encoders. If you are a Mac user, unfortunately only Wirecast is compatible with those three.
Wirecast and Layers
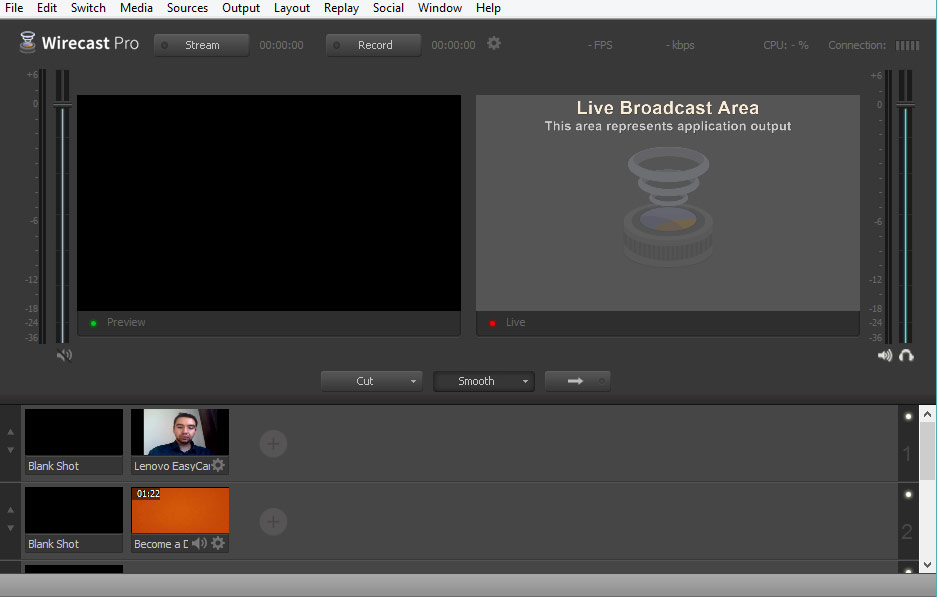
Wirecast and Wirecast Pro can handle simultaneous input from several video and audio sources. Released by Telestream, the product has been popular in the market, with even early reviews praising it. The encoder lets you place both still and motion overlays on live content. It has powerful tools for changing the look and sound of your material.
Anyone who’s worked with graphic software of any kind, still or video should be familiar with the concept of layers. Layers consist of graphic content set up so that one element is “on top of” another. A layer might be mostly transparent and invisible. This is items of opaque/visible content that is placed over the content of the layer underneath it. One of the more common uses of layers is to have a text layer on top of an image.
Wirecast uses the concept of layers in video as well. Recorded material can constitute one layer on top of the main or anchor layer. For broadcast, the live video feed should be the main layer in almost all cases. The only exception would be when switching sources, which we will address in a bit.
One thing to keep in mind is the direction of the layers. Layer 1 is the uppermost layer, which is never obscured by anything else. Material you always want to see goes here. This maybe your company logo, or text that should always be visible. The usual practice is to include this sort of material in layers 1 and 2, and the live video feed in layer 3. Extra video material, background images, or still shots go in layer 4. Layer 5 is for audio, which of course can’t be obscured by video layers on top of it.
You can see the separate layers when working in Wirecast as separate mini-windows. There are many tools available for working with layers, switching their relative positions, and determining what’s done with each.
Selecting a Version of Wirecast
Wirecast offers a “standard” version of their software and also a more expensive Pro version.
The lower-cost version may work well enough for you, but we recommend looking at the details before making a purchase decision. The Pro version does have some extra functionality that may be important. For example, the ability to use IP cameras or scoreboard overlays are exclusive features to the Pro version.
Which features to use depends, of course, on the nature of your broadcast. A different approach with different tools may be needed for a live broadcast with overlays. That’s quite divergent from a live program that switches to the recorded video for a commercial break or some other interlude or lead-in.
Regardless of the version selected, both will allow you to change between live and recorded video. Both can also double as recording software too. This allows storing your live video content to your hard drive in retrievable file formats (MPEG-4 or Flash).
vMix and Inputs
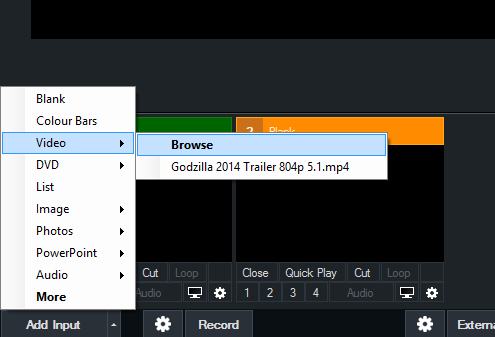 vMix makes it fairly easy to add a pre-recorded video to a stream. To begin this process, first, click the “Add Input” option in the very bottom left corner of the encoder. From here select “Video” as the source for the input. You will either see a list of recent videos, if you have used this feature before and a browse option.
Once added, the video will appear in the live area. You do need to click the Play button to engage the content, or switch it to the Preview area (on the left) and then back to the live area.
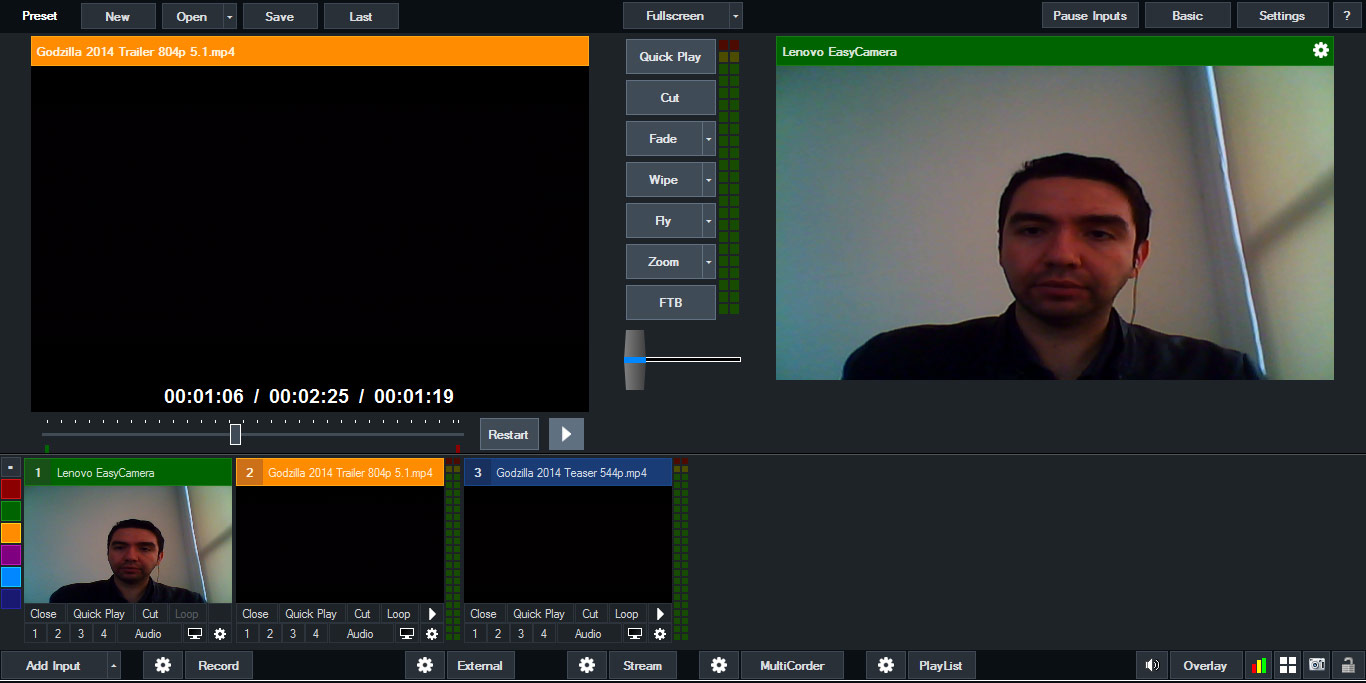 You can add multiple video inputs as well, as seen to the right. In this example, we have a video keyed up in the preview area, a live cam in the live area (to the right) and another video as an input in blue below. We can switch between these contents as the broadcast streams as well. One of the nice things with the vMix setup is that you can queue up a specific moment for the video and then transition it to the live area.
VidBlaster and Players
Another good program for this purpose is VidBlaster. This has many of the same functionality as Wirecast but operates a little differently.
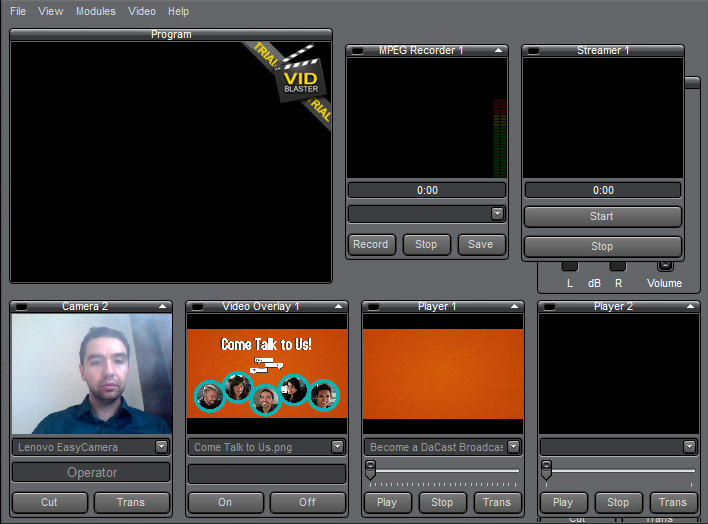
VidBlaster arrives at a comparable function without using layers. Instead, each source of the material is called either a “Camera” (it’s live feed) or a “Player” (if it’s recorded). You can switch at will from one to another, with the selected Camera or Player being what is presented in the visible window at any time. This is, in many ways, more simple to initially understand than Wirecast’s approach. However, it doesn’t offer easily managed features for many, many overlays that the multi-layer approach provides. Keyword there is easy, as it’s quite possible to do overlays with VidBlaster. In fact very simple to just use a singular overlay on your content as well. You can even see a “Video Overlay” in the included image there of the VidBlaster interface.
Both are excellent encoders, though. VidBlaster is cheaper than either version of Wirecast as a notable bonus. Sadly, the encoder is Windows exclusive and does not work over Macs.
Switching Sources with Either Encoder
Switching video sources from a recording to live feed is handled differently depending on what program you’re using. With VidBlaster, it’s quite intuitive. Each video feed comes from either a Camera or a Player, and you can switch from one to another at will.
Wirecast works comparably but with different labels and a slightly different procedure. The basic unit of choice here is the “shot,” which may (and usually does) include multiple layers. Switching from one source to another is simply a matter of switching the active shot displayed in the window.
Video from a recorded file fits into the program accordingly. Either a whole video file or segment from one can be defined as a shot in Wirecast. These can be cued during the display so that the broadcast cuts from the live feed to the video file or file segment. This can be done many times. The source for the recorded material can be the same computer that’s running Wirecast. It can also be on another computer that’s networked with it, which these days means any computer except one that’s not connected to the Internet. In VidBlaster, it’s simply a matter of switching from a Camera to a Player and back again at the right time.
There’s a lot more to it. Good video software has a huge capacity for fine-tuning and composing shots. But essentially, it comes down to composing your program using shots and layers (or Cameras and Players) to broadcast the desired material at the desired times. With a little practice, it can all be done seamlessly and your broadcast can have a professional, polished look.
Streaming Service and Infrastructure
 When choosing between streaming solutions and servers, the first question to ask is how many people will be viewing the video at any one time. This has a bearing on the necessary server architecture and networking. A single server hosting the content may be fine if you have only a few viewers. Hundreds of concurrent viewers require a different arrangement, though.
A more robust setup uses a content delivery network (CDN), also known as a streaming host. This consists of a group of networked servers that distribute the load efficiently to serve a large audience.
Similar considerations apply to the hardware you’re processing this with. The processing power needed to resize a live feed from cameras or other live sources is not trivial. Add in special effects and splicing in recorded material seamlessly and it can be taxing on your computer. You are going to need an advanced or at least a modern computer to handle this. The more RAM the better, and a 2.0 GHz dual-core processor is the minimum, and faster and more powerful than this makes better sense.
Quality of cameras and sound equipment is also important, of course. Then there’s the matter of bandwidth, and whether you want to provide a high definition (HD) video stream.
If you aren’t sure if your setup is up to snuff, the best procedure is to test. Throw up a live stream and play around with your settings. While you can’t test the upper limits of your streaming service, you can test how your computer handles broadcasting it.
Conclusion
Depending on your encoder, broadcasting with prerecorded content can be simple or challenging. While there are other setups to make this work, we have outlined how easy this can be with Wirecast, vMix or VidBlaster. With a one time investment in either, you can begin using prerecorded content to spice up your live broadcasts.
If you are looking for a video guide on this same topic, please check out our post below. Please note, though, that the video focuses on using XSplit instead of VidBlaster.
For regular tips on live streaming, you’re also invited to join our LinkedIn group. Ready to give the Dacast online video platform a try? Why not take advantage of our 14-day free trial (no credit card required) to test out our features for yourself. What do you have to lose?
Thanks for reading and, as always, let us know what you think in the comment section below. We love to hear from our readers, and we’ll get back to you as soon as we can.
Best of luck with your live streams!
By Esther Vicent.