


Navigating the Dacast VOD Solution: A Walkthrough

This guide will show you how to upload a video file to your Dacast VOD solution account.
1. Get Started with VOD Streaming
To upload a video to Dacast you must sign in to your account and click the “Add +” button found on the left hand side of the dashboard and then click on Video.

2. The File Uploader and Supported File Types
After clicking the “Video” button, you will be brought to the Dacast uploader.

We recommend you upload MP3 and MP4 files, however, we do accept many other file types, such as:
.mov, .qt — Apple QuickTime
.flv, .f4v — Adobe Flash
.wmv, .asf — Windows Media 9
.mpg, .vob, .m2v, .mp2 — MPEG-2
.m4v — Apple iTunes
.avi — A/V Interleave
.webm — WebM (Vorbis audio only)
.ogv, .ogg — Ogg
.mxf — MXF
.mts — AVCHD
.mkv — Matroska
.r3d, .rm — Red Raw Video
.flac — Native Flac
.mj2 — Motion JPEG2000
3. Selecting renditions
You are now able to select the number of renditions that will be encoded to the video you are uploading. There’s also a tooltip that explains why multiple renditions (adaptive streaming) are better than just one rendition, See below.


You may also get an estimation of the storage needed for the video upload according to the renditions selected but clicking the “Get an estimation” hyperlink below the recipe selection dropdown.

4. Creating VODs
When you are ready to add videos to your account, click the “Browse Files” button. This will let you search your hard drive for media files to upload. As soon as you upload a video, a prompt will appear where you can create or select an existing folder where you want to place the video in:

If you want, you can select the desired folder, or/then click “Upload” and the upload will begin.
While these are uploading, you can search for and add more files to the queue. Another way is to simply drag and drop the files to automatically upload them.
If you need to cancel an upload you can click the cross button. When your files are done uploading you can go to your Video tab on the left to manage your content.
As soon as your video is uploaded, we’ll start creating your renditions:

5. Managing Your VODs
Upon finishing uploading the files, all successfully uploaded videos to the system should appear in the Video Section of your account. It will show the following information:
- Title
- Size
- Created Date
- Status
- Features
To begin working on a VOD, simply hover your mouse towards the right of a video file and click on the pencil (edit) icon.

6. Configuring and Publishing VODs
After selecting edit, you will be able to manage and control the media file. Seven main tabs offer a variety of settings. Let’s break down what you can do in each tab.

General
- Manage the name and description of the file
- See if the file is part of a specific video folder

- Upload images specifically for your content

- Access embed codes and Dacast share links (can be used to embed videos on your website, Facebook page, or Twitter account)

- Add subtitles

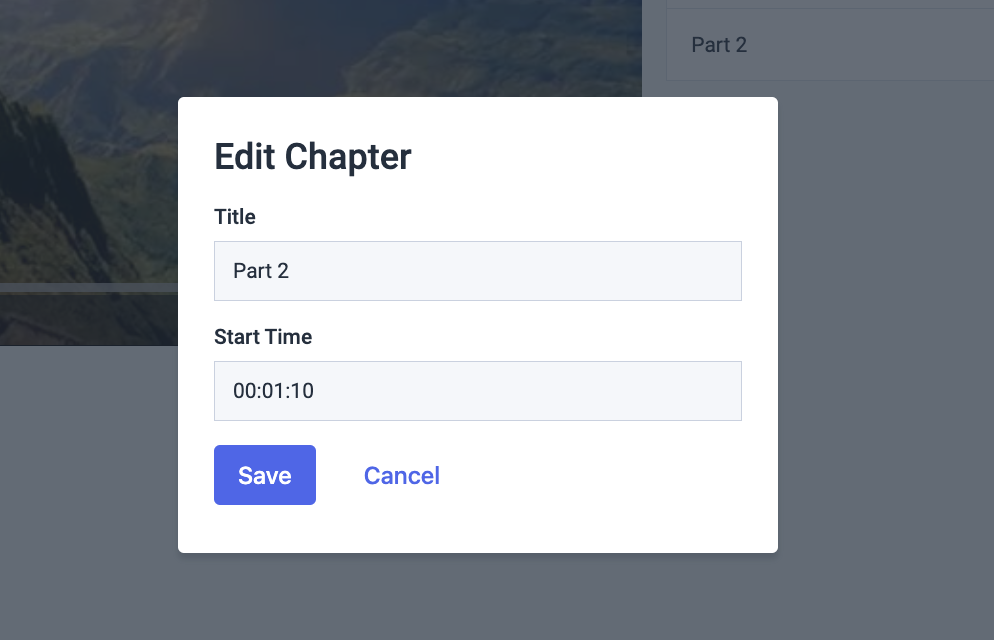
Chapters
You can select positions within the video to put specific chapter markers by clicking on “Add Chapter.”

Paywall
This tab allows you to do the following to your VOD platforms:
- Enable paywall
- Change paywall theme
- Add an intro to your VOD
- Set prices, promo Codes, and associate group prices
Please note that you can use both TVOD and SVOD monetization methods on the Dacast paywall.

Engagement
Click on the lock icon to edit the settings under engagement. This section allows you to do the following to your VOD:
- Enable ads (Ad Network needed)
- Upload a Brand Image
- Add a Brand Text
- Add an End Screen Text


Security
Always click on the lock icon to edit the settings under the “Security” tab (just like the “Engagement” tab). This section allows you to set up the following:
- Password protection for your VOD
- Content scheduling (Date/Time/Timezone)

- Geo-Restriction (restrict certain countries from viewing your VOD)
- Domain Names (restricting specific domain names to your VOD)
- Signed Keys

Theme
By default, the “Standard Theme” of Dacast is used. If you wish to create a new theme, please go to the “Theming” section of your Dacast account. This is found under “Settings.”

This section allows you to control the following settings:
- Enable controls (player controls, big player button, and show scrubbing thumbnail)
- Put actions (download button, social sharing link, and display embed code)

- Change player appearance (overlay and menu colour)
- Change the Brand Text (text color and background color)
- Change behaviour (enable autoplay, mute the video on play and loop the video)

VIDEOS
- An option to show full timecode of the video (in milliseconds)
- An option to resume playback for your viewers
- An option to add animated thumbnails. Once toggled on, the animated thumbnail seen in the backoffice VODs list will appear when viewers hover over the player. This functionality requires that the animated thumbnail was generated during the initial video upload, so it may not work for very old videos unless they are re-uploaded. The animated thumbnail will disappear once the video starts playing, leaving only the player visible. In cases of playback blocking features like paywalls or password protection, the animated thumbnail will not be displayed.
OFFLINE MESSAGE
- An option to put a customized message when your video is offline
- An option to show the position of your customized offline message (Top, Middle, Fullscreen)
PASSWORD PROTECTION
- An option, if video is password protected, to put a title/subtitle/placeholder/CTA button message/Error message, for your viewers to see when inputting the password of your choice for the video

CONTENT SCHEDULING
You can also customize your content scheduling:
You set up your content scheduling, the same way you did before, through your security tab (you need to make sure the timezone is specified).
Then, on your theme, you can personalize the message you want to display, and/or display the date and time your content will be available using the toggle.

Renditions
By default, all videos uploaded to Dacast will be encoded using our “Standard” recipe.
This recipe includes the following renditions:
- High Definition (HD)
- Standard Definition (SD)
- Ultra-Low Definition (ULD)
So in the example below for this video, the standard recipe was used when this video was uploaded. You will see the size of the uploaded video (Source File Size), the quality of the compressed uploaded video (Source File Bitrate), and the remaining storage on the Dacast account (Storage at remaining).

On the left side you will have an option “Not Encoded”. These are the other resolutions not included in the Standard Recipe, which you have the option to transcode.
On the right side, you will see the status of the standard recipe (ULD/HD/SD), as well as the resolution, size and bitrate it was encoded at, and the status.
Please note that adding bitrates to your file requires additional encoding and also consumes storage space. That is the reason we show the remaining storage space as well.
If you exceed your storage capacity, you will be billed accordingly for the excess consumption.
We do have an option though, if in case a video has already been uploaded to the account, but you, the user, decide that you just want to save some money by removing some unnecessary space, there is an option you can do.
A button called “remove source file” is present, by clicking on it, a confirmation modal will appear, to inform you, the Dacast user, that the source file will then be deleted. Once it’s done, the source file size turns to zero and the “remove source file” button is then grayed out. This button is located at the top right part of the Renditions tab.

Once the source file is deleted, any new renditions will be created by getting from the largest available rendition from the list.
Another button entitled, “Replace Source File” is something that can be useful for you, the Dacast user.

When you click on this button, you will be redirected to a window where in you can now upload the preferred video you want to replace the original with.

When a video is replaced, all links (embed codes/share links) will lead to the newly replaced video. If you encoded the original video with a standard recipe, it will still use the same recipe (HD/SD/ULD resolutions), but the size and bitrate will change accordingly depending on the size of the new video.
A progress bar will show the status of the replacement video.
In terms of creating your own encoding recipes, you may choose to do so by going to the Settings part of your Dacast account, then choose the Encoding option.

You may read our walkthrough explaining more of this, via this link.
Analytics
You can also see the following options in terms of analytical data your video is garnering:
- Audience
- Paywall
- Engagement

For Audience, you will see on the graph on the left side, the following:
- Plays (total number of clicks on the play button)
- Impressions (usually if a video is embedded on a website, once the page wherein the video is embedded is loaded, that is considered an impression. Even if the viewer does not click the Play button
- Unique Viewers (the number of viewers or people who watch your video, regardless of how many times)

You also have the option to choose a specific time period you want. Options include the last 24 hours from the YTD. You also have the option to choose a custom date.
The graph will give you two options: Days and Hours. On the right side of the graph you have the option to choose a specific Time, Location, and even the browser to display on the graph on the left side. It will also show the figures and data, and give you an option to export and download it via a CSV file.

If you choose the paywall option for the analytical data of your video, assuming your video is monetized, it will also display a graph on the left side and figures and data on the right side. As well as an option to download a CSV file.

The graph on the left side will show the total sales per time (Days/Hours) as well as the total revenue.

For the Engagement part, the graph on the left side, it will show essentially the total watchtime via seconds per Day or every hour. You also have the option as well to see the unique viewers of your video.

The right side will show the figures and data once more (Engagement by time per day/date), as well as the option to download a CSV file for safekeeping.

If you have any questions on how to upload a video, please contact us.
Not yet a Dacast user, and interested in trying Dacast risk-free for 14 days? Sign up today to get started.
Additional Resources
- What Does VOD Stand For?
- Top 5 VOD Platforms for Online Video Hosting: A Comparison
- SVOD: Everything You Need to Know About Subscription Video On Demand
- VOD Streaming: The Premier Content Delivery Strategy
- How to Build Your Video On Demand Platform
- How to Organize Dacast VOD Content in the New Back Office