



How to Stream NDI to the Cloud: The Dacast Workflow Guide
NDI has always been one of the most powerful protocols for video over IP, but it was built for LAN. Send an NDI signal across the internet and you’re fighting packet loss, latency spikes, and a protocol that was never designed for that journey.
NDI 6 changes the equation. The NDI Bridge Utility, for hardware and as a Windows service, lets you send encrypted NDI streams across the public internet, so your production tier no longer has to share a physical LAN with your sources. This guide covers the exact steps to get your NDI signal into Dacast, whether you’re routing through a software switcher, a hardware transcoder, or a lean OBS rig.
Dacast is the professional live streaming and VOD platform for organizations that broadcast on a schedule. Once your NDI signal is converted to RTMP or SRT at the encoder stage, Dacast handles ingest, transcoding, global CDN distribution, and player delivery across every device. If you’re new to NDI, our NDI Protocol: The Complete Guide for Broadcasters covers the fundamentals before you follow these steps. Skip ahead to the workflow that matches your setup:
- Software switcher path: vMix or Wirecast → RTMP/SRT → Dacast
- Hardware transcoder path: Magewell, Kiloview, or Haivision → RTMP/SRT → Dacast
- Lean setup path: OBS + NDI plugin → RTMP/SRT → Dacast
Table of Contents
- What NDI 6 Changes for Cloud Workflows
- Choosing Your Workflow Path
- Dacast Encoder Settings Reference
- Troubleshooting NDI Cloud Streaming to Dacast
- FAQ: NDI Cloud Streaming
- Conclusion
What NDI 6 Changes for Cloud Workflows
NDI 6 introduced native WAN connectivity through the NDI Bridge Utility, which is the single biggest change for cloud-oriented production workflows. The protocol now has a defined path for sending video from a local NDI environment to a cloud ingest point without requiring a full LAN extension. NDI 6.3 is the latest release in the NDI 6 line and the version you should be running today. It adds real-time sender monitoring and enhanced source discovery, which means you can see stream health, codec support, and connection status across every NDI source in your pipeline from a single Discovery Tool interface. For multi-camera productions routing through Bridge to a remote encoder, 6.3’s monitoring gives you visibility into what’s happening at each stage before the signal ever reaches Dacast. Download NDI 6.3 from ndi.video/tools. In practice: your NDI sources (PTZ cameras, capture cards, virtual inputs) can now feed into a cloud delivery pipeline with far less infrastructure overhead. You still need an encoder to bridge to RTMP or SRT at the ingest point (NDI is not a CDN-delivery protocol), but that translation step is now straightforward. Dacast accepts both RTMP and SRT ingest. Once your NDI signal is encoded at the switcher or transcoder stage, Dacast handles ingest, transcoding, CDN distribution, and player delivery.
Choosing Your Workflow Path
Three viable paths exist depending on your budget, production complexity, and reliability requirements:
| Path | Best For | Tools Required | Approx. Latency |
|---|---|---|---|
| Software Switcher | Multi-cam productions, live events, broadcast | vMix or Wirecast + capable PC | 2–6 seconds |
| Hardware Transcoder | 24/7 unattended, rack-mounted, broadcast-grade reliability | Magewell, Kiloview, or Haivision | 1–4 seconds |
| OBS + NDI Plugin | Small productions, budget setups, testing environments | OBS 30+ and obs-ndi plugin | 4–10 seconds |
Not sure which path fits your setup? See our guide to hardware vs. software encoders for a full breakdown.
Workflow A: Software Switcher → Dacast (vMix / Wirecast)
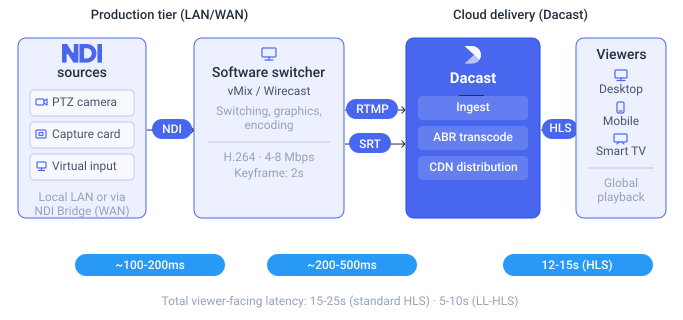
This is the most common professional setup. Your NDI sources feed into vMix or Wirecast for switching, graphics, and encoding, then push to Dacast via RTMP or SRT.
vMix Step-by-Step
- Open vMix. In the Add Input dialog, select NDI/Desktop Capture. Your NDI sources, whether on the local network or connected via NDI Bridge, will appear automatically in NDI 6.3. Select your feed and add it as an input.
- Build your program output as normal. NDI inputs behave identically to any other source in vMix. Add graphics, mix audio, configure your transitions.
- Go to Settings > Streaming. Select RTMP Server as the streaming type.
- Enter your Dacast RTMP URL and stream key. Both are available in your Dacast channel settings under the Encoder Setup tab.
- Set encoding parameters: H.264, 4,000–8,000 kbps for 1080p, AAC audio at 128–192 kbps, keyframe interval 2 seconds. The 2-second keyframe is non-negotiable for Dacast ingest.
- Click Start Streaming. The stream health indicator confirms the connection is live. Verify in your Dacast dashboard that the channel shows active input.
Wirecast Step-by-Step
- In Wirecast, add a new shot layer. Click the + icon, select NDI Source, and choose your feed from the discovery list. NDI sources appear here whether they’re on the same LAN or connected via NDI Bridge.
- Composite your layers, add lower thirds, and configure your program flow as normal.
- Go to Output > Output Settings. Click Add and choose RTMP Server as the destination type.
- Set the Destination URL to your Dacast RTMP ingest address and enter your stream name (key) from the Dacast channel settings.
- Under Encoding, select H.264. Target 5,000–8,000 kbps for 1080p delivery. Set keyframe interval to every 2 seconds.
- Click OK and then Stream. The toolbar indicator confirms live ingest. Cross-check in Dacast, the channel preview should populate within 15–30 seconds.
RTMP vs. SRT for Dacast ingest: RTMP is simpler to configure and reliable on stable connections. SRT adds built-in packet loss recovery and is worth using when you’re streaming over congested or unpredictable networks. Dacast supports both. The choice depends on your network conditions, not the platform.
Workflow B: Hardware Transcoder → Dacast (Magewell / Kiloview / Haivision)
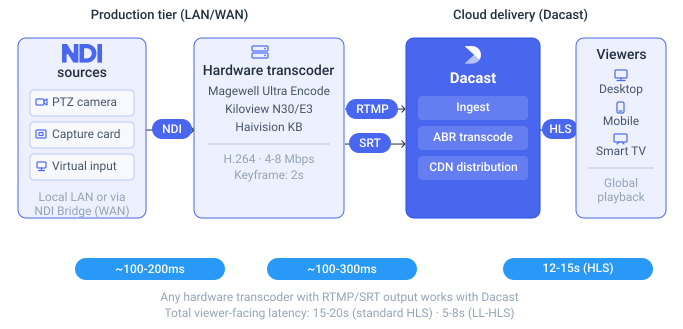
Hardware transcoders are the right choice for unattended streams, 24/7 channels, or any production where you need encoder-level reliability without a PC in the loop. The Magewell Ultra Encode, Kiloview N30/E3, and Haivision KB all support NDI input natively and output directly to Dacast via RTMP or SRT. More broadly, any hardware transcoder that outputs RTMP or SRT to a custom destination will work with Dacast.
General Hardware Transcoder Workflow
- Connect the transcoder to your network. Confirm it’s on the same subnet as your NDI sources or configure an NDI Discovery Server address in the device settings, or use NDI Bridge if you’re routing sources across subnets or over WAN.
- Access the device web UI via its IP address. Navigate to Input settings and select NDI as the input type. The device will scan for active sources. Select your feed.
- Navigate to Stream Output or Encoding. Select RTMP as the output protocol.
- Enter your Dacast RTMP URL and stream key in the output destination fields.
- Set encoder parameters: H.264, 4,000–8,000 kbps for 1080p30, AAC audio at 128 kbps minimum, GOP/keyframe interval of 3 seconds.
- Enable the stream output. Confirm the device shows a connected or streaming status.
- Log into your Dacast dashboard and verify the channel is receiving input. The stream preview will populate within 15–30 seconds of the transcoder going live.
Device-specific notes:
- Magewell Ultra Encode: NDI is a licensed input type. Confirm your NDI license is activated in the device interface before step 2. Without it, the NDI source option won’t appear.
- Kiloview N30/E3: SRT output is available natively. If your network uplink is unstable, configure the Dacast SRT ingest URL here instead of RTMP.
- Haivision KB/Makito: Use the SRT gateway output for lowest latency delivery. Configure the Dacast SRT ingest URL as the SRT output destination in the Haivision interface.
For a broader look at hardware encoder options, see our hardware encoders for live streaming guide.
Workflow C: OBS + NDI Plugin → Dacast
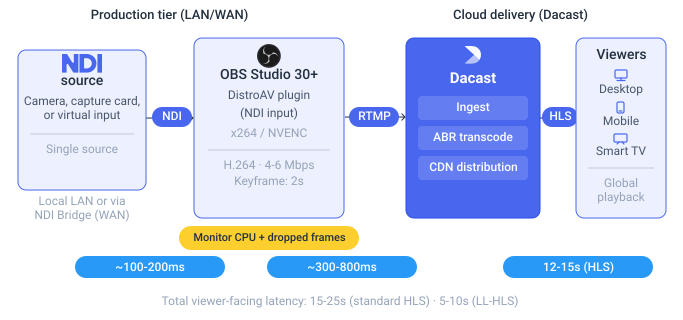
OBS is not the most efficient NDI path. It adds CPU overhead compared to a dedicated transcoder or switcher, but it’s free, widely understood, and fully functional for smaller productions and test environments.
- Install OBS Studio (version 30 or later) and the the DistroAV plugin (formerly obs-ndi), available at github.com/DistroAV/DistroAV. Restart OBS after installing the plugin.
- In OBS, click + in the Sources panel. Select NDI Source from the source type list. The plugin adds this option automatically.
- In the NDI Source properties, open the Source Name dropdown. Your active NDI sources will appear. Select your feed and click OK.
- Under Settings > Video, set Output Resolution to match your NDI source (typically 1920×1080) and frame rate to 30 or 60 fps to match the source.
- Go to Settings > Stream. Set Service to Custom and enter your Dacast RTMP URL and stream key.
- Under Settings > Output > Streaming: set encoder to x264 (or NVENC/AMF if using a capable GPU), bitrate 4,000–6,000 kbps for 1080p, keyframe interval 2.
- Click Start Streaming. Open View > Stats and monitor Dropped Frames and CPU Usage. If either climbs, reduce output resolution or bitrate before the stream degrades.
Your NDI workflow is ready. Start your 14-day Dacast trial and push your first stream live today.
Dacast Encoder Settings Reference
These are the settings to pull from your Dacast dashboard (Encoder Setup tab) and configure in your encoder before going live:
| Setting | Recommended Value | Notes |
|---|---|---|
| Video Codec | H.264 (AVC) | |
| Resolution | 1920×1080 (1080p30) | Match your NDI source output resolution exactly |
| Video Bitrate | 4,000–8,000 kbps | Higher end for sports or motion-heavy content |
| Keyframe Interval | 2 seconds (fixed) | Critical, variable or 0 keyframes will cause ingest rejection |
| Audio Codec | AAC | MP3 is not recommended for RTMP ingest |
| Audio Bitrate | 128–192 kbps | Use 192 kbps for music-heavy productions |
| Protocol | RTMP (default) or SRT | Retrieve the RTMP URL and stream key (or SRT credentials) from your Dacast channel settings |
Troubleshooting NDI Cloud Streaming to Dacast
NDI source not appearing in software switcher or OBS
All devices must be on the same subnet for NDI’s mDNS discovery to work. NDI multicast does not cross routers by default. If using NDI Bridge or a dedicated NDI Discovery Server, confirm the server IP is configured in NDI Tools > Access Manager on every machine in the workflow.
Stream disconnecting from Dacast repeatedly
Almost always a keyframe interval mismatch. Confirm your encoder is set to a fixed 2-second keyframe interval, not 0, not auto, not variable. Variable keyframe encoding will cause Dacast to reject or drop the stream intermittently.
Choppy or pixelated video on Dacast output
Bitrate is too low for the motion content, or your upload bandwidth is being saturated. Run a bandwidth test from the encoding machine. Your encoder bitrate should not exceed 70% of your sustained upload speed to leave headroom for protocol overhead.
Hardware transcoder cannot discover NDI source across subnets
Deploy an NDI Discovery Server on a machine accessible from both subnets. Configure the transcoder to point to that server IP in its NDI settings, rather than relying on multicast broadcast. NDI Bridge can also solve this. The Bridge Utility for Hardware requires Linux and NDI High Bandwidth or HX3 output capability. The Bridge Service runs as a headless Windows service via REST API with SSL.
High glass-to-glass latency
RTMP and SRT ingest both deliver to viewers via HLS, which carries 12-15 seconds of player buffer latency. SRT reduces packet loss on the ingest side but does not change viewer-side latency. For sub-5-second delivery, Dacast offers Go Live with Dacast, a browser-based WebRTC ingest option. That is a separate workflow from the encoder-based NDI path described in this guide. Factor in NDI capture (roughly 100-200ms) plus encoder buffer plus CDN delivery plus player buffer when setting latency expectations.
FAQ: NDI Cloud Streaming
Not directly. NDI is optimized for LAN transport, it’s not designed for direct CDN delivery. NDI 6 added WAN connectivity via the NDI Bridge Utility, which lets you send encrypted NDI streams across the public internet to a remote encoder or switcher. But even with Bridge, you still need that intermediate step to convert NDI to RTMP or SRT before the signal reaches a platform like Dacast. Think of NDI as the intra-facility transport layer, Bridge as the WAN extension, and RTMP/SRT as the internet delivery layer.
End-to-end latency depends on the full chain: NDI capture adds roughly 100–200ms, the encoder adds another 100–500ms, and RTMP/CDN delivery adds 5–30 seconds of player buffer latency. RTMP to CDN is not a sub-second architecture. SRT improves ingest reliability over unstable networks but does not reduce viewer-side HLS latency. For sub-5-second delivery, Dacast offers Go Live with Dacast, a browser-based WebRTC ingest option, which is a separate workflow from encoder-based NDI.
Yes. Dacast supports both RTMP and SRT ingest. SRT is the better choice when streaming over congested or unreliable networks, as it includes built-in packet loss recovery that RTMP lacks. Your encoder (vMix, Wirecast, hardware transcoder) handles the SRT output; Dacast receives and distributes from there.
The Magewell Ultra Encode, Kiloview N30/E3, and Haivision KB are all well-tested for this workflow. Magewell requires an NDI license activation. Kiloview is cost-effective with solid SRT support. Haivision is the broadcast-grade option for demanding deployments. All three support RTMP output to Dacast out of the box.
NDI 6 added native WAN connectivity through the NDI Bridge Utility, enabling devices to send encrypted NDI streams across the public internet without requiring a second LAN with a Bridge tool. NDI 6.3 (the latest release) builds on that foundation by adding real-time sender monitoring and enhanced discovery, making multi-source cloud-bridged workflows easier to operate at scale. The combination of Bridge for transport and 6.3 for visibility is what makes NDI viable for cloud production today.
Ready to Stream NDI to the Cloud with Dacast?
You have the workflow. Dacast provides the ingest, the CDN, and the player. Whether you’re coming from vMix, Wirecast, OBS, or a hardware transcoder, the connection is straightforward once your encoder settings are correct.
Start your 14-day Dacast trial and ingest your first NDI-sourced stream within the hour.
