


Tutorial: Dacast’s Pay Per View Video Platform

In this video tutorial, we’ll be looking at the monetization options on your Dacast Channel. Dacast’s Pay Per View video platform includes adding Pay Per View tickets, setting up Subscriptions, and using Promo codes.
In this video tutorial, we’ll be looking at the monetization options on your Dacast Channel. Dacast’s Pay Per View video platform includes adding Pay Per View tickets, setting up Subscriptions, and using Promo codes.
Live Streaming Broadcasts can be a great source of revenue for your events and regular broadcasts. Typical paywall models include a one-off payment or subscription model for repeat broadcasts that are scheduled ahead of time.
The paywall is accessible to: – Free trial – Starter plan – Scale plan – Event plan
Free trials have the ability to set up between 1 and 3 prices per video content and an unlimited number of promo codes per video content. After the free trial has ended, you will need to purchase a Premium plan to get access to the paywall.
For ideas on paywall and monetization strategy, check out these guides:
Setting a Price
Start by logging into your Dacast account, going into the channel you want to monetize and click the “Paywall” tab. Adding your first price will turn on the paywall for your channel.
You also have the possibility to use the “Batch configure” menu if you want to apply the same price to several video files.
To add a price to your broadcast, click “New Price”. This will open up a window where you have a number of options to set up your price. You can add as many prices as you like except on Free trial (limited to 3 prices per video file).

For “Duration” we suggest that you allow ample time for your viewers to enjoy their product. For instance, a Soccer match lasts 90 minutes, but that shouldn’t be the duration because there is also the Half-Time break. Also, what happens if there is a problem, and the match starts late? If your viewers only have a small amount of time allotted, they can miss out on your broadcast.
For these reasons, we strongly suggest you set the duration to at least twice the duration of your whole broadcasts. If you are only broadcasting once a week, you can set the duration to 24 Hours
By default, multiple purchases of tickets are turned off. If you want to let viewers buy more than one “ticket” of access at a time, please turn it on.
Immediate versus the Scheduled ticket
Finally, you can set whether your ticket activates “Available on Purchase” or “Set Date and Time”.
If the ticket is set to “Available on Purchase” the duration timer will start as soon as a viewer makes their purchase. Than they can watch as much content as they like in that time, but when the timer runs out their viewing experience ends.

Alternatively, you can “Set Date and Time” your tickets. This means that the timer for the duration does not start until a specific date and time. All times are UTC, so be sure to check the time difference between your viewers and UTC.
Subscriptions
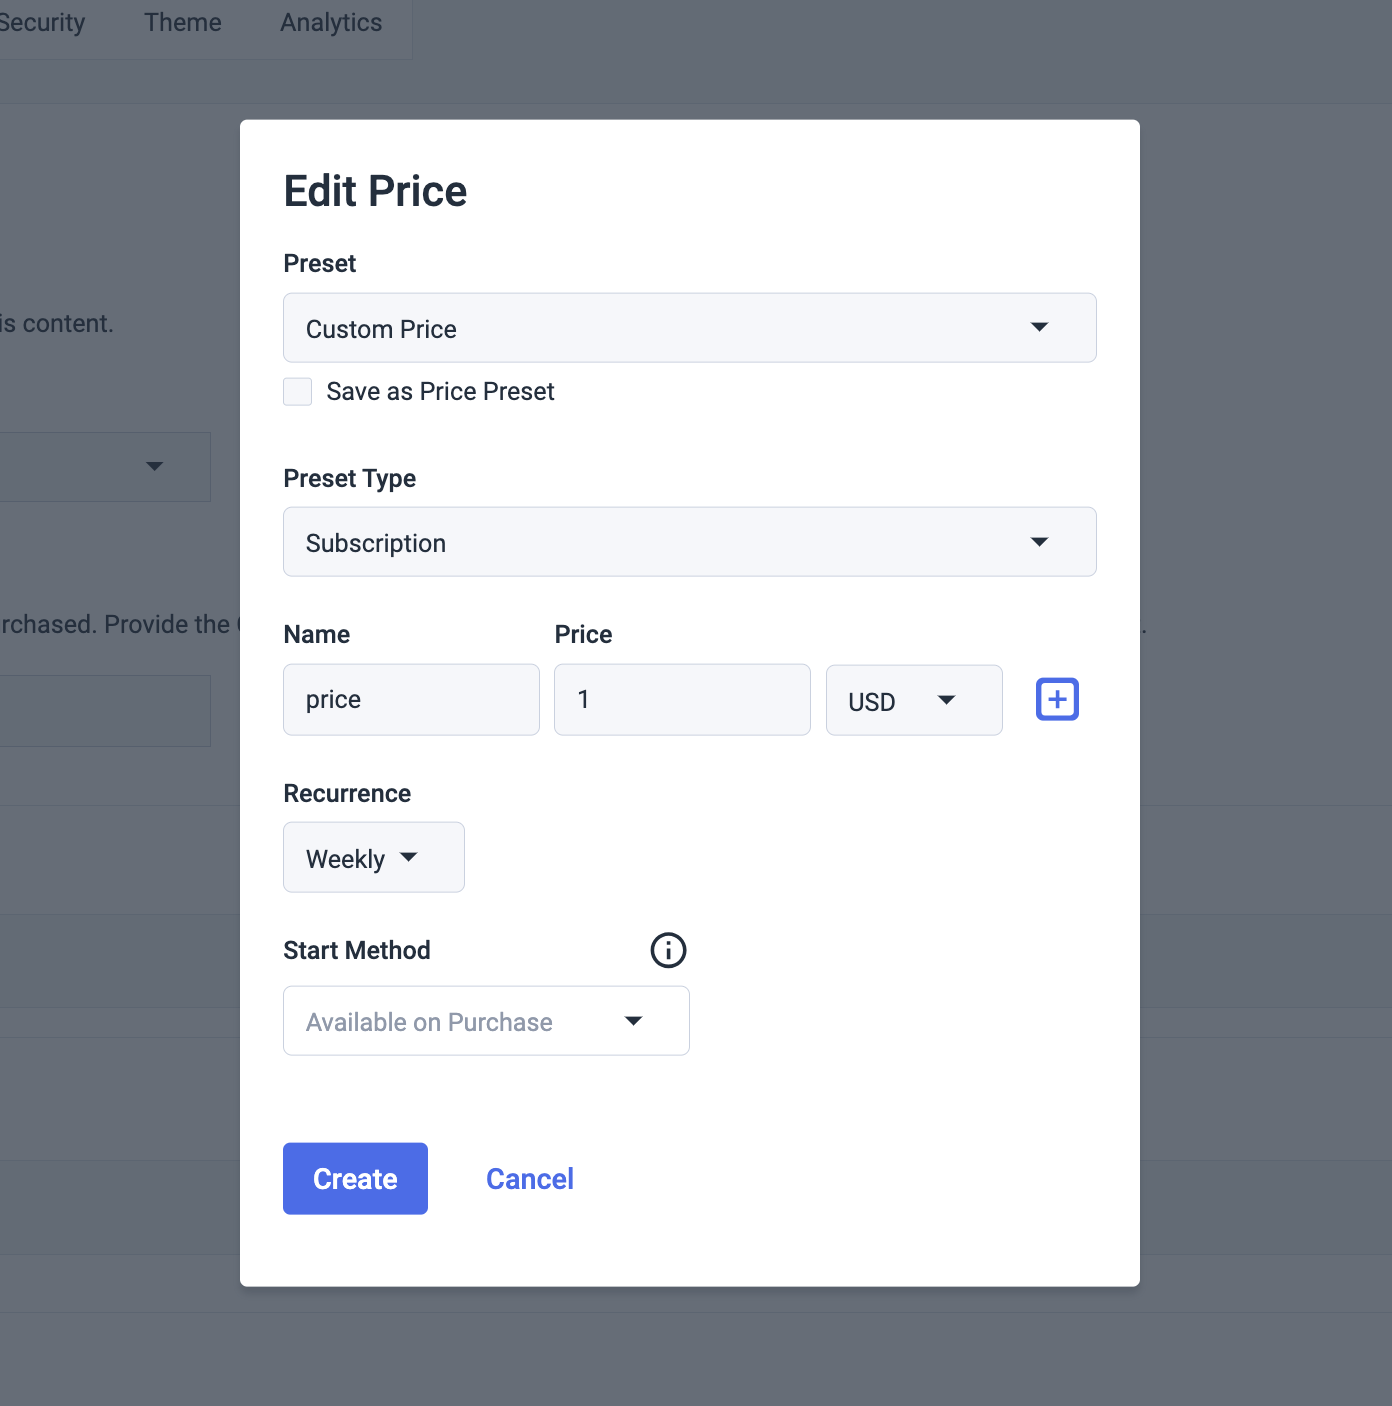
The Subscription can be set to Weekly, Monthly, Quarterly, or Bi-Annually. Click “Add” when you’re done.
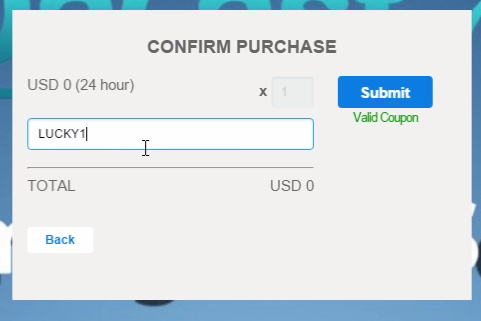
Promo Codes
Adding Promo codes is as simple as adding Prices. Promo codes either apply to Pay Per View tickets, or Subscription tickets, but only one or the other.
To add a promo code click “New Promo”. Create a 4-6 character alphanumeric code. Make it something that’s easy to remember like XMAS25 or LUCKY1.

Then choose how you want your promo to work. It can be a percentage discount (e.g. 25% off), a flat Monetary Discount (e.g. $10 off), a Free Pass, or a Gift.
Finally, set the Limit for your Promo code. This will determine how many people can use the promo code before it runs out.
Monetize your Live Stream!
You’re all set to start broadcasting with a paywall. Make sure to save your changes and allow 5-10 minutes for the changes to take effect.
When a viewer tries to watch your broadcast, they will now see a paywall and be prompted to pay before watching your content.

To use a promo code, a viewer just needs to click on one of your channel’s tickets and then enter the promo code where prompted. A promo code will come up as “valid” if it is spelled correctly, and if it is still available.
For more details on:
- How to set up a paywall: check out our dedicated tutorial here
- How to set up a promo code: check out our dedicated tutorial here
If you have any questions or suggestions for future tutorials, feel free to leave them in the comments below, or reach out to us on Twitter or Facebook.