


Dacast’s Expo Video Portal: How to Create an Immersive Video Gallery

What is Dacast’s Expo Video Portal Feature
Dacast’s new Expo video portal feature is an immersive video gallery that allows you to organize videos together and share a collection of videos with your audience.
For example, if you do not have a website, this is the perfect way to launch a content gallery in minutes and create captivating, immersive video experiences. The result is a quick and easy website set up with all your content ready for your audience to view.
The Expo feature is white-label and totally customizable. That means your brand is at the front and center, no matter what. You can create as many Expo pages as you need, and it is as easy to configure as a playlist.
All of the content on an Expo page is yours. You can monetize and secure it, to control exactly who gets to see each video content. There are no third-party ads unless you decide to add yours to your video content. You also have the option to create Pay per view or subscription packages.
The Expo dashboard will show you the list of all the Expo’s you’ve created which displays the name, number of views, date created, and the status if the expo is on or offline.
You also have the ability to sort, search and edit a specific expo of your choice in this section.

Here are the list of tabs that you will see when you click an Expo on your list:
- Content
- Paywall
- Security
- SEO
- Editor
- Sharing

Content
The content page is the default page when you click a created Expo on your list.Here you’ll have a view of your content, add it with drag and drop, create sections or even quickly access settings like cname or rename your expo.

Paywall
Here you can access the paywall setting of your expo, setting prices, promocodes, and choosing the paywall theme.

Security
This page allows you to set security features on your expo such as setting password protection, AES/DRM, Domain/Geo restriction, and content scheduling.

SEO
Here you can access the SEO settings of your EXPO to optimize your site for discovery on search engines and social media.

Editor
The editor section is where you can customize the look and feel of your EXPO by setting the Layout, background color, font style, and the overall theme of your site.

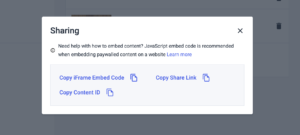
Sharing
The sharing section is where you can find all the tools that you need to share your Expo to your audience such as the sharelinks, and the content ID by just clicking the Copy button.
How to Create an Expo Portal Page
Creating an Expo page on Dacast can be done in just a few clicks. Here’s how to get started:
STEP 1: Select “Expos” from the left side panel of your Dacast dashboard.
STEP 2: Click the “Create Expo” button on the center or on top right corner of the screen if you already have existing EXPOs:
STEP 3: Enter an Expo Title

STEP 4: Click “Create” to save your Expo video gallery.
You will be automatically redirected to your Expo dashboard where you can select the video content you want to see on your Expo page.

How to Add Videos to Your Expo Video Portal
STEP 5: Add videos to your Expo page.
You will be able to add videos to your Expo video gallery by dragging and dropping videos from your “Folders” or “Contents” video libraries.

Type in a name for your Added section so you can start adding contents.

Once the section is created, you can now drag and drop your video contents on the right side selection panel to the section of your Expo.

Note: You can also drag an entire video folder to the section you have created, only 100 pieces of content can be added.
How to Customize an Expo Video Portal
To customize your Expo, click the Editor button found on the top right menu and on the left panel.

Once clicked, you will be directed to the editor feature of the expo where you can edit the following:
- Layout
- Styles
- Display
Layout
Header – This is where you can edit the name and description of your expo, add a cover photo, and a logo which will be displayed next to the page title.

Featured – Here you can select which content you want to be displayed as featured content and will be displayed at the top of your expo.

Body – Is where you can display or hide the name or the descriptions of the contents on your expo, you may also choose the type of layout for the contents whether you like it to be displayed on grid or Carousel.

Styles
The Styles tab is where you can customize the look of your portal. You can change the colour of the background, text color, the type of font, the size, and you can also switch the overall theme to Dark mode.

Display
The display tab is the section where you can select particular content and where you can enable social media platform links, so your viewers will be able to click on them and be redirected to them.

You can also check the preview of your Expo by clicking the ‘View’ button at the top right of the editor section alongside the Sharing button. You can copy the share link and embed codes of your Expo, see below:
How to add a Paywall to your Expo
Click the “Paywall” button on the left panel to set up monetization for your Expo.
In this section you will be able to setup the following features:
Enable/Disable Paywall
- Choose the authentication only
- Select a “Paywall Theme”
- Add a Intro Video ID
- Create “Prices”
- Create “Promos”

Prices
To setup a price/s for your Expo, click the “New Price” button

Here you will be able to select or create a Preset, select between Pay per view or subscription based paywall, setup the price and currency, the duration or validity of the ticket, and the date/time of the ticket activation
Once done, click Create.
Promos
To setup a price/s for your Expo, click the “New Promo” button

Here, you will be able to set up promocodes that you can provide to your viewers for discounts or even free access.
You can create the Alphanumeric codes, discount percentage, code limit, date/time of the validity, and how many times the promocode can be used.
Once done, click Create.
Add Security settings to your Expo
On this tab, you are able to set security features such as the following:
- Password protection
- Content Scheduling
- Geo-restriction

Optimize your Expo with SEO
You also have the ability to Optimize your Expo for discovery on search engines and social media. Just click the SEO option on the left side panel to set it up.
In this tab, you can add a title and the description of that contains keywords for search engine optimization.
Please note: that the description will allow you to incorporate keywords related to your Expo for search engine optimization (SEO). Optimizing this description will help make it easier for your Expo to be discovered by new audiences online.
Once you’ve completed all of these steps, your Expo is ready to go. You can share this video portal with your audience via email newsletter, social media, webpage, or whatever outlet you use to distribute content. Once they click on the link it will take them directly to your portal page. For more information regarding video hosting, please take a look at our different tutorials within our knowledge base center.
If you have any questions about the new Video Portal, live streaming, setting up playlists, or need help with this Dacast feature, feel free to contact us directly. Not yet a Dacast user, and interested in trying Dacast risk-free for 14 days? Sign up today to get started.