


Multi-Bitrate Streaming with vMix and Wirecast: What You Need to Know

Successful live streaming requires a lot of moving parts. Software, hardware, and configuration come together to create a highly effective form of communication. One element that is key for successful live events is multi-bitrate streaming.
Multi-bitrate streaming can fix most problems that occur with buffering, lagging, and so on. However, it’s not always easy to set up when you’ve never used an encoder. This essay will take a proactive look at how to set up multiple bitrate streams using vMix and Wirecast video broadcasting software that have directly integrated our OVP into their dropdown menu.
Table of Contents
- What is a Multi-bitrate Stream?
- Why Multi-bitrate Streaming is Essential
- Video Broadcasting Software Integrated with Dacast
- Multi-bitrate Streaming
- Bandwidth Requirements for Multi-bitrate Streaming
- Conclusion
Most professional live streaming platforms and video encoding solutions update their features and pricing regularly. We have updated this post to reflect the most recent information as of September 2020.
What is a Multi-bitrate Stream?
 Back in the days of yore, internet streams were only delivered at a single quality level. If the viewer had a fast enough internet connection, she could watch the stream. If not… well, better luck next time. Trying to stream content that is too much for your internet connection is just about impossible. You can expect buffering, stuttering, or total failure.
The solution is a multi-bitrate stream. This refers to a single stream that is available in multiple qualities. If you’ve ever used YouTube, you’ve probably noticed the quality settings options in the lower right corner of the video player. These allow you to select a quality—typically, 144p, 240p, 360p, 480p, 720p, or 1080p.
Similarly, a modern live stream is typically delivered in multiple bitrates. When used with a modern, compatible web video player, viewers will automatically be delivered the best possible video quality based on their internet speed. This is configured via video broadcasting software.
Why Multi-bitrate Streaming is Essential
Why is this so important? Well, today people watch video in all sorts of locations and on all devices. Some viewers may be watching via an extremely fast fiber connection on a 4K smart TV. Others may be watching via a poor 4G cell network connection on a smartphone, or on a rural DSL internet line on an aging computer.
There are billions of internet users. To maximize the audience size for any live stream, you need to reach as many of them as you can. And you need to reach them with a watchable stream. That means that your stream needs to be delivered in multiple quality-levels. For viewers with fast internet, you should ideally send a High-Definition, high-quality stream. Viewers with slower internet should receive a stream that will play smoothly, even if the quality is very poor.
The end goal is that each viewer is delivered a live stream that is viewable, doesn’t buffer or lag, and plays smoothly—in the best possible quality.
This requires the proper configuration of your video broadcasting software. Wirecast is a very popular encoder used by a wide variety of broadcasters. Multi-bitrate streaming is pretty easy to set up with Wirecast. Let’s take a look at how to do this.
Video Broadcasting Software Integrated with Dacast
1. Wirecast
Wirecast is available in two versions: Wirecast Studio is available for $599, and Wirecast Pro at $799. To ensure software compatibility, check out our post on the minimum Wirecast system requirements. so you can get to live streaming quickly and easily.
There is also a free trial version which includes a watermark but is otherwise totally functional. Both the free and paid version include Dacast in their dropdown menu, allowing you to start streaming in a few minutes.
Wirecast Studio Includes features such as:
Unlimited Capture
- Unlimited inputs
- 2 remote guests via Wirecast Rendezvous conferencing
Enhanced Production
- 4096 x 3072 maximum project and encoding resolution
- 5 Master Mixing layers
- Integrated text, titles, chroma key, and built-in transitions
- Custom transitions, playlists
- Advanced audio mixer
- Social media integration
- Integrated Stock Media Library
- New Blue Titler Live Express animated titles and graphics
Unlimited Destination Outputs
- Unlimited output destinations + multiple simultaneous record-to-disks
- A virtual camera and microphone output
- 1-4 slot multi-viewer output
Support
- Free Email Support & upgrades for a year with Standard Support
Wirecast Pro includes all features of Wirecast Studio, plus:
Advanced Unlimited Capture
- 7 remote guests via Wirecast Rendezvous conferencing
Advanced Production
- PTZ Camera Control
- Pro Audio FX
- Sports Production (instant replay, scoreboards)
- Virtual Sets and backgrounds
- NewBlue Titler Live Present animated titles and graph
Advanced Unlimited Destination Outputs
- Adds baseband SDI/HDMI output, NDI program out
- 1-17 slot multi-viewer output
- ISO Record of individual sources
- Multi-track audio recording
Support
- Free Email Support & upgrades for a year with Standard Support.
2. vMix
Another popular video broadcasting software along with Wirecast Pro is vMix. There are six versions of vMix ranking from a free version, with a maximum resolution of 768 x 576, to a pro version at $1200 supporting multiple video sources and live video conferencing with up to 8 callers. The in-between versions offer a good mixture of functionality and affordability. There is also a 60-day free trial. Learn more on the vMix pricing page, and it details a comparison feature side by side of all the products currently offered.
In terms of compatibility, vMix only operates on Microsoft Windows computers. Both the free and paid versions include Dacast in their dropdown menu, allowing you to start streaming in a few minutes.
Multi-bitrate Streaming
Please note that for multi-bitrate streaming either with Wirecast or vMix, you would have to manually configure your encoder as you will need to slightly modify the stream name of your live channel for each bitrate you want to set up.
To set up a multi-bitrate stream in Wirecast Basic, Wirecast Pro, or vMix, follow these steps:
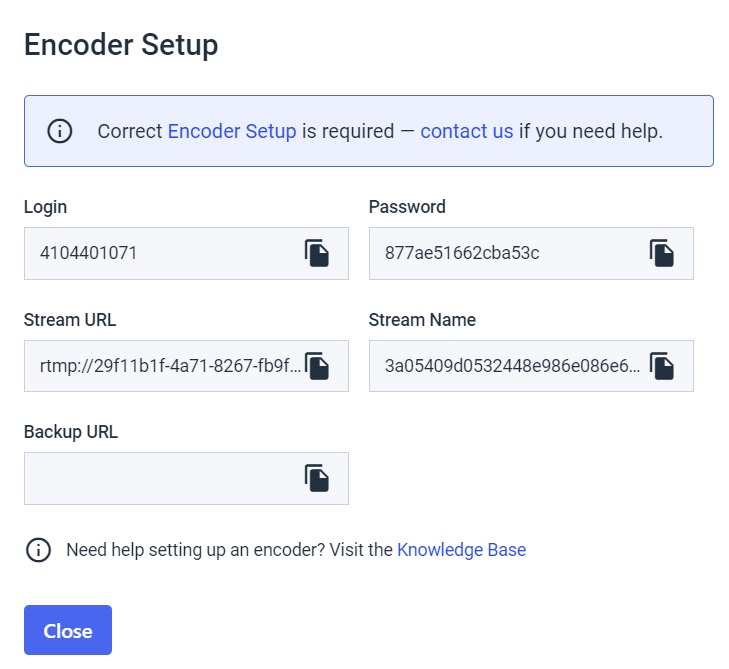
Step 1: First, log into Dacast and visit your account backend. Click on the live streaming channel you’ll be using for this stream, then under the General tab, click on:
![]()
![]()
Step 2: The encoder setup window has 4 panes. These 4 panes contain stream credentials. The stream credentials are the Login/Password/Stream URL/Stream Name. You need to copy-and-paste them into vMix or Wirecast pro video broadcasting software:
 Step 3: Open Wirecast or vMix and start by adding a video source to your stream. In Wirecast, you will have to click on the icon “+” next to the first layer window, in the second part of your screen. In vMix you will have to click on “Add Input” located toward the bottom of your screen.
Step 4: Now that you have the video source of your live channel, let’s set up the settings of your live channel. In Wirecast, you will want to open the “Output Settings” window. This can be done by clicking “Stream,” or via the keyboard shortcut Ctrl + Y (PC) or Cmd + Y (Mac). In vMix you will click the gear icon found to the left of the word STREAM and located at the bottom of the layout.
Step 5: In the window that opens up, you’ll be prompted to select an output destination. Select “RTMP Server,” then click OK.
Step 6: Next, you’ll need to enter the output settings. This is where you will have to enter the Stream URL, Stream Name, Login, and Password of your live channel, all available in the window of your Dacast account that you kept open. It is pretty easy, you just have to copy-paste the info. The tricky part comes with the stream name that you will have to adapt for each bitrate you set up. Edit the stream name to match this format as always:
dclive_1_1@123456
dclive_1_2@123456
dclive_1_3@123456
The highlighted numbers should always have the format in ascending order with numbers 1–3.
Step 7: To ensure a successful live stream, we recommend you the following live streaming encoder settings:
| VIDEO CODEC | H.264 (x264 may work) |
| FRAME RATE | 25 or 30 |
| KEYFRAME INTERVAL | 3 secs (or 3x frame rate) |
| SCANNING | Progressive |
| ENCODING BITRATE | Constant (CBR) |
| AUDIO CODEC | AAC |
| AUDIO BITRATE | 128 kbps |
| AUDIO CHANNELS | 2 (Stereo) |
| AUDIO SAMPLE RATE | 48 kHz (48,000 Hz) |
Step 8: Your first stream is now set up. To add your second bitrate, click the “Add…” button in the corner of the Output Settings window.
Step 9: Enter the settings exactly as before. However, you should make two changes. First, you’ll need to edit the stream name. As mentioned in the previous paragraph, the second stream name should look something like this: dclive_1_2@123456. The audio and video bitrate, resolution, and frames per second should also be set manually (see step 11, below).
Step 10: For each stream, you’ll need to select the video resolution, video bitrate, and audio bitrate you desire. For a standard live stream, we often recommend three settings:
| ULD | LD | SD | HD | FHD | |
| Name | Ultra-Low Definition | Low Definition | Standard Definition | High Definition | Full High Definition |
| Video Bitrate (kbps) | 350 | 350 – 800 | 800 – 1200 | 1200 – 1900 | 1900 – 4500 |
| Resolution Width (px) | 426 | 640 | 854 | 1280 | 1920 |
| Resolution Height (px) | 240 | 360 | 480 | 720 | 1080 |
| H.264 Profile | Main | Main | High | High | High |
Step 8 and 9 can be repeated as many times as you wish. However, your available bandwidth at the site of streaming can influence your choices here, as we’ll explain next.
Bandwidth Requirements for Multi-bitrate Streaming
Ok—so we’ve explained already that the viewer’s internet speed determines whether or not they can watch any given live stream. However, a similar limitation exists for the broadcaster. When you’re live streaming, the data you’re streaming is uploaded via your local internet connection to the OTT video provider that you’re working with.
That means it’s important that your internet speed is up to the task. If it’s not, your stream could buffer or fail—even for viewers with excellent internet connections.
The relevant number is the upload speed. To check the upload speed of the current connection you’re using, you can visit www.testmy.net. Make a note of the upload speed this test shows.
When streaming in multiple bitrates, each stream quality is being uploaded at the same time. That means that to determine the total upload bandwidth needed, you should add the bandwidths of each quality together. Let’s say you used the recommended settings, as above. In that case: Low @ 5oo Kbps + 64 Kbps audio, Standard @ 1000 Kbps + 128 Kbps audio, and High-def @ 3 Mbps (equal to 3000 Kbps) + 128 Kbps audio. Your total is nearly 5 Mbps.
In this example, you need to be sure your internet speed is at least 5 Mbps. In fact, we recommend that you have twice the bandwidth needed, so a 10 Mbps upload speed internet connection would be best. To learn more, have a look at our dedicated article on bandwidth requirements for streaming live video.
Conclusion
Streaming in multiple bitrates is practically a necessity. The process can be a little bit confusing, but hopefully, this explanation has helped clarify it. Multi-bitrate streaming with vMix, Wirecast Basic, or Wirecast Pro video broadcasting software only takes a few minutes to set up and configure. And once you’ve done this process once, it’s easy in the future.
Any questions? Let us know in the comments section below, and we’ll respond as soon as we can. Thanks for reading, and best of luck with your live streams!