


Wirecast Settings Live Streaming Configuration

Encoding, multi-bitrate streaming, and adaptive streaming are all very important elements for maintaining an excellent user experience and improving the quality of your live stream.
In this post, we’re going to discuss how these features look in action with the Wirecast live encoding software. We will cover how to set up this software encoder with a specific focus on Wirecast bitrate settings.
What is an Encoder?
Encoding is a process used to convert the RAW video files captured by a camera into digital files suitable for live streaming over the internet.
Wirecast is an example of a software encoder that is used for live streaming. This means that the encoder feeds digital video files to the streaming platform in real time.
Setting Up Your Wirecast Encoder
To use multi-bitrate streaming with Wirecast, you must configure your encoder with the required encoder settings from Dacast.
You will need to access your Dacast dashboard to retrieve some information, and from there, our adaptive player will automatically detect Wirecast’s multi-bitrate settings.
To ensure your system is compatible, check out our post on the minimum Wirecast system requirements. When properly configured, the adaptive bitrate tool allows you to provide the best quality stream to your viewers based upon their individual connections.
Setup Live Streaming Step-by-Step
Step 1:
Click on your stream under “Live Streams” on the left-hand menu. You can either click the title of your stream or use the pencil icon (if you have already created one).

If you haven’t created a stream yet, you must click the “Create Live Stream” button towards the far right side:

Step 2:
Once you’re in the “General” tab of the specific video, click “Encoder Setup.” There, you will find the credentials you’ll need to connect the two platforms:

Wirecast Encoder Setting Configuration
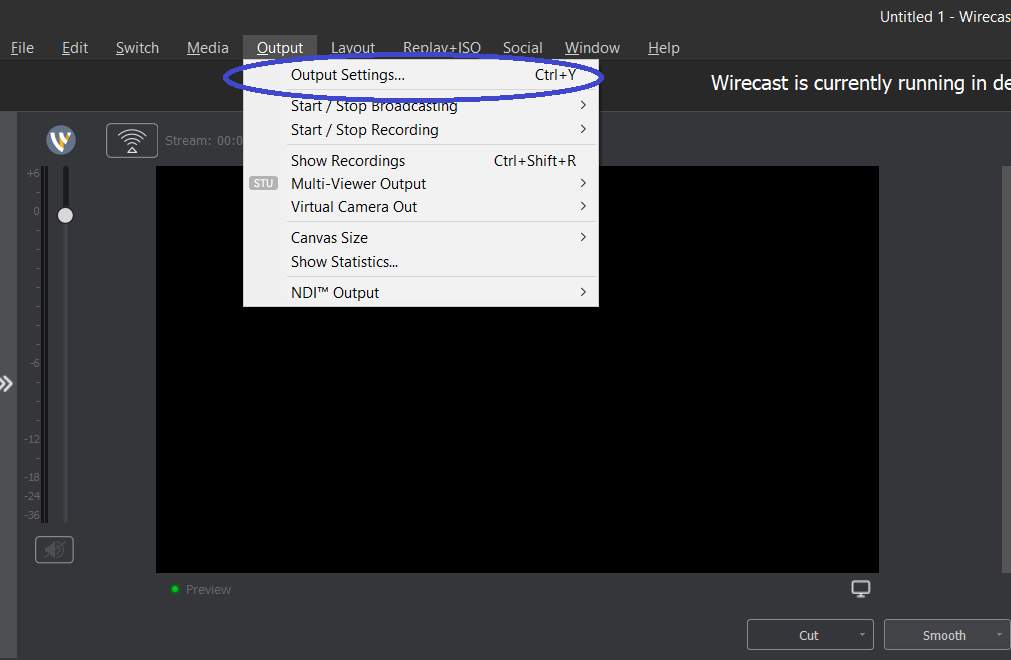
Log into Wirecast. Click on “Output” in the top menu, and open the “Output Settings” window. If you have not streamed yet, please click on the black “Stream” icon to make the Output Settings visible.
Alternatively, press (CTRL + Y) or click “Output” then “Output Settings,” as shown below:
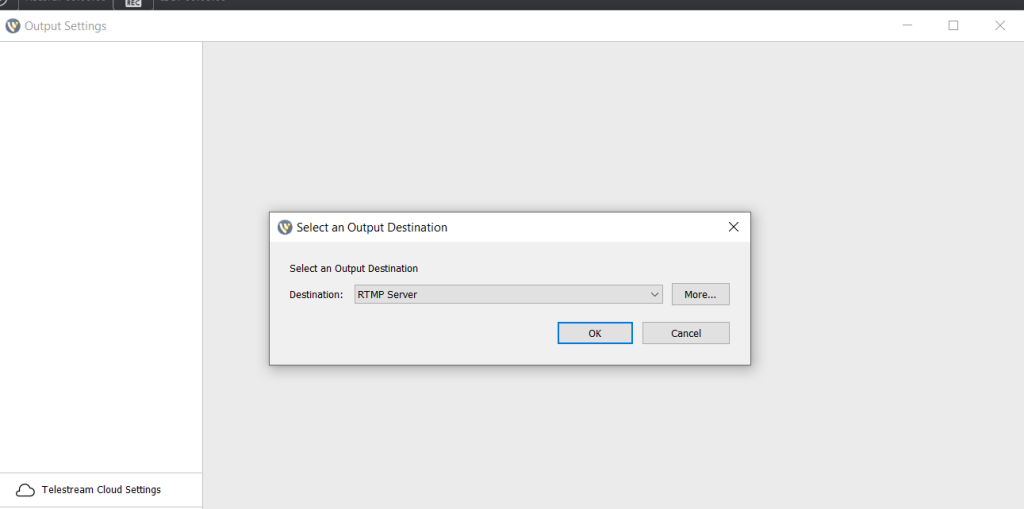
When the window opens, you will be asked to “Select an Output Destination.” The destination should be “RTMP Server.” Click “OK”:
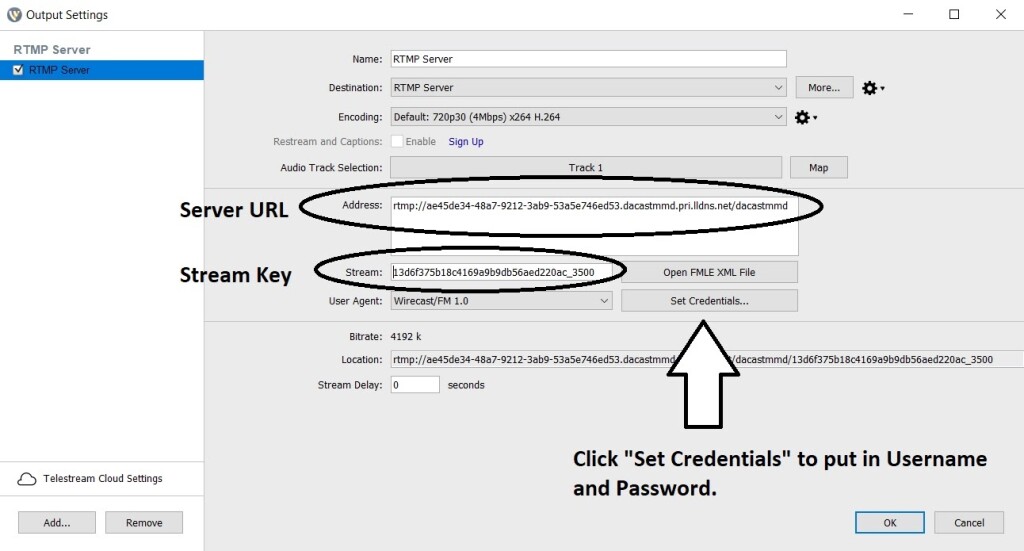
Adding The First Stream
Input the Server URL in the “Address” bar and the Stream Key in the “Stream” bar.
Next, click the “Set Credentials” button. Put the username and password on the corresponding tabs:
If you plan to use NVENC, then 720p60 + NVENC is the option you should select.
Step 4:
Click “OK” to save your changes.
Internet Speed and Bitrate
From here, you’ll want to ensure that you’re using the appropriate settings for smooth delivery of the stream in terms of playback and functionality.
To get started, do an upload speed test via testmy.net. The purpose of this is that you will need to adjust the video bitrates accordingly to the appropriate resolution (FHD, HD, SD, etc.) based on your upload speed test.
There is no mandatory minimum upload speed for live streaming on Dacast, so how you set this up depends on the quality of the video you want to stream at.
The upload speed on your internet should be around double what you plan to use to live stream. You can push this to up to 80% of your internet connection speed if need be.
For example, a 1,000 kbps connection would let you stream from 500 kbps to 800kbps.
If you are streaming at more than half your connection speed, do not try to watch your own feed at the same time as that will exceed your internet’s capabilities.
Also, please keep in mind that other variables, such as being on a wireless or shared network, will reduce the bitrate you can stream at. That said, using a hardwired internet connection is the best way to go for live streaming.
Encoder Presets on Wirecast
Now, we need to make sure that the stream is correctly set up for HTML5.
To do so, click on the clockwork icon near the “Encoding” drop-down, and choose “View Details” or “New Preset”:
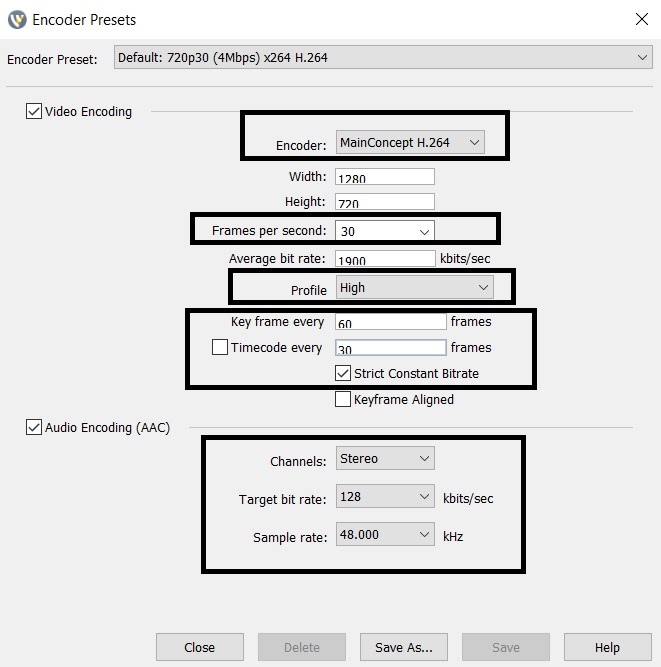
The settings for HTML5 streaming should be as follows:
- Encoder: H.264 (x.264 may also work)
- Width, Height, FPS, Average bitrate: your choice (depending on your upload speed)
- Profile: High
- Keyframe every: 60 seconds (double the size of the FPS)
- Channels: Stereo
- Target bitrate: 128
- Sample rate: 48 Khz
All of these settings and more are indicated on our Dacast Encoder settings guide.
Click “Save” or “Save As” to save your changes.
You are now ready to stream. Click on the “Stream” icon. Once it begins, a timer should appear, this means you are now connected to the Dacast server and your live stream has begun:
To preview your live stream, go back to your Dacast account in the “General” tab of your stream. Click on “Preview” or copy the “Share Link” and paste it into a new browser window:

Live Encoder Settings FAQ
Here are a few frequently asked questions about configuring encoder settings with Wirecast and Dacast.
1. Which customers can use this feature?
All customers, including free trials, have access to this feature. The additional cost would be entirely on the Dacast customer, not us, who is doing the additional encoding.
2. Which Stream Key should I use?
It doesn’t really matter which Stream Key you use for each rendition, just as long as you copy and paste a different stream key each time you add a rendition on Wirecast.
3. What are the limitations?
While each Stream Key ends in what looks like a bitrate (e.g. “_4500”) this is actually just an advisory and not a technical limitation.
The only real limitation is that the sum of all renditions remains below 16 Mbps. This should not be a problem because it is a relatively high limit.
Required Encoder Settings
Since we just went over the topic of Wirecast Bitrate Settings and Multi-bitrate Live Streaming Configuration, we wanted to include a bit more information on the required encoder settings for live streaming on the Dacast streaming platform. The following settings are required for live streaming with Dacast, regardless of your selected resolution and bitrate:
| VIDEO CODEC | H.264 (x264 may work) |
| FRAME RATE | 25 or 30 |
| KEYFRAME INTERVAL | 3 secs (or 3x frame rate) |
| SCANNING | Progressive |
| ENCODING BITRATE | Constant (CBR) |
| AUDIO CODEC | AAC |
| AUDIO BITRATE | 128 kbps |
| AUDIO CHANNELS | 2 (Stereo) |
| AUDIO SAMPLE RATE | 48 kHz (48,000 Hz) |
Any questions or need help/access to this feature? Please contact us. Not yet a Dacast user, and interested in trying Dacast risk-free for 14 days? Sign up today to get started.
- Spanish Tutorial: How Do I Broadcast My Screen With Microphone Audio On Wirecast?
- How to Use Wirecast and OBS Studio with Multiple Video Sources
- Wirecast: What to Do When You Get an Error Publishing Stream
- Introduction to Live Streaming: A Walkthrough
- Video Renditions and Bitrates
- New Transcoding Limits on VOD
- Transcoding: Everything You Need to Know
- VOD Multi-Bitrate Walkthrough
- Video Streaming Software and Multi-Bitrate Streaming