


How to Seamlessly Migrate to Dacast: A Step-by-Step Guide

Migrating video content to a new professional streaming platform may sound complex, but with the right approach, you can switch without downtime or disruption. If you’ve decided it’s time to move, you’re in the right place.
Whether you’re coming from Vimeo, Brightcove, YouTube, or another provider, Dacast makes it simple to migrate your video library, live channels, and audience experiences. Follow our practical step-by-step guide to get started quickly and confidently. Our world-class Success Team is ready to assist whenever you need a hand, ensuring a smooth migration to the best live streaming platforms for enterprises in 2025.
Prefer learning through video? This tutorial walks you through all the key steps of migrating to Dacast, from uploading your files to putting them online.
Why Migrate to Dacast?
Organizations choose to migrate to Dacast for a variety of reasons, including:
- Reliability & Performance – Global CDN delivery ensures fast, buffer-free playback.
- Professional Features – Monetization (SVOD, TVOD, AVOD), password protection, analytics, and white-label branding.
- Scalability – From one-time events to 24/7 streaming, Dacast supports growth at every stage.
- Cost Efficiency – Transparent, predictable pricing without hidden overage fees.
If you’re switching platforms, Dacast’s all-in-one solution helps consolidate hosting, live streaming, and monetization in a single place.
Ready to get started? Create your account and begin your migration with Dacast
Step 1: Plan Your Migration
Before starting, define what you need to move:
- Video-on-demand (VOD) library: Do you want to migrate all existing videos or only select content?
- Live streaming setup: Are you replacing your current live streaming platform, or running both temporarily?
- Metadata and settings: Titles, descriptions, categories, thumbnails, captions, and analytics.
- Monetization options: Subscriptions, pay-per-view, or ad-supported.
Tip: Create a spreadsheet of your current video inventory. This will help you track which assets have been uploaded and configured in Dacast. Also important, If you currently have paid subscribers, simply prepare a CSV file with their names / emails, and we will assist with next steps to make sure their streams keep flowing normally.
Step 2: Prepare Your Files
Most platforms allow you to download your original video files (MP4, MOV, or other supported formats).
- Download the highest-quality version available (avoid compressed copies if possible).
- Check file names and organize them into folders for easier tracking.
- Review video specs. Dacast supports most standard codecs, but MP4 (H.264 video + AAC audio) is recommended for best compatibility.
Tip: If you have many files, compress or re-encode them in batches before uploading to save time.
Step 3: Set Up Your Dacast Account
1. Log in to your Dacast account.
2. Navigate to Video > VODs or Live Channels, depending on what you’re migrating.
3. Create categories and folders in advance to match your existing structure (e.g., “Training Videos,” “Events,” “Sermons”).
Tip: Setting up categories before upload makes it easier to keep your library organized.
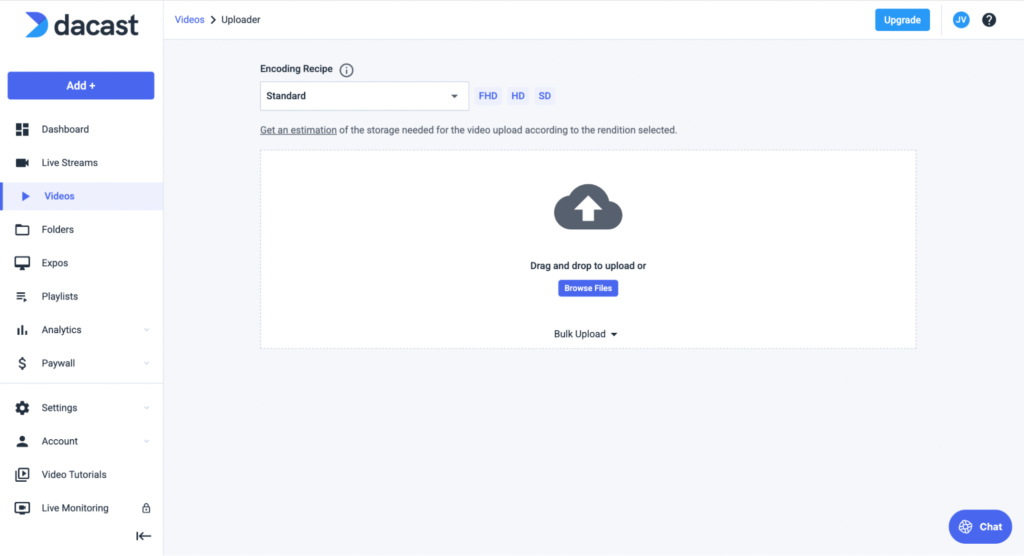
Step 4: Upload Your Video Files
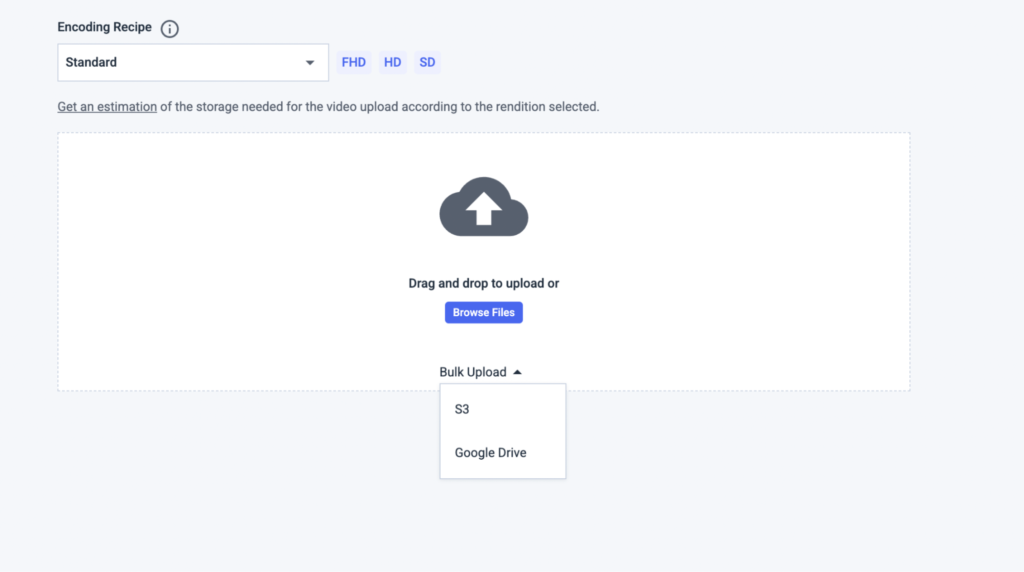
There are three main ways to upload content:
- Web upload (best for small libraries): Drag and drop files directly into the Dacast dashboard.
- Bulk upload from cloud storage: You can also directly import your content from Amazon S3 or Google Drive for faster transfers.
- API-based migration (best for enterprises): If you need to automate migration, use Dacast’s RESTful API to programmatically upload and manage content.
Tip: Upload in smaller batches (e.g., 10–20 files at a time) to prevent network interruptions.
Step 5: Configure Video Settings
For each uploaded video:
- Title & Description – Copy from your old platform or update as needed.
- Thumbnails & Posters – Upload a custom thumbnail or use auto-generated frames.
- Closed Captions – Import existing subtitle files (SRT or VTT) if available.
- Privacy Settings – Set restrictions (geo-blocking, domain restrictions, password protection).
- Monetization – Apply subscription, pay-per-view, or ad-supported settings.
Tip: Dacast allows bulk editing for settings like categories and monetization, saving time during migration.
Step 6: Redirect or Update Embeds
If your videos are embedded on a website, intranet, or LMS:
- Replace the old embed codes with the new Dacast HTML5 player embed codes.
- Test on multiple devices (desktop, mobile, tablet).
- If needed, use domain whitelisting to restrict playback to your approved websites.
Tip: If you have hundreds of embedded videos, Dacast’s support team can help streamline the process with API or batch embed updates.
Step 7: Test Your Setup
Before announcing the switch:
- Play back migrated videos to confirm smooth streaming.
- Test live streaming channels (encoder → Dacast ingest → playback).
- Verify monetization options (free preview, checkout process, ad playback).
- Check analytics to ensure data is being tracked properly.
Tip: Run a small pilot launch (e.g., migrate 10% of your library) before completing the full migration.
Step 8: Monitor and Optimize
Once your content is live on Dacast:
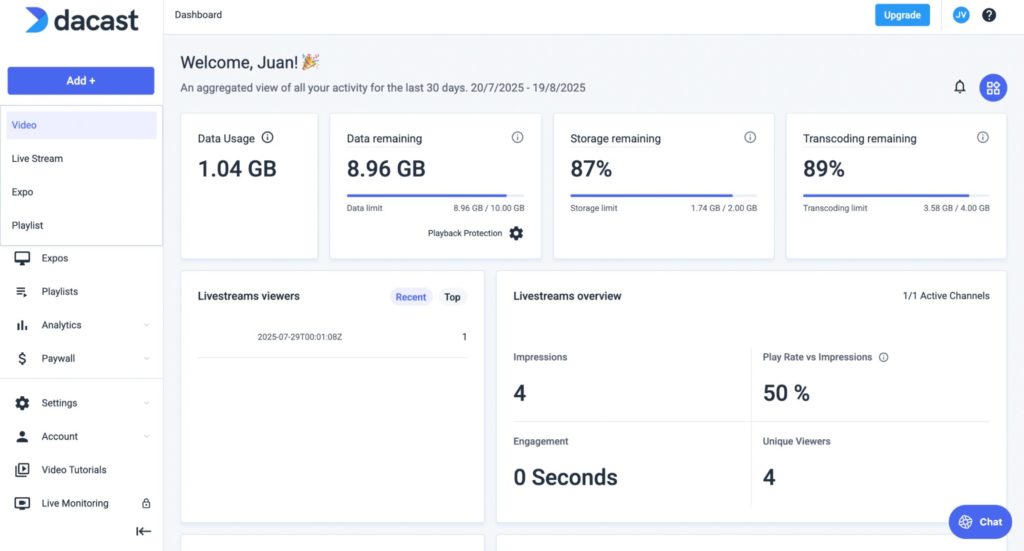
- Monitor analytics to identify top-performing content.
- Review bandwidth consumption and adjust plans if needed.
- Optimize encoding and bitrates for better audience experiences (Dacast supports adaptive bitrate streaming).
Best Practices for a Smooth Migration
- Start with priority content first. Migrate videos that are actively in use.
- Keep a backup. Maintain local or cloud copies of your original files.
- Communicate the transition. If your audience is expecting access, notify them in advance.
- Use Dacast’s support. Migration specialists can help with bulk uploads, API integration, and troubleshooting.
Next Steps
Migrating to Dacast doesn’t have to be complicated. With proper planning and support, you can transition your content seamlessly and take advantage of a powerful, all-in-one streaming platform.
- Need technical assistance? Contact Dacast Support for migration help.
- Ready to maximize your new platform? Learn more about monetization options.
Additional Resources
- Dacast Custom Ingest (V2): Setup and Benefits
- Simulcast Streaming to X (ex. Twitter) and Dacast Using RTMP
- M3U8 Online Player to Test Your HLS Stream
- Low Latency Streaming: HLS Stream Ingest
- HLS Streaming: What You Need to Know
- How to Host and Embed an HLS Live Stream on Your Website
- What is RTMP? The Real-Time Messaging Protocol Explained
- What is RTMP Ingest and Why is it Important for Live Streaming?
- HLS Ingest: What It Is and How It’s Compatible with Streaming Software
- Dacast Live Stream Recording Tutorial
- Introduction to Live Streaming with Dacast: A Step by Step Walkthrough