


ROKU Walkthrough

Note to our readers: We’ve updated this tutorial with information that is current as of 2018.
This ROKU Walkthrough will walk through how to set up a live ROKU channel and begin streaming using Dacast. Need help with the basics of live streaming (i.e., setting up cameras and encoders)? Check out this guide instead.
In this tutorial, we will show you how to create your own private channel on ROKU, step-by-step.
In order to start, you will need the following:
- Your Dacast account
- An InstantTVChannel account (create one for free here.)
- A ROKU account (create one for free here.)
STEP 1: Create your channel on InstantTVChannel
First, log in to the account you just created on www.instanttvchannel.com. The main page should look like this:

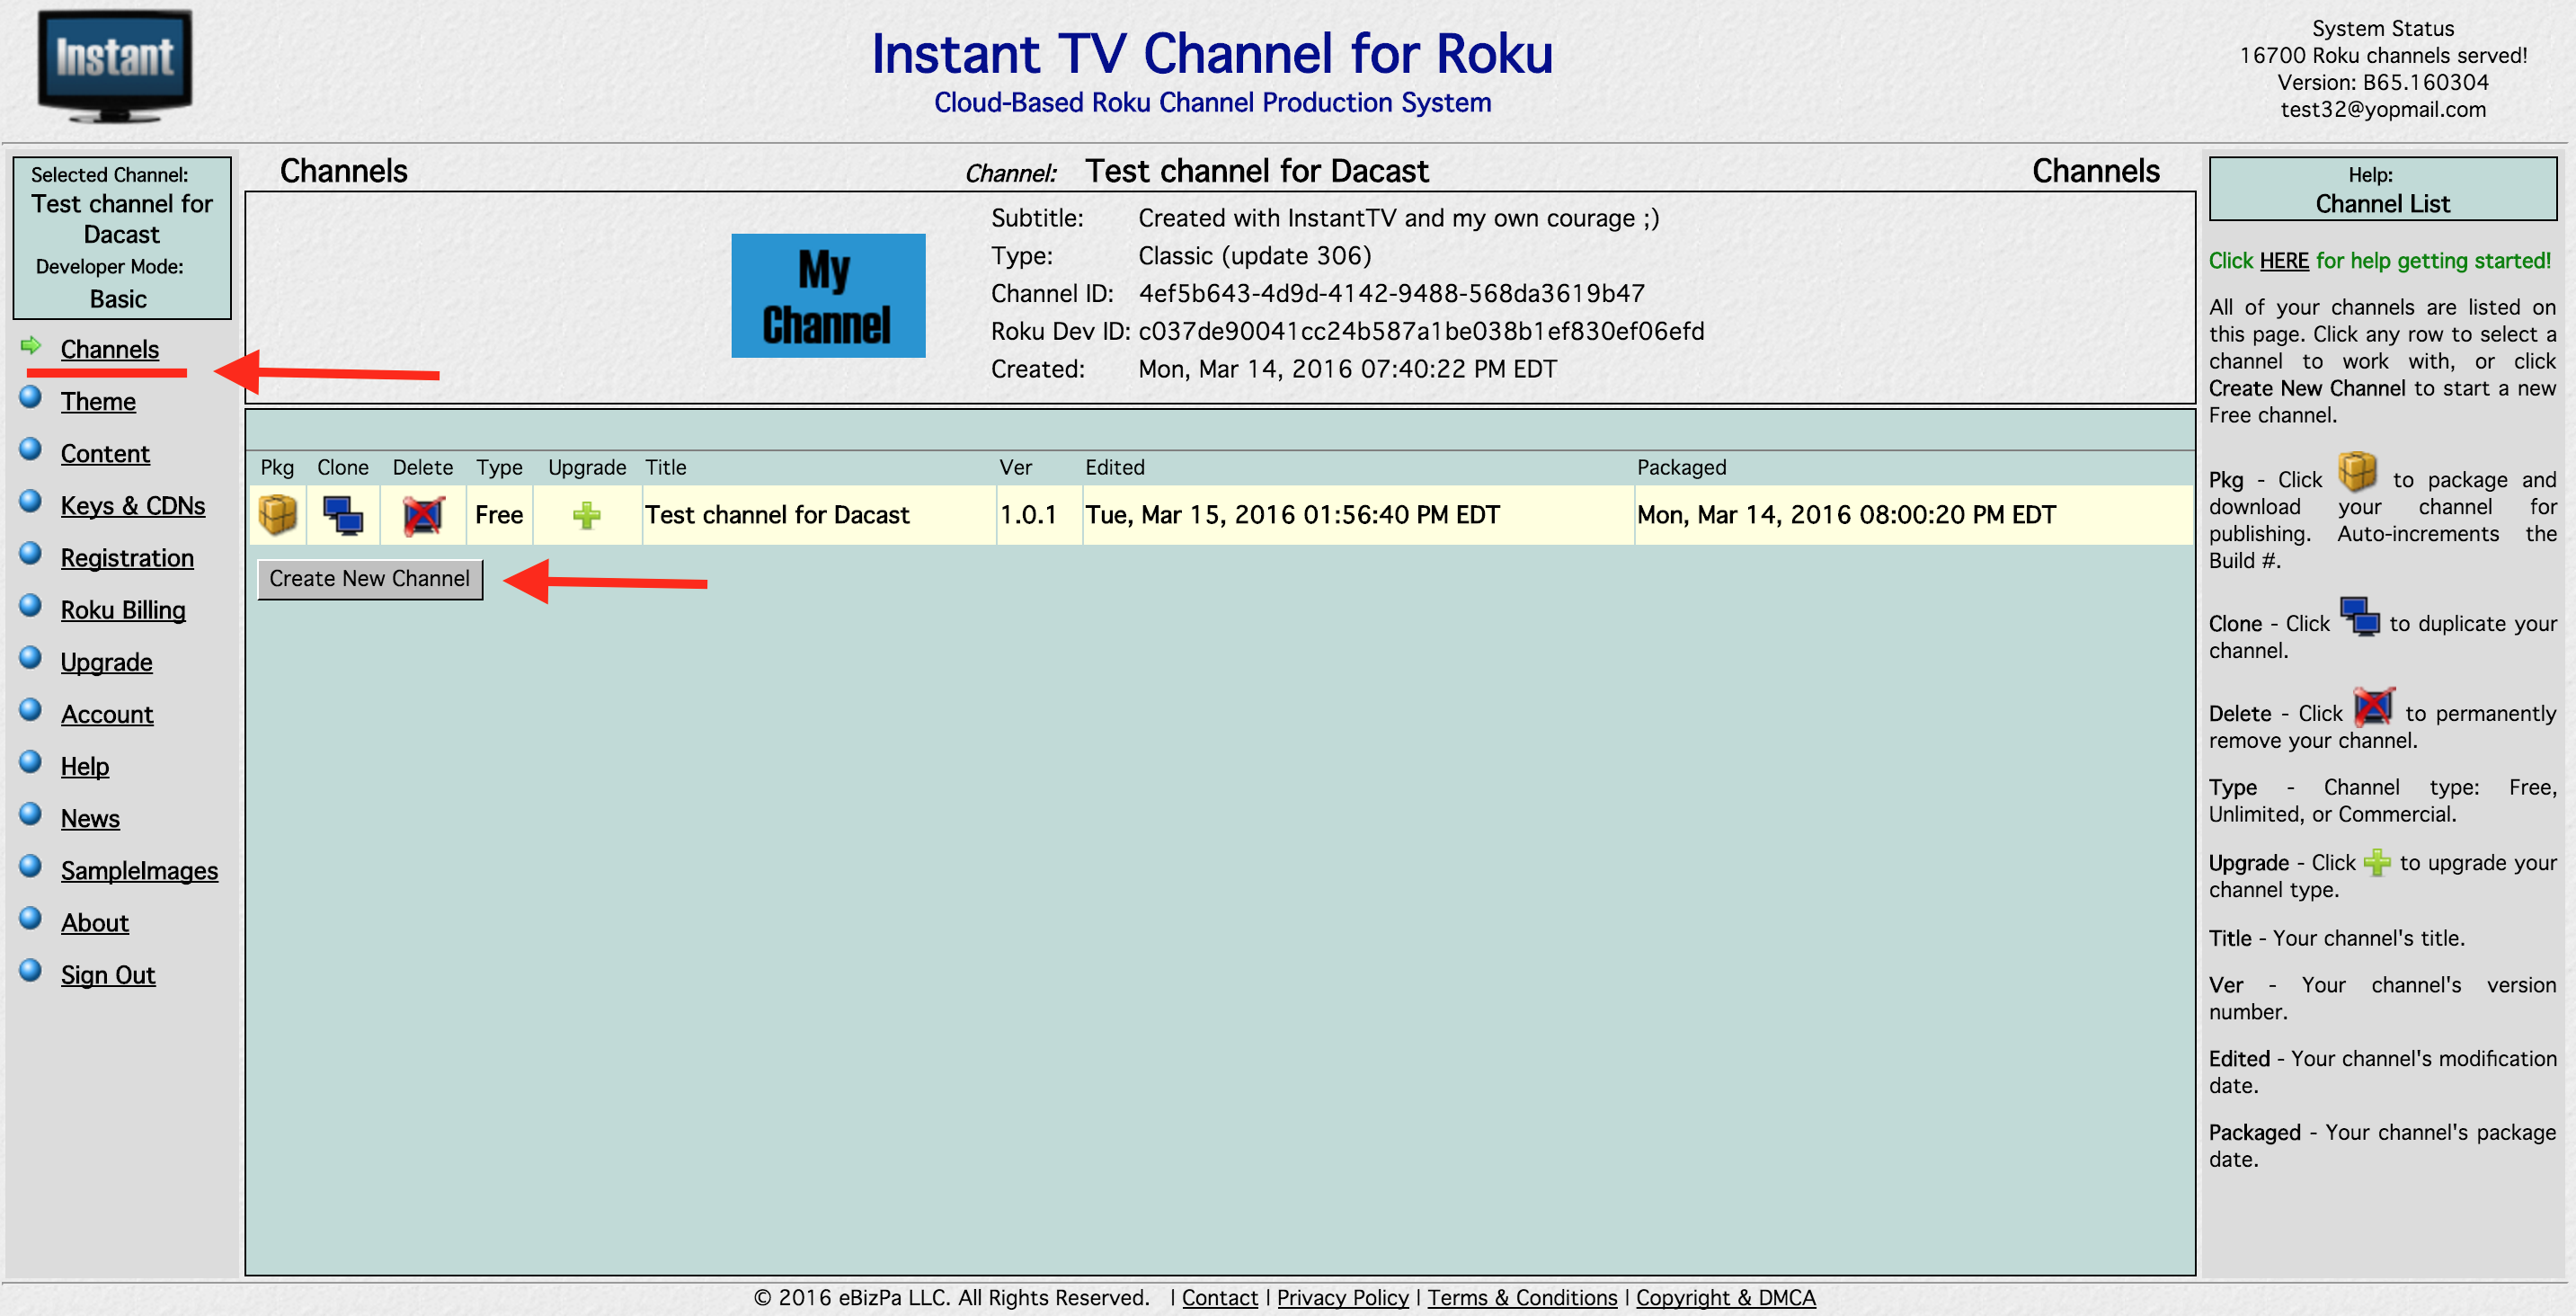
Click on “Channels” on the top-left part of the screen and then on “Create New channel”. An Information BOX will appear on the Top-Center of the page. Be sure to select “Classic” for the Channel Type and hit the “Confirm button”.
STEP 2: Choose and Edit your Theme
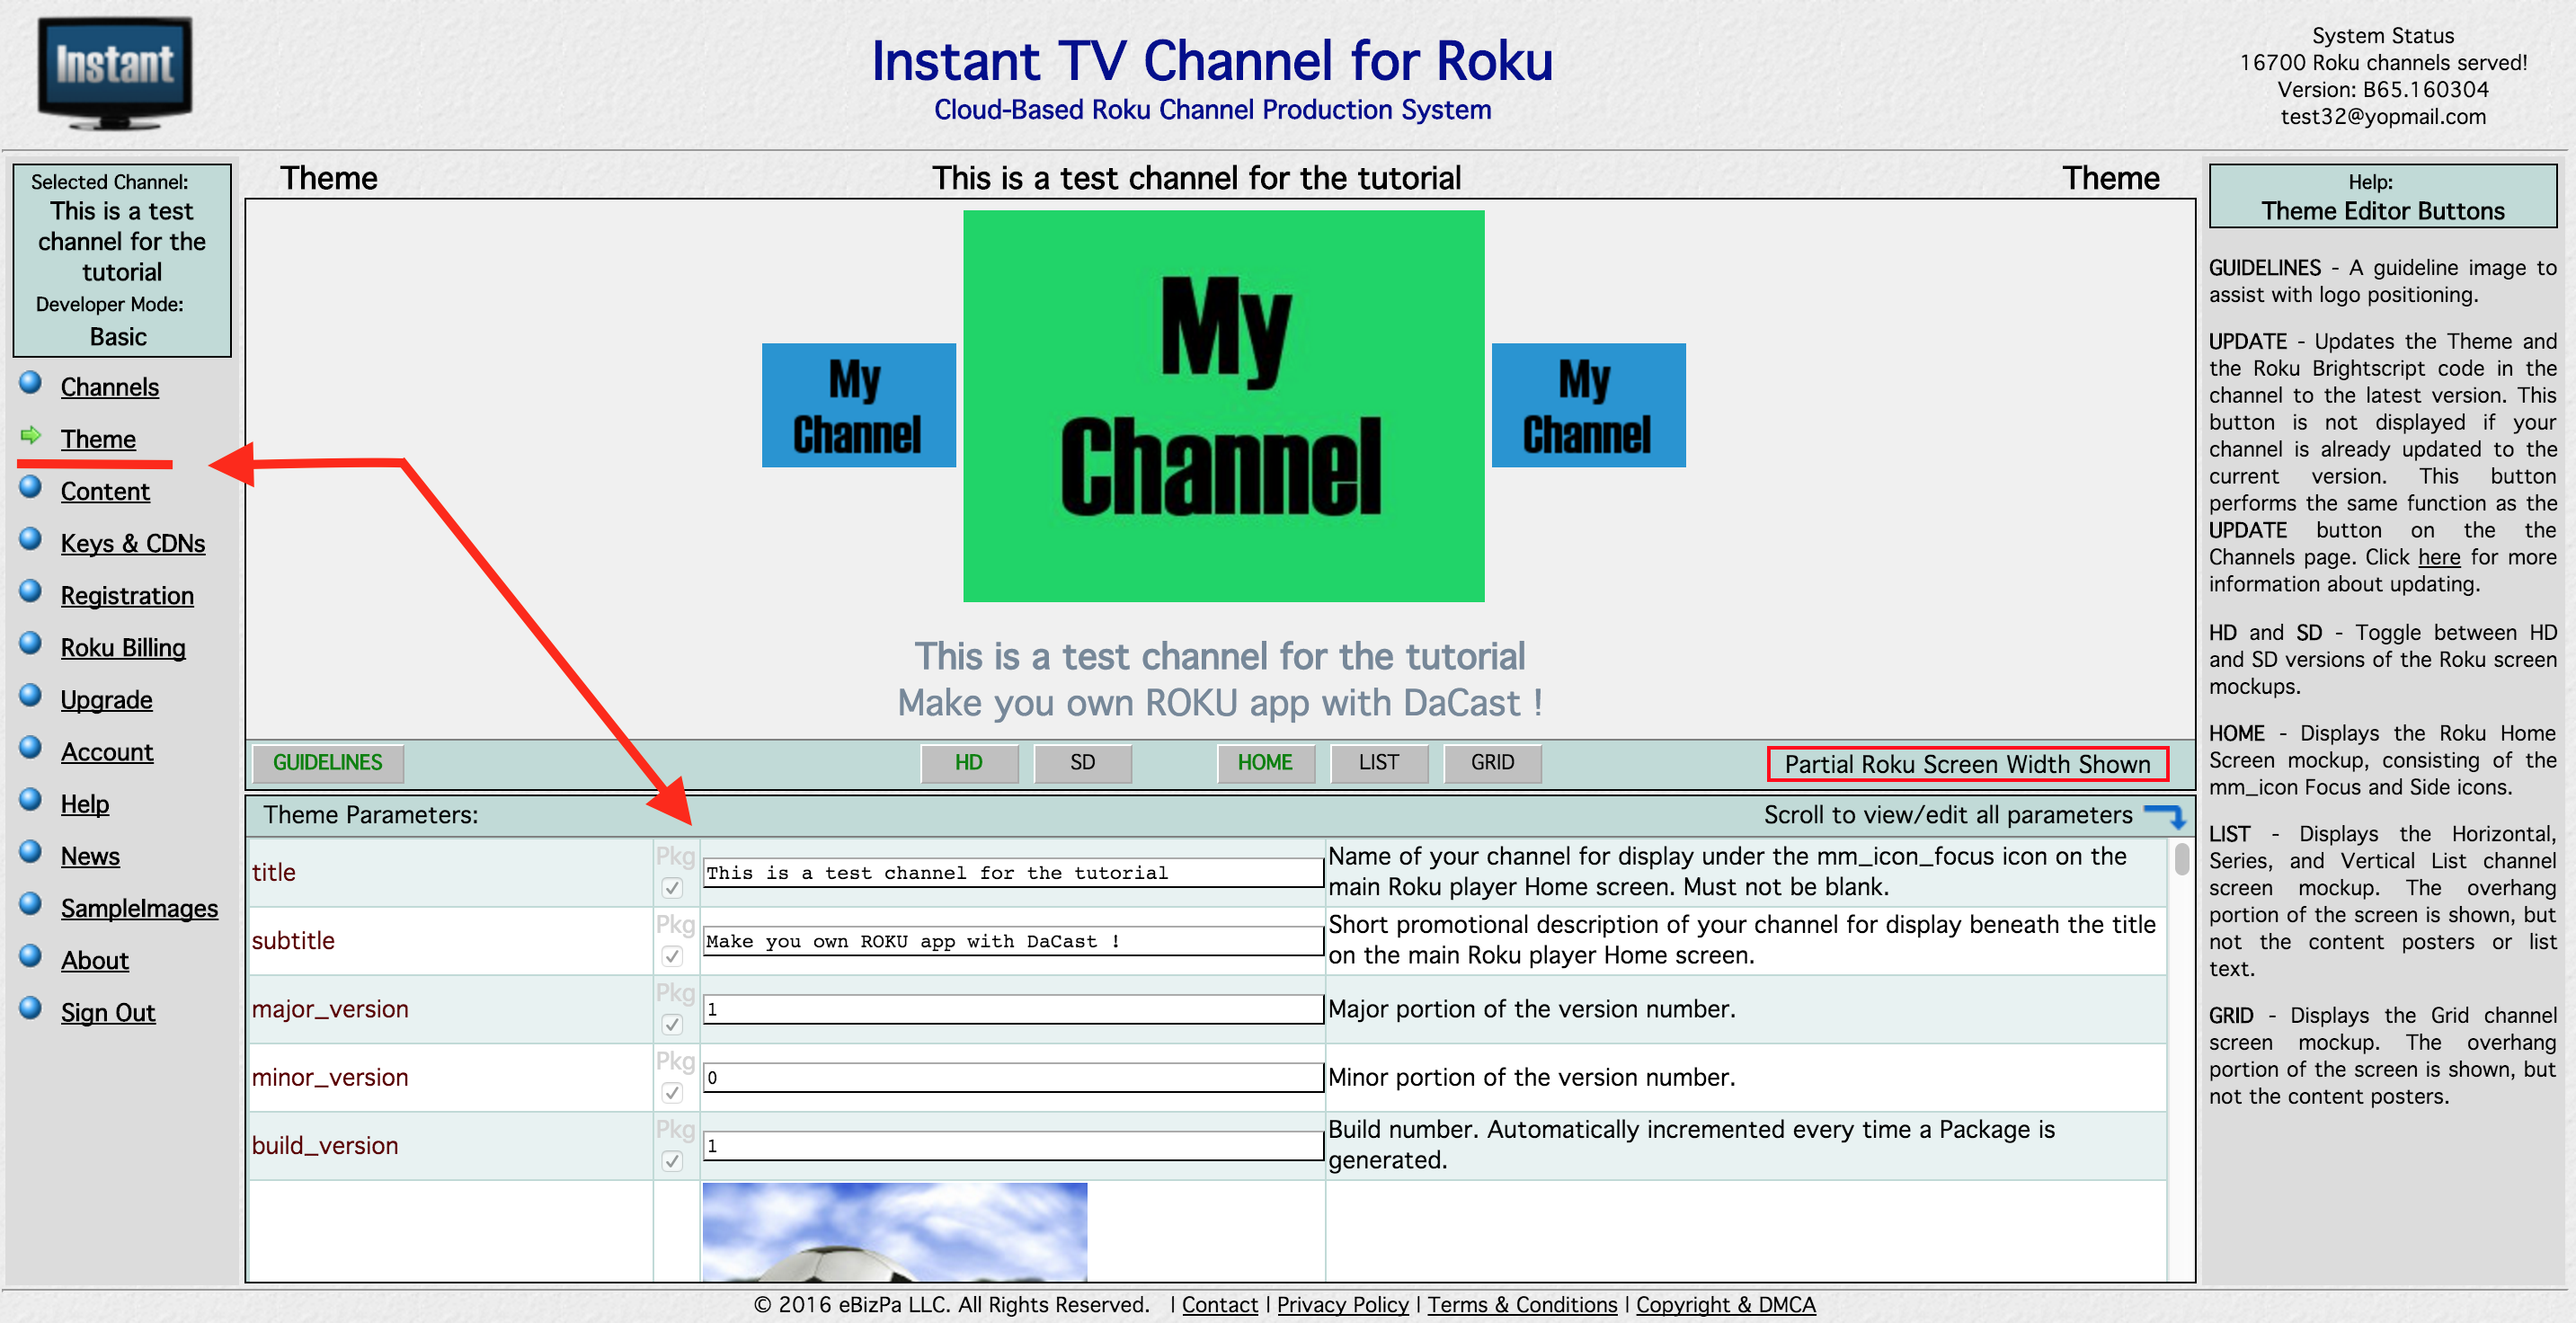
You can now click on “Theme” on the Top-Left part of the screen. In this section, you will be able to choose a Title and a Subtitle for your content, various Icons (in order to fit all the screen types, you can upload both SD and HD picture. The image shown for your users will depend on the hardware they have at home).
The Theme Settings look like this:
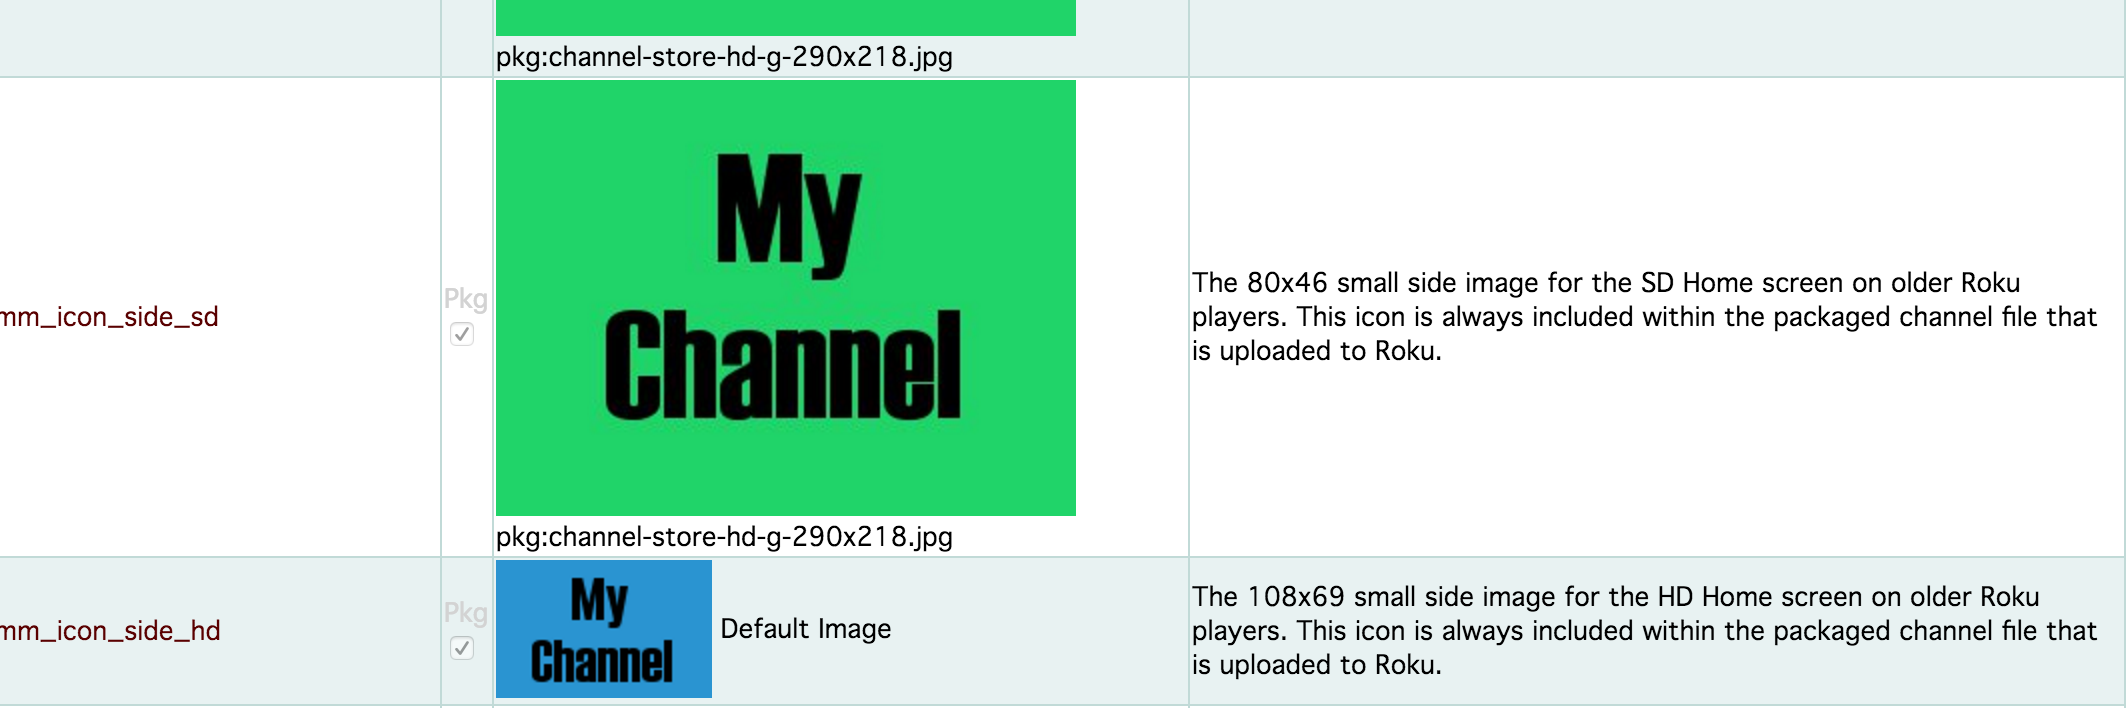
And the Picture/Icons Settings looks like this. Use the Image Ratio requested every time if you want the picture to be shown:
You also have the possibility to tailor your Text and Style by setting all the details.
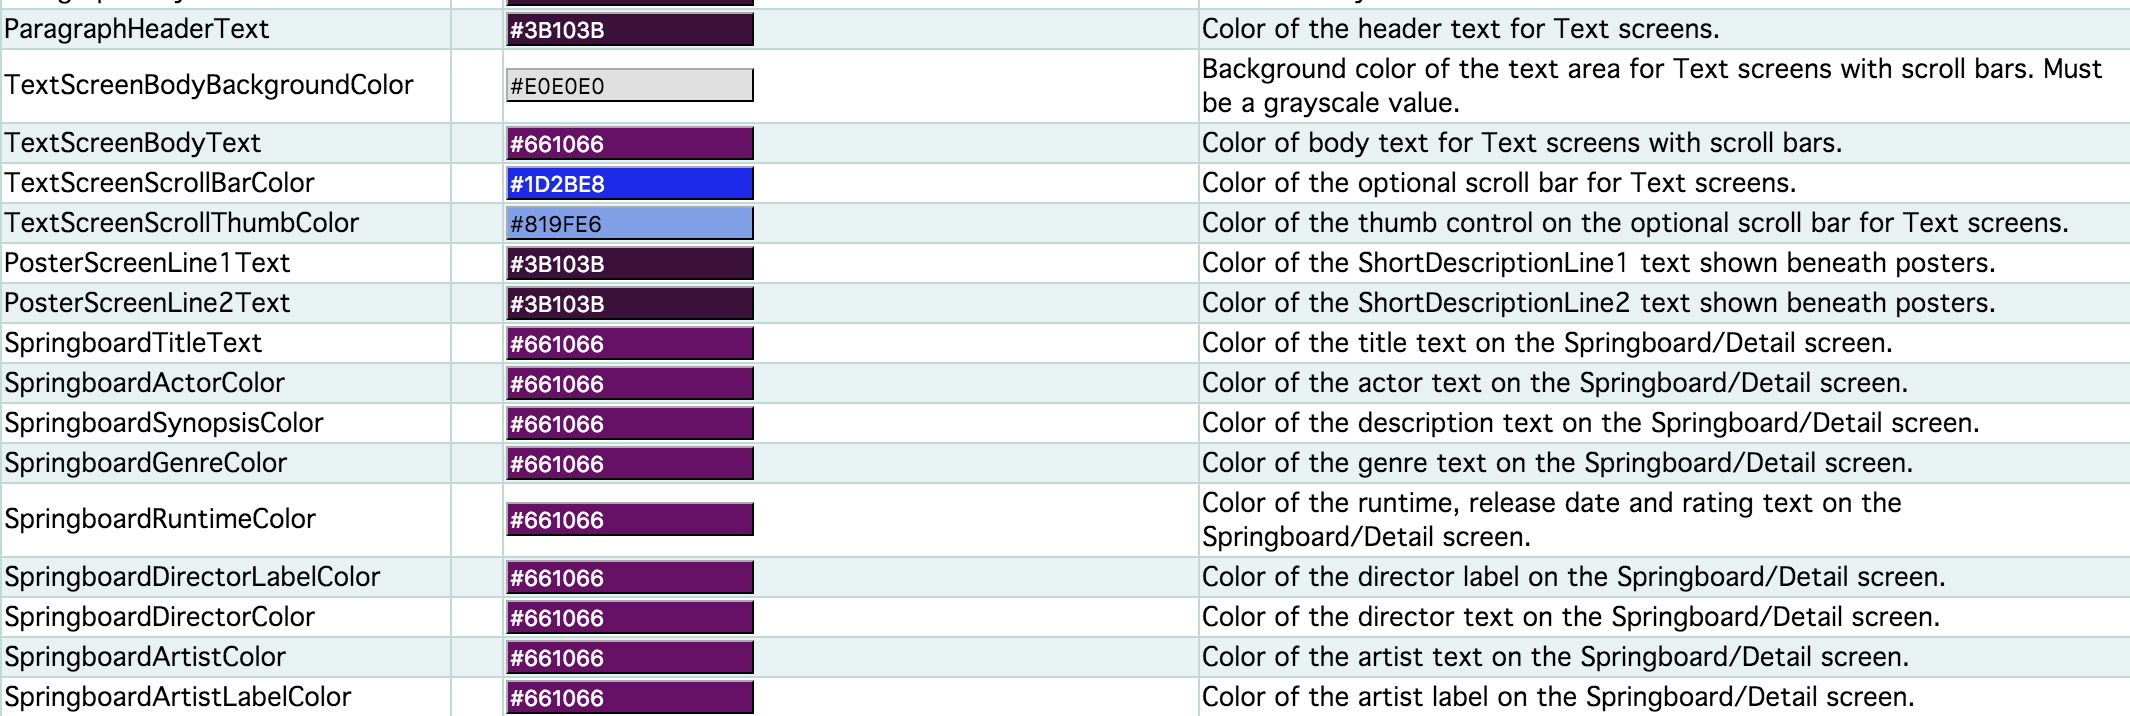
For each parameter, a small description of what it does is given on the Right. You can also report to the “Help” window on the very Right part of your screen for more information.
STEP 3: Enter the Content information for your channel
Now that we have created our channel and set its description, icons, and style, it is time to select the content that you will be broadcasting on your ROKU App (ROKU calls this an App). Click on “Content” on the Left part of your screen:
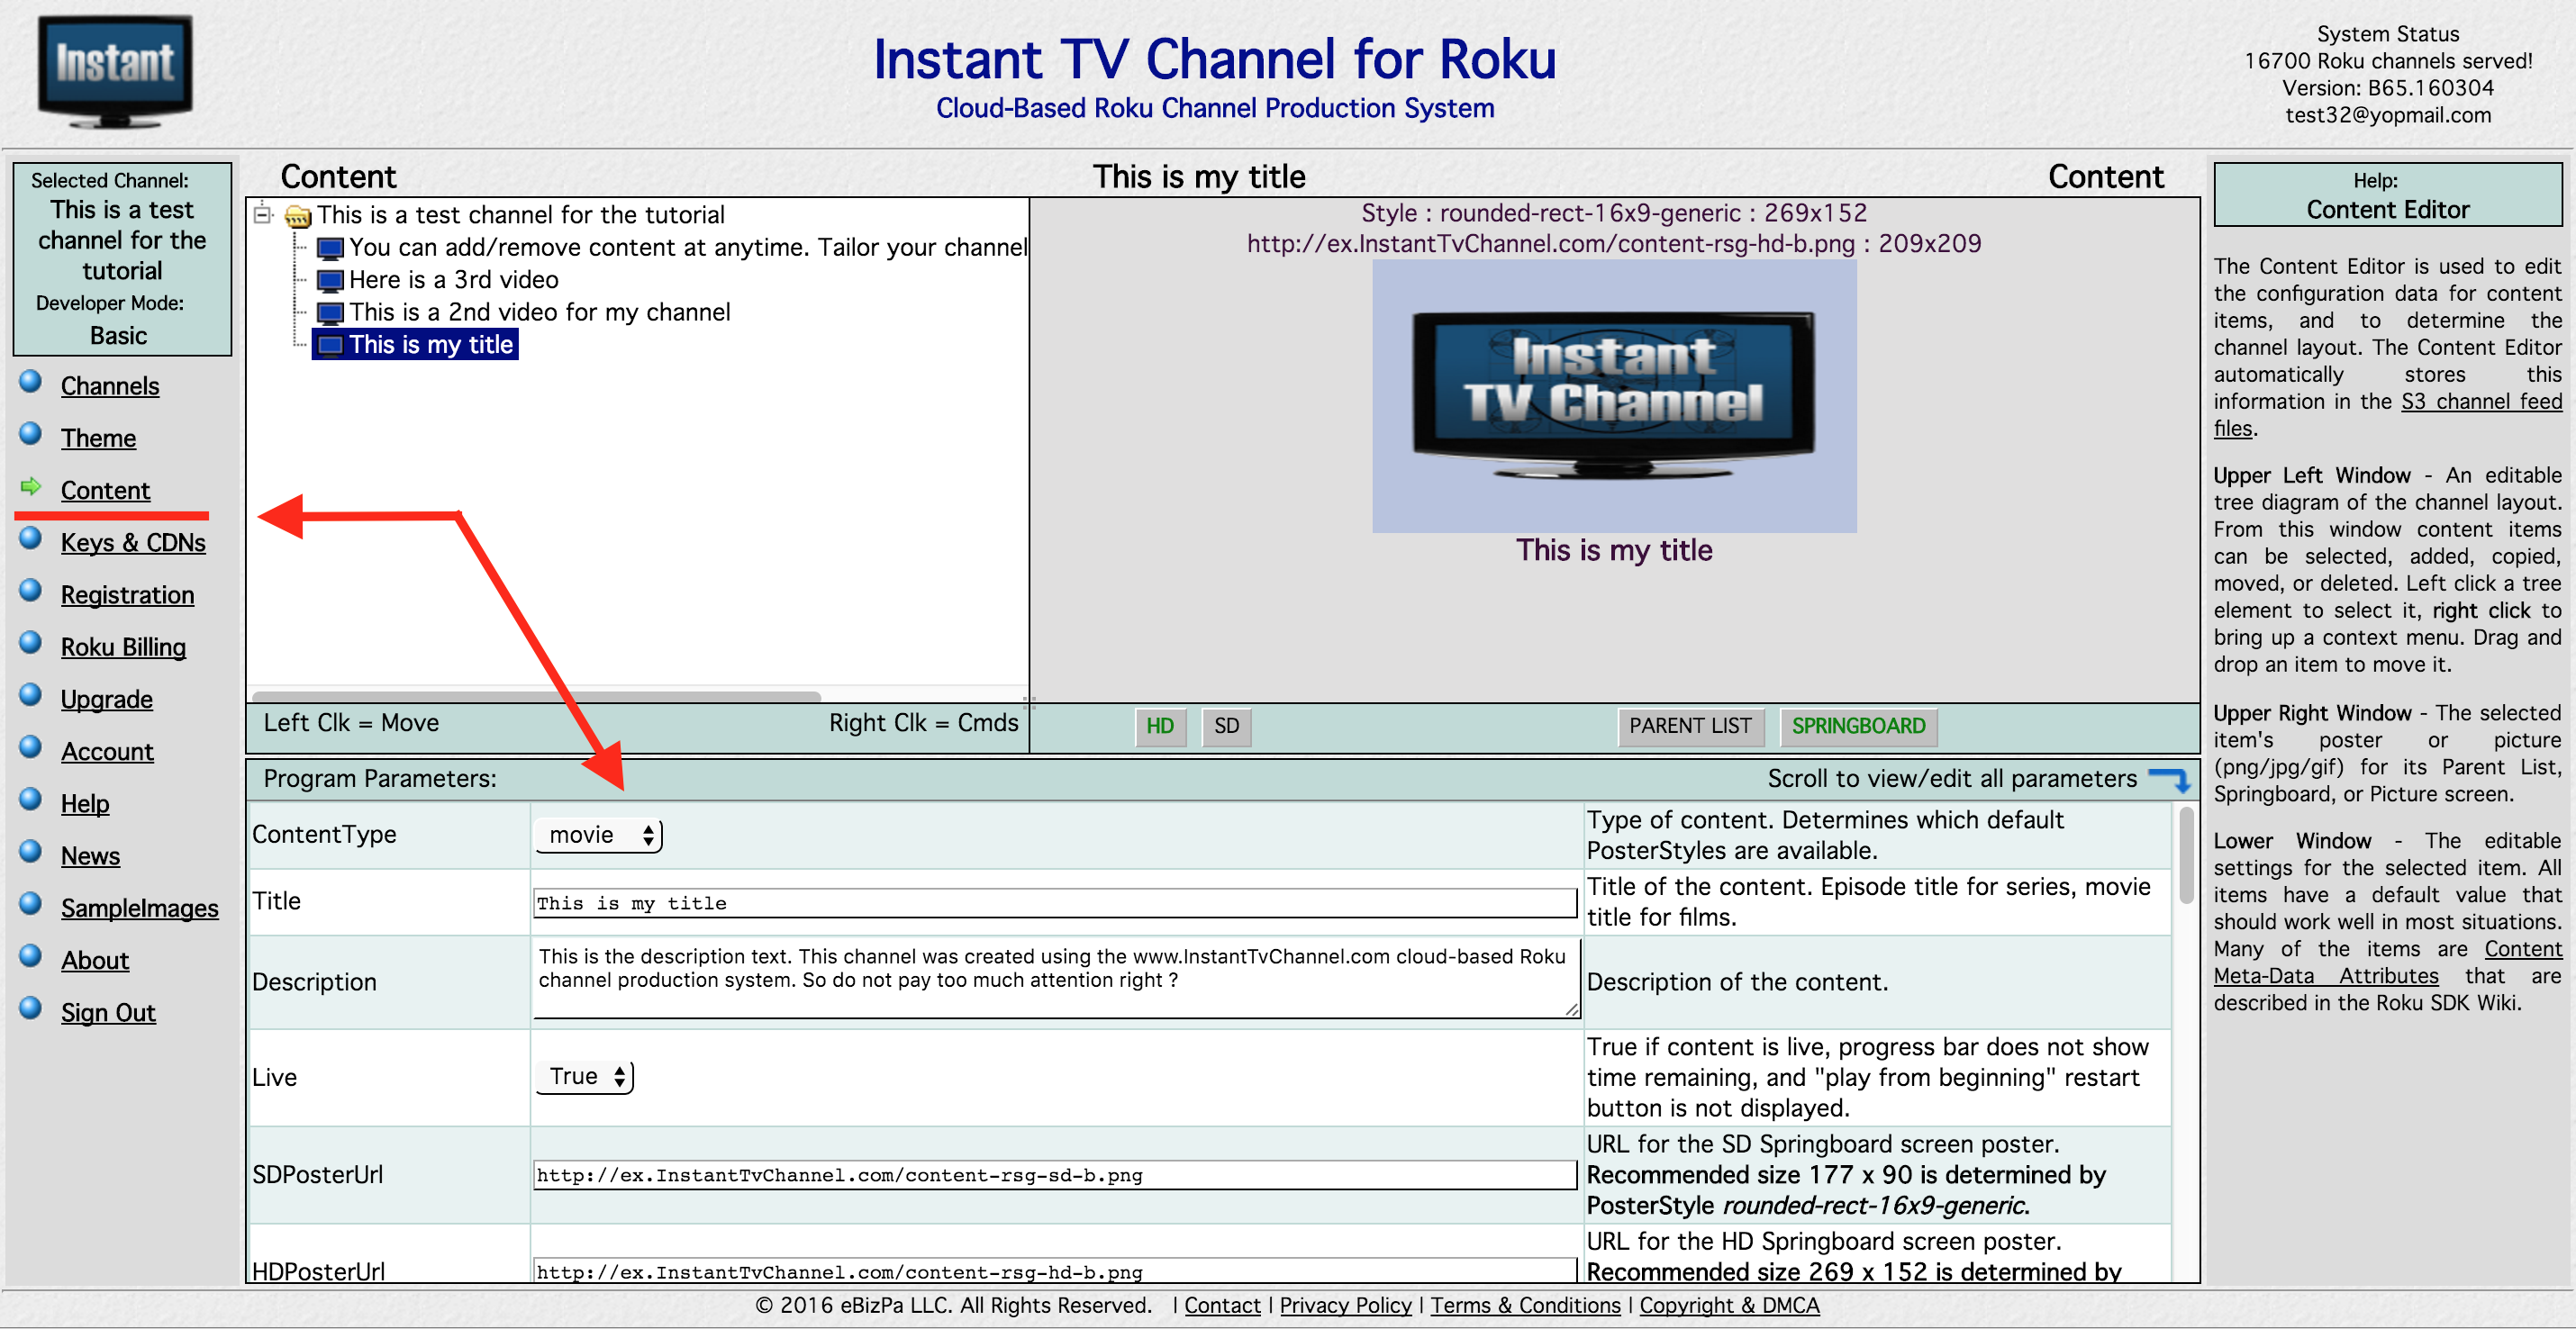
In this section, you will choose what content you will broadcast on your ROKU Channel. By default, only 1 video is already showing. You can “Right Click” on the name of your Channel (Top-Left part of the screen) and click on “New Video or Audio” to add more.
Once you have done that, you can now parameter each video by setting its Title, Description, Poster, Length, Feature Actors and Director, etc. (You can even protect you content with a Password we won’t use this feature on this tutorial in order to make it simple).
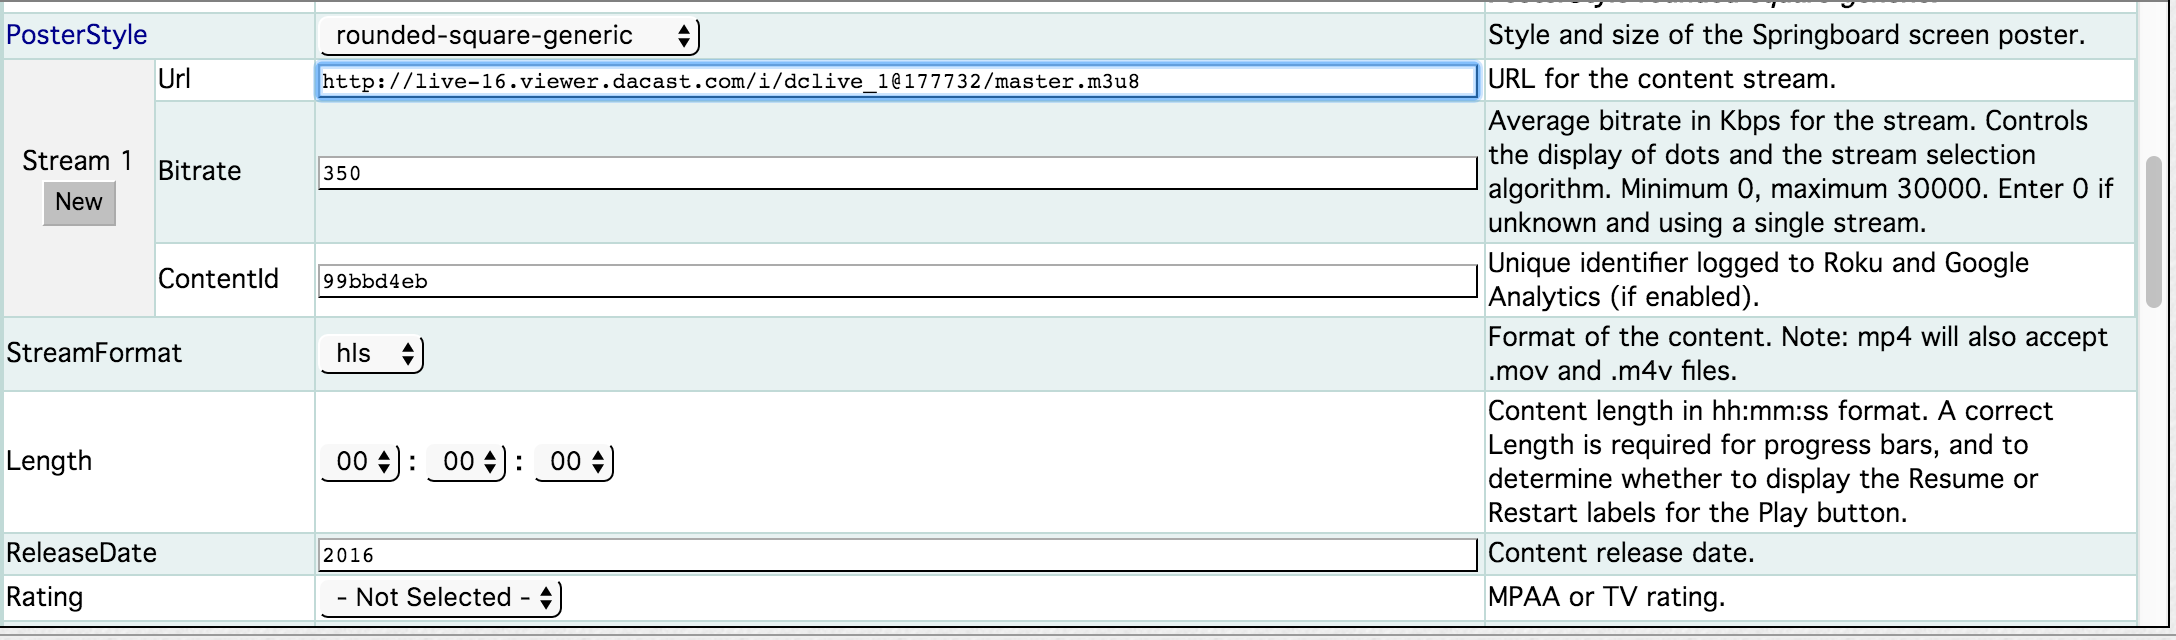
In the section “Stream 1” => URL, you must provide the M3U8 link to your content and set the StreamFormat to “hls”:
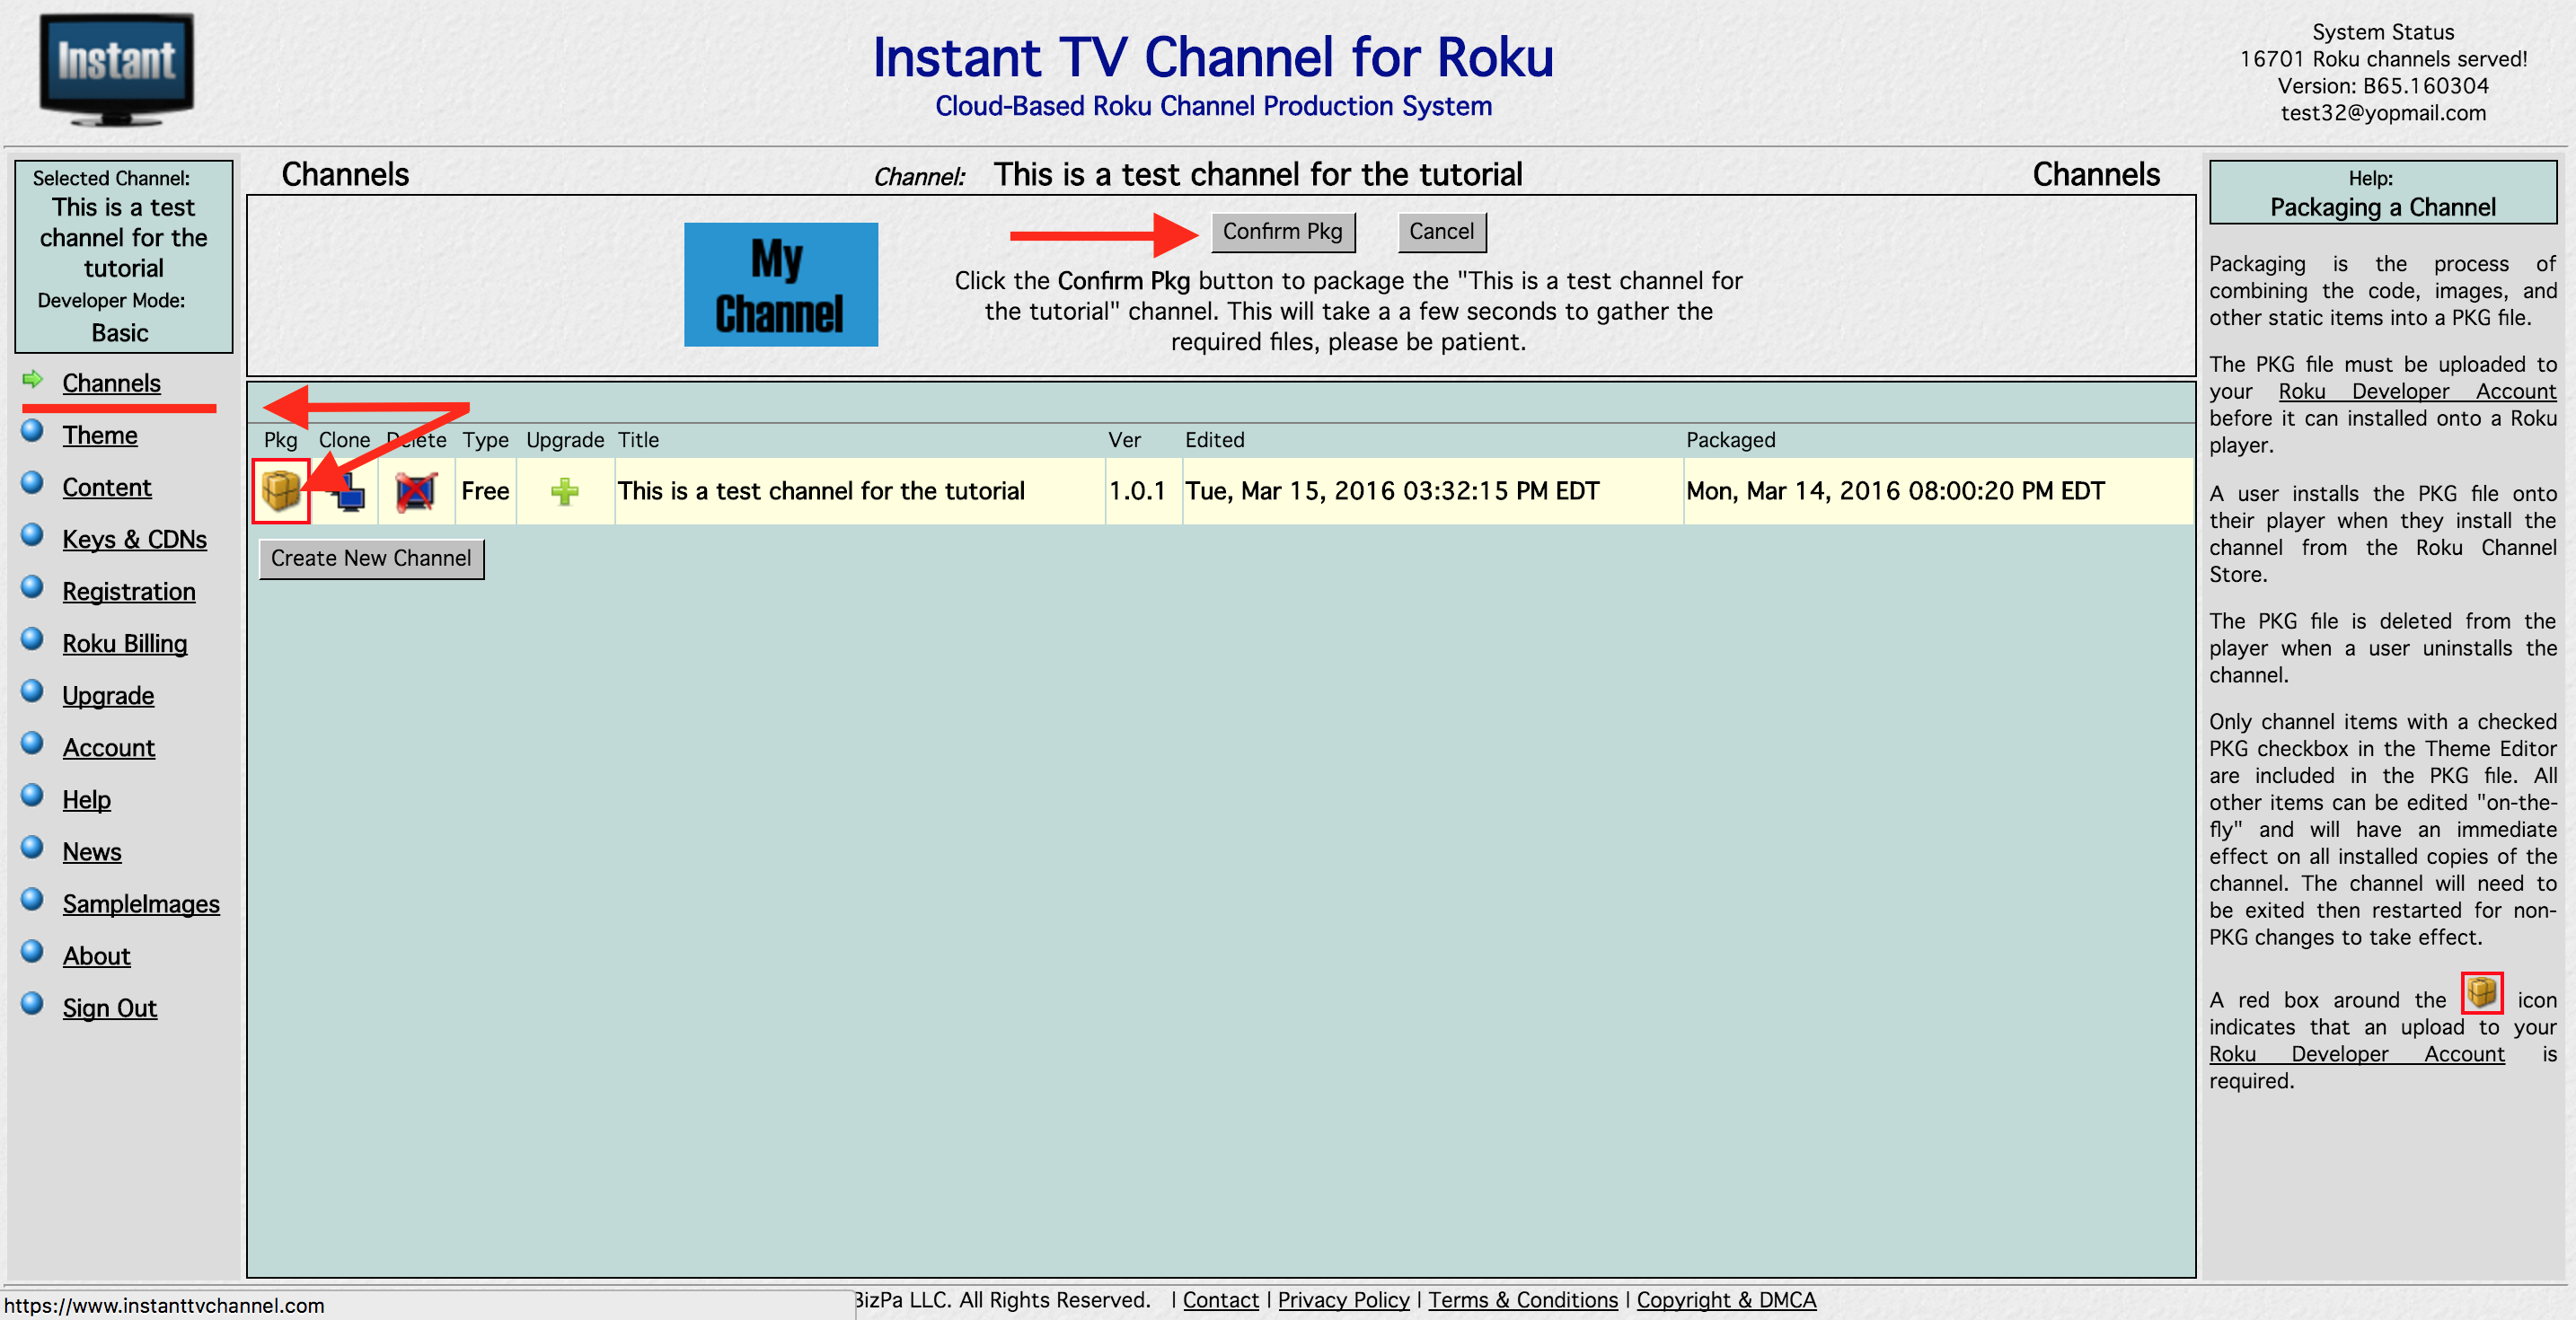
STEP 4: Create your PKG file and get ready to broadcast
Now that we are done setting up your channel, click back on “Channels” (Top-Left of the screen), then click on the “Package” icon designated by the red arrow on the picture below and finally click on “Confirm Pkg” on the Top-Center on the screen. Save the file somewhere on your computer that you can easily access.
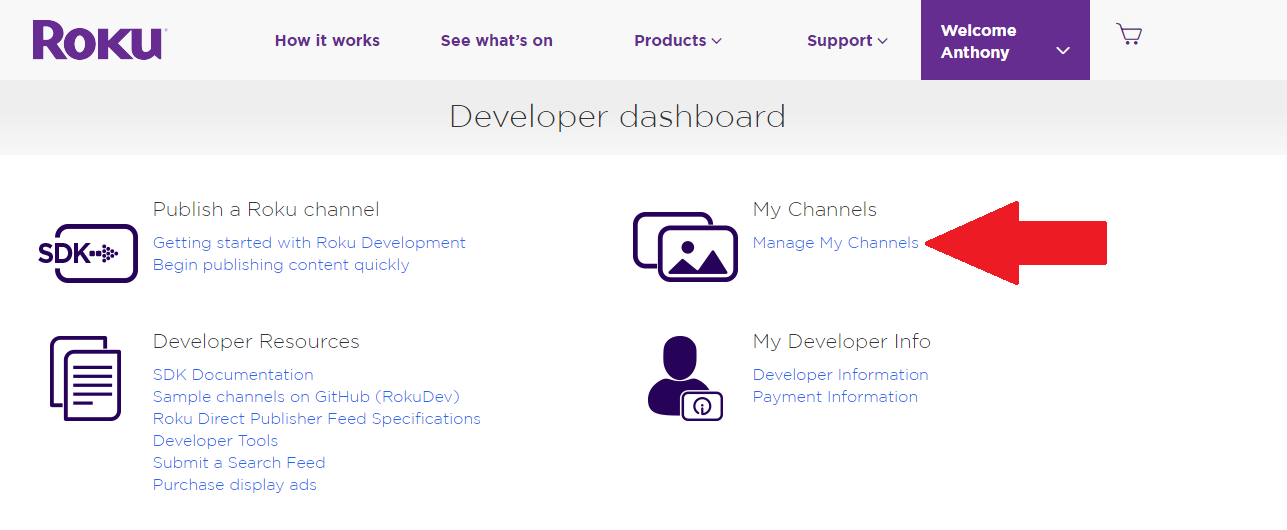
STEP 5: Go to your Dev account on ROKU
Login to your dev account at https://developer.roku.com/home. Then, display the different sections of your account by clicking on the arrow next to your name and select “Developer Site”. It will redirect you to the page below. Click on “Manage My Channels”.
Then click on “Add Channel”.
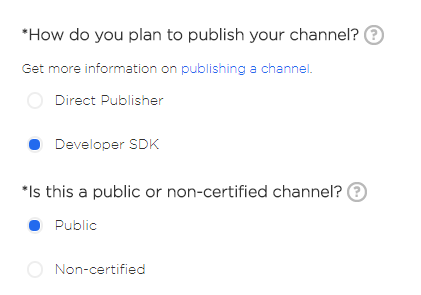
Select “Developer SDK” and “Non certified” as shown below:
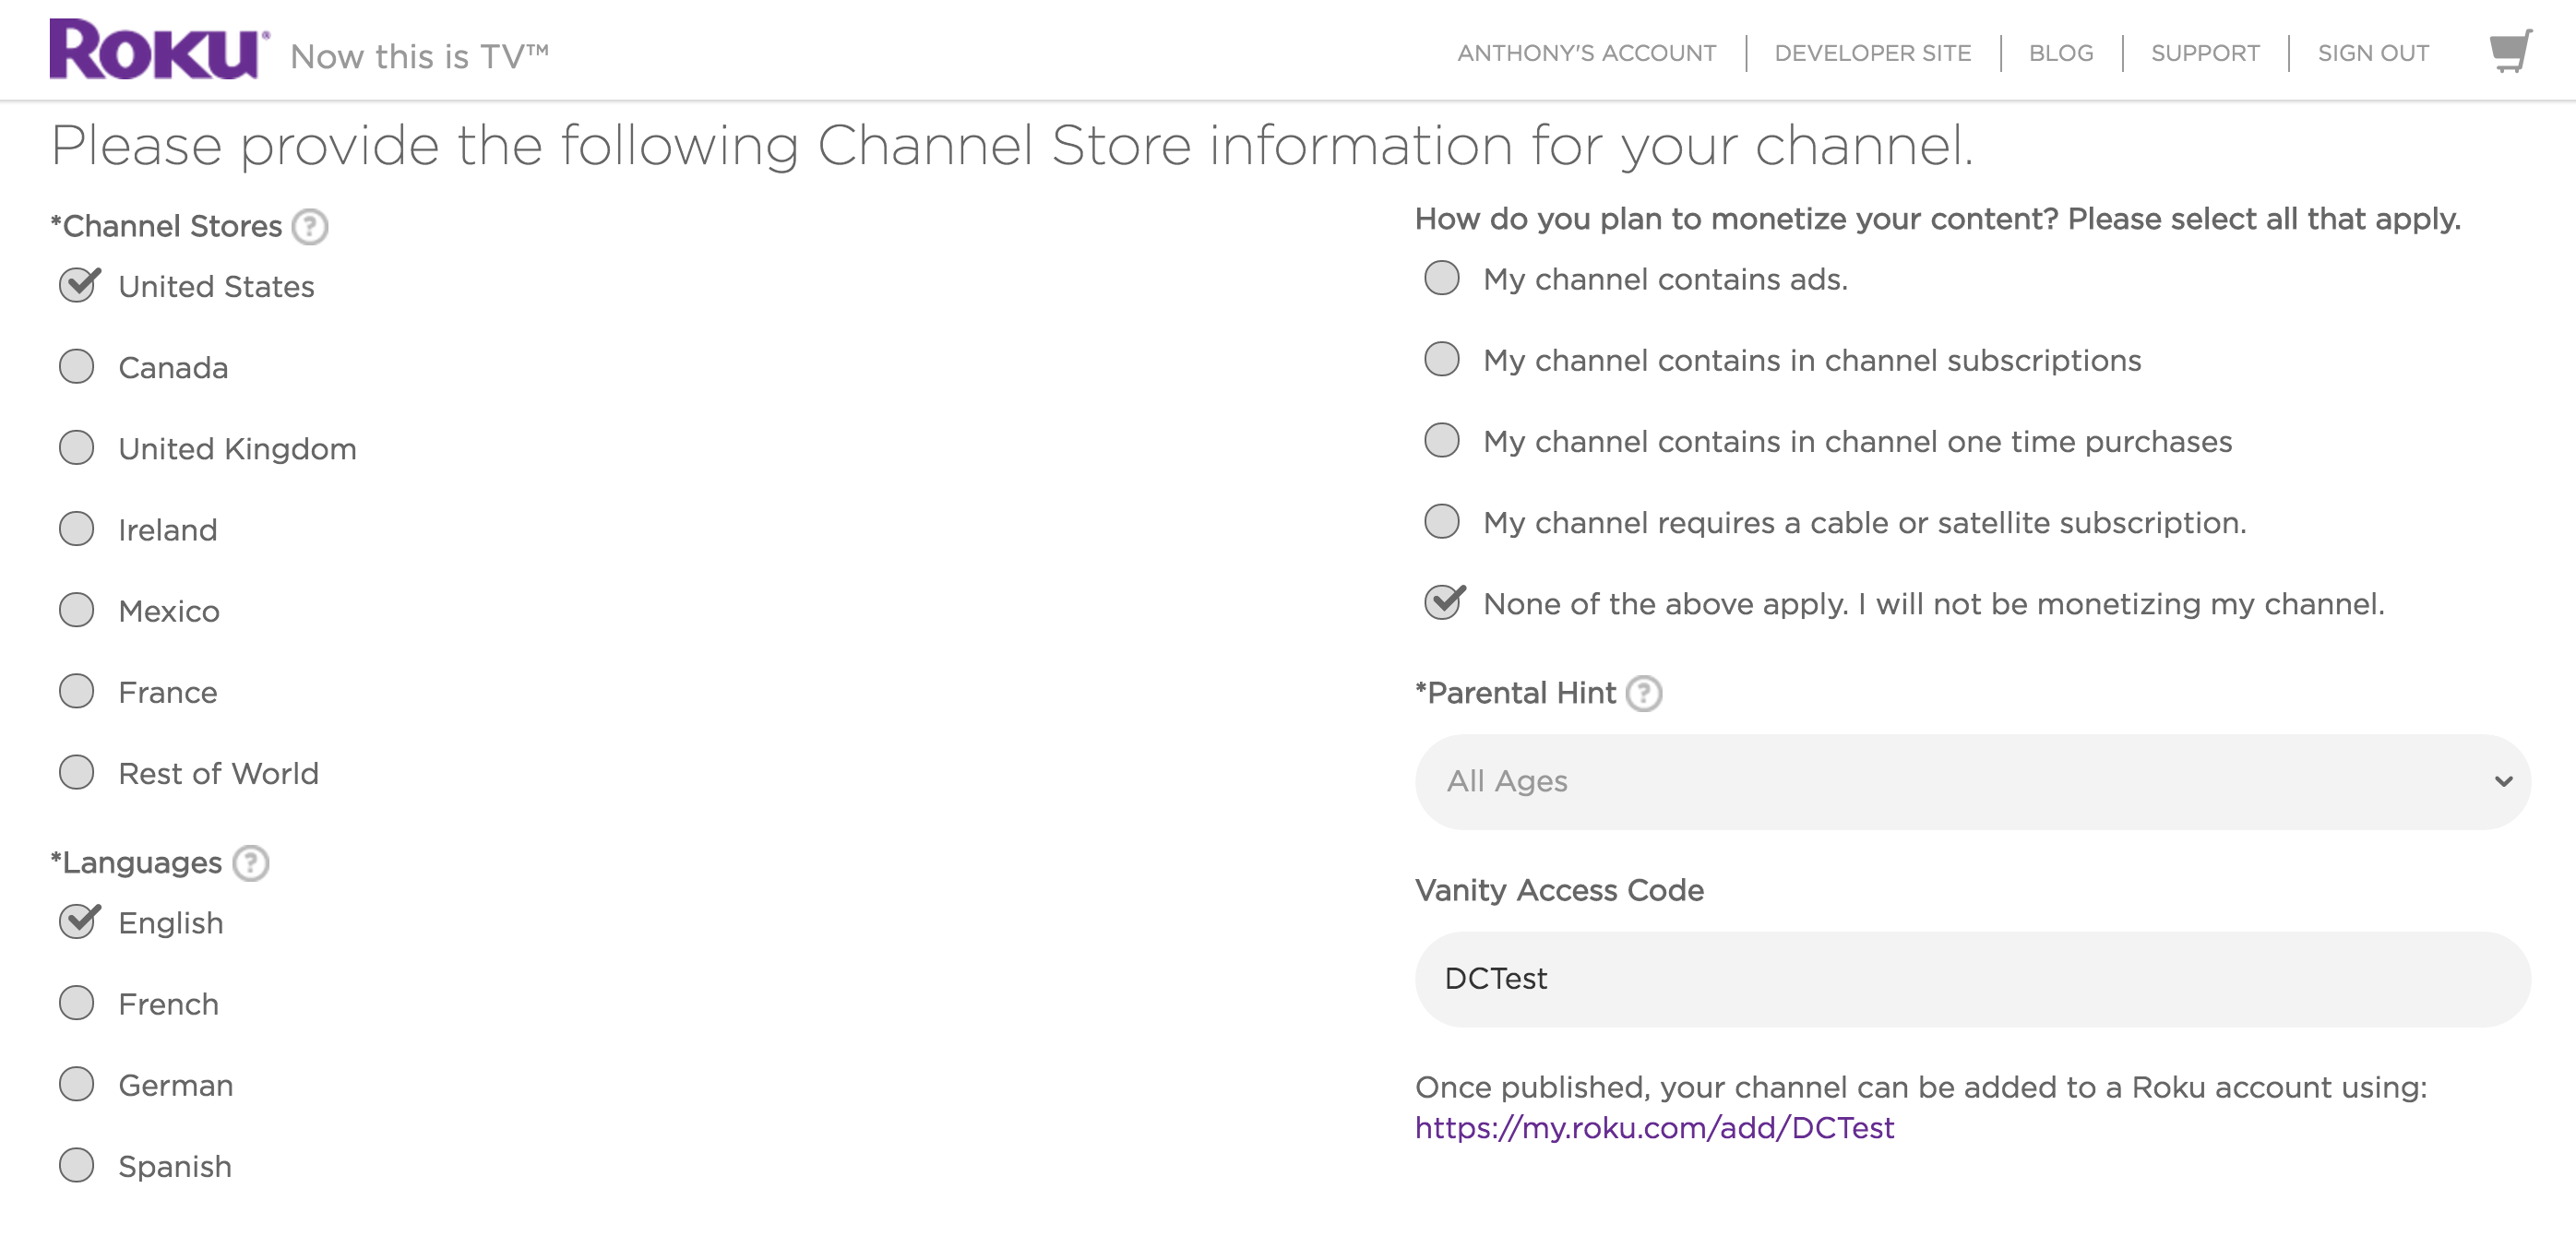
You can now select the desired features for your channel and select the Language:
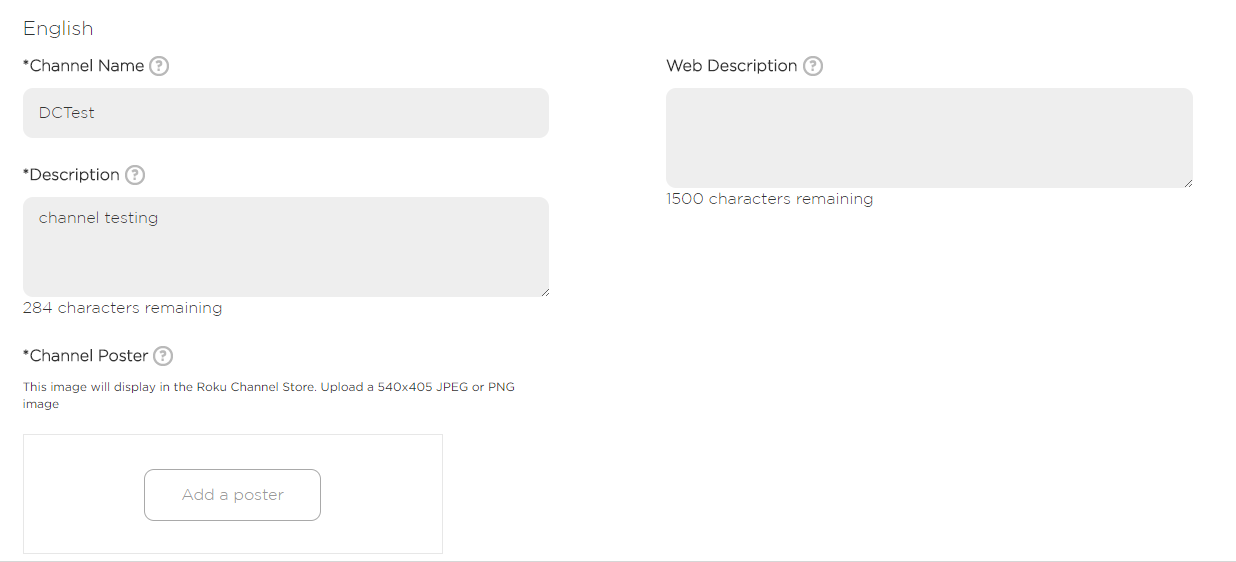
 And you can also Name your channel, provide a short description of its content and add a poster that will be displayed in the Roku Channel Store:
You will also have to enter some contact information in case there is an issue with your Roku TV Channel.
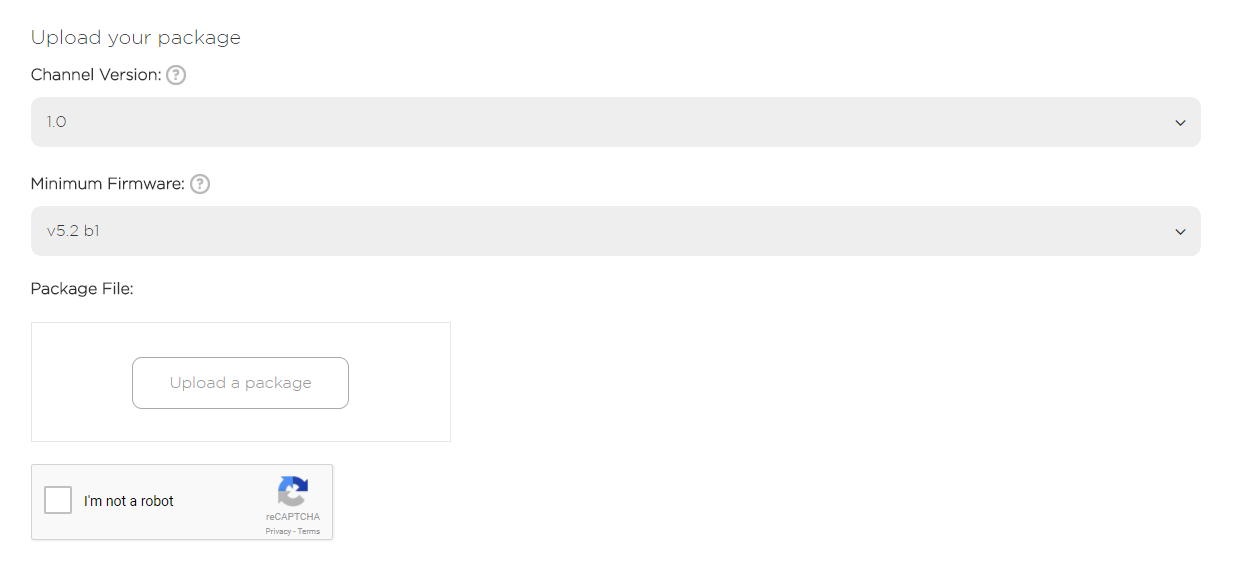
Once you’ve entered all the necessary information, the final step before submitting your channel is to upload the PKG file that you created earlier on InstantTVChannel.
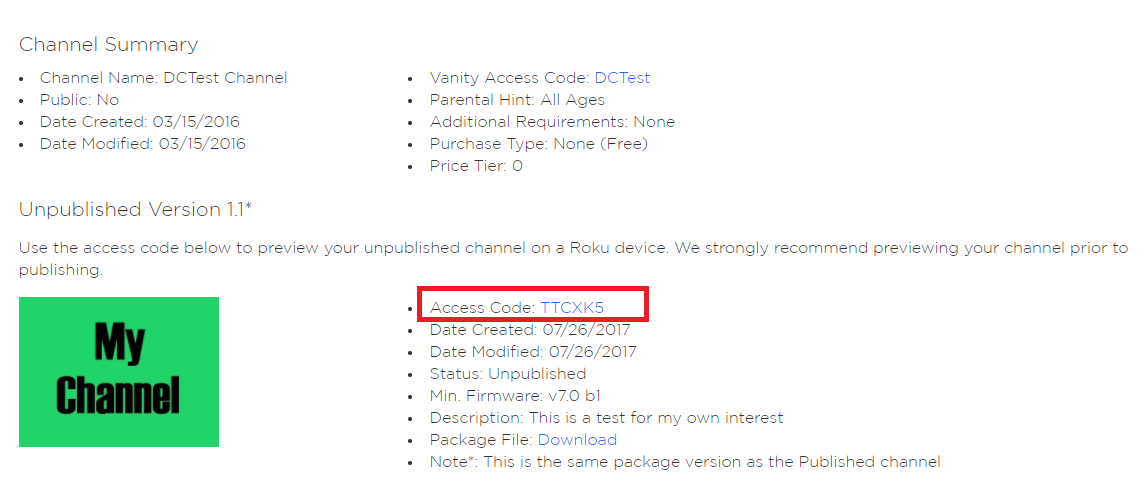
Once you’ve uploaded your package, you will get the following window with a preview of your channel information so you can review and submit your channel for publication. Please take note of the “Access Code” highlighted below:
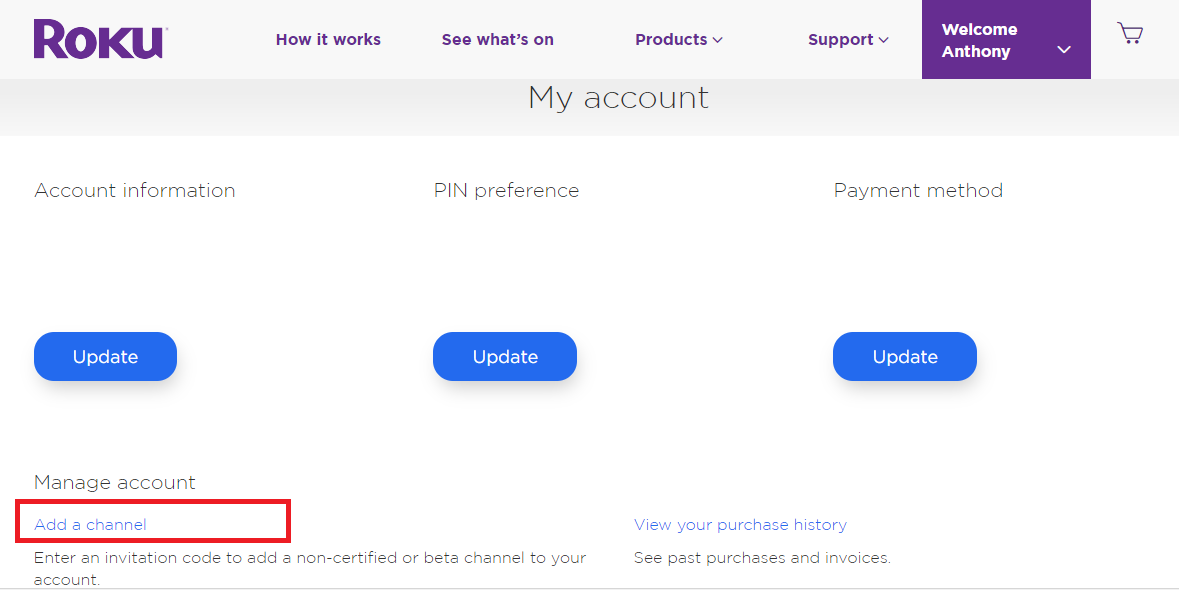
The final step is to go under “My Account” and click on “Add a channel” as shown below:
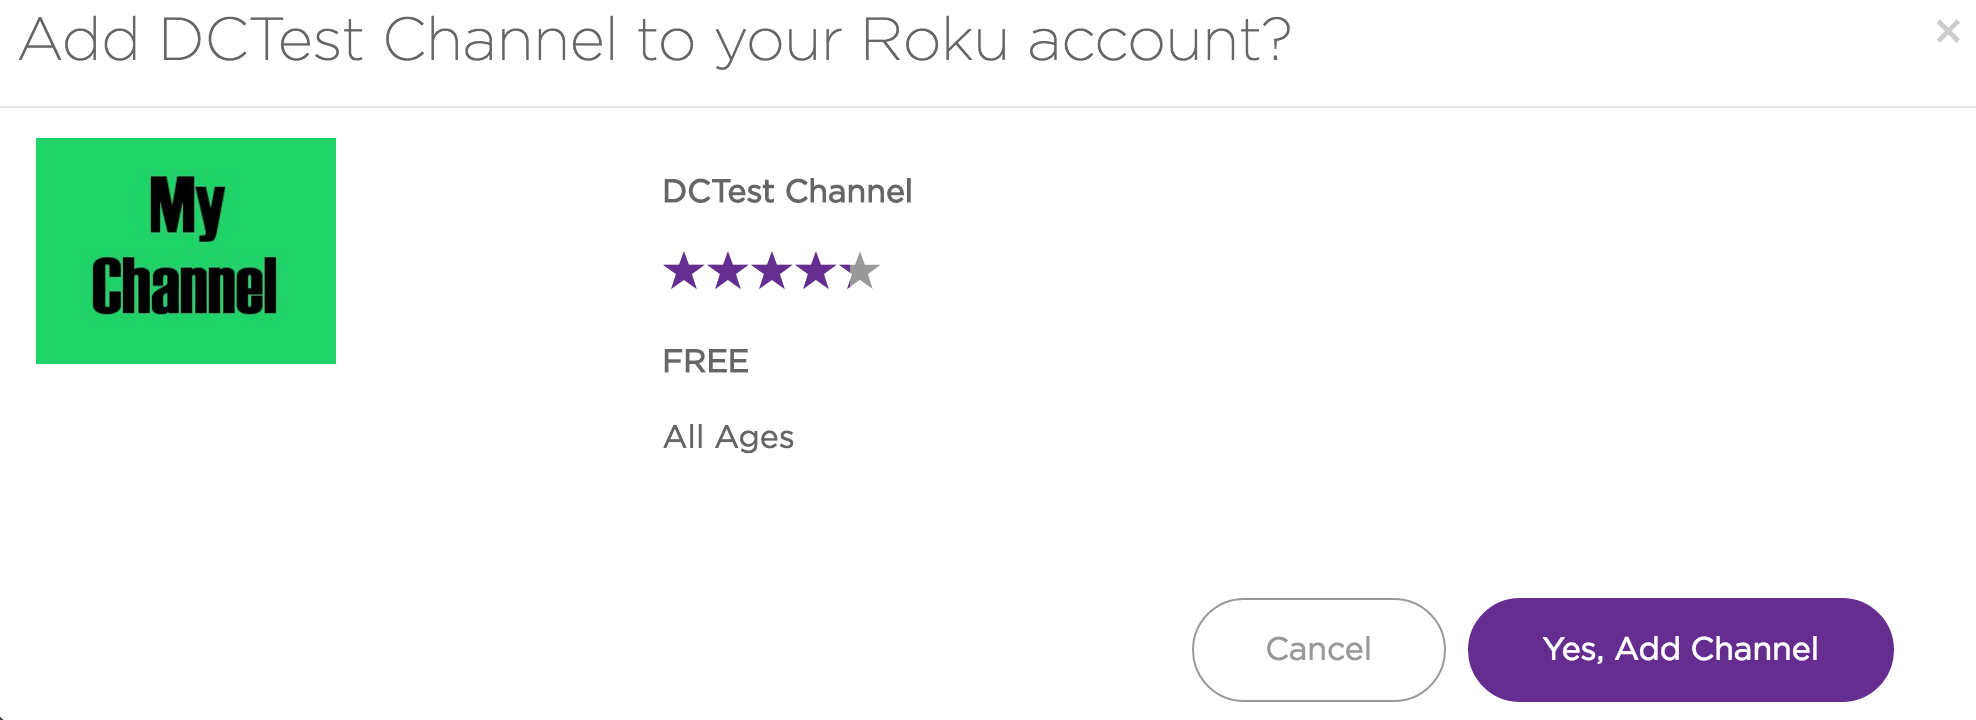
And enter the code you noted earlier:

A message will confirm that you successfully added you Channel:

STEP 6: Access your content on your ROKU device and verify that it works well
We are now almost done setting up a ROKU channel. We created the App and parameterized the Channel. It is now time to test it.
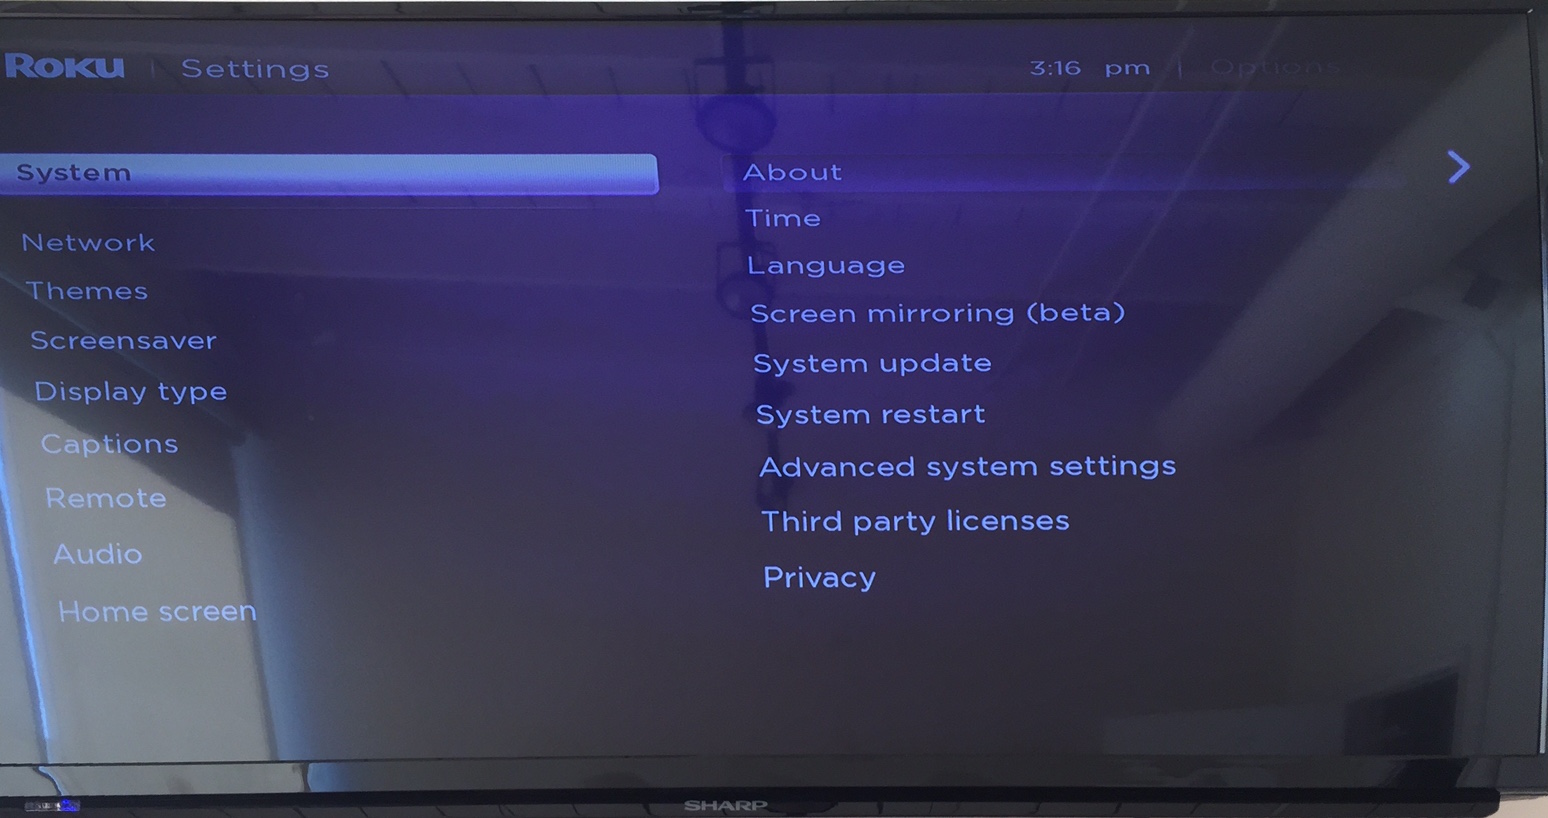
Go to your ROKU device and turn it ON. Then go to “Settings” => “System” => “System Update”:

This will allow your ROKU box to upload the App on its system.
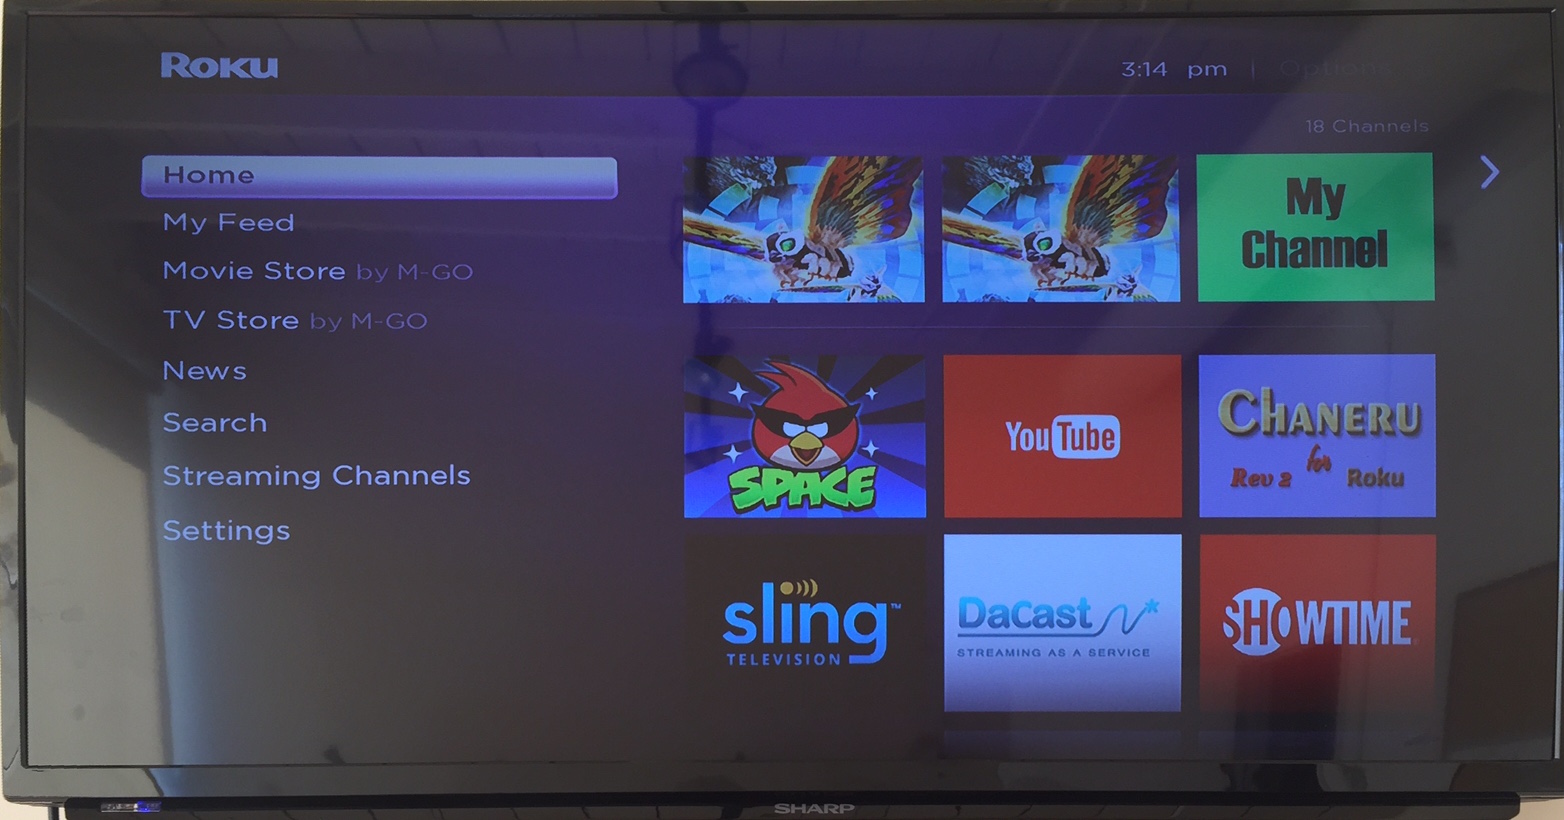
You can now access your Channel. It is located in the “Home” section, at the very bottom of your Channels list:
You are now all set. We hope you enjoyed this ROKU Walkthrough. For more tutorials about Streaming and VOD, please come visit our dedicated page.
New to Dacast and ready to give our platform a try? Click the button below to sign up for our 14-day free trial (no credit card required) and test out all our features for yourself. And for regular tips and exclusive offers, you can also join our LinkedIn group.
Happy streaming!
Nota aos nossos leitores
: Actualizámos este tutorial com informações actualizadas a partir de 2018.
Este passo a passo do ROKU explica como configurar um canal ROKU ao vivo e começar a transmitir usando o Dacast. Precisa de ajuda com as noções básicas de transmissão em direto (ou seja, configuração de câmaras e codificadores)? Consulte este guia.
Neste tutorial, vamos mostrar-lhe como criar o seu próprio canal privado no ROKU, passo a passo.
Para começar, é necessário o seguinte
- A sua conta Dacast
- Uma conta InstantTVChannel (crie uma gratuitamente aqui).
- Uma conta ROKU (crie uma gratuitamente aqui).
PASSO 1: Crie seu canal no InstantTVChannel
Primeiro, inicie sessão na conta que acabou de criar em www.instanttvchannel.com. A página principal deve ter o seguinte aspeto:
Clique em “Channels” (Canais) na parte superior esquerda do ecrã e, em seguida, em “Create New channel” (Criar novo canal). Aparecerá uma CAIXA de informação na parte superior central da página. Certifique-se de que selecciona “Classic” (Clássico) para o tipo de canal e prima o botão “Confirm button” (Confirmar).
PASSO 2: Escolha e edite o seu tema
Pode agora clicar em “Tema” na parte superior esquerda do ecrã. Nesta secção, pode escolher um título e um subtítulo para o seu conteúdo, vários ícones (para se adaptar a todos os tipos de ecrã, pode carregar imagens SD e HD. A imagem apresentada aos seus utilizadores dependerá do hardware que têm em casa).
As definições do tema têm o seguinte aspeto:
E as Definições de imagem/ícones têm o seguinte aspeto. Utilize sempre a relação de imagem solicitada se pretender que a imagem seja apresentada:
Também tem a possibilidade de personalizar o seu Texto e Estilo, definindo todos os pormenores.
Para cada parâmetro, é dada uma pequena descrição do que faz à direita. Também pode consultar a janela “Ajuda”, situada na parte direita do ecrã, para obter mais informações.
PASSO 3: Introduza as informações de conteúdo do seu canal
Agora que criámos o nosso canal e definimos a sua descrição, ícones e estilo, está na altura de selecionar o conteúdo que irá transmitir na sua aplicação ROKU (a ROKU chama-lhe uma aplicação). Clique em “Conteúdo” na parte esquerda do seu ecrã:
Nesta secção, escolherá o conteúdo que irá transmitir no seu Canal ROKU. Por defeito, apenas um vídeo já está a ser apresentado. Pode “clicar com o botão direito do rato” no nome do seu canal (parte superior esquerda do ecrã) e clicar em “Novo vídeo ou áudio” para adicionar mais.
Uma vez feito isso, pode agora parametrizar cada vídeo definindo o seu título, descrição, cartaz, duração, actores e realizador, etc. (Pode até proteger o seu conteúdo com uma palavra-passe, mas não utilizaremos esta funcionalidade neste tutorial para simplificar).
Na secção “Stream 1” => URL, deve fornecer a ligação M3U8 para o seu conteúdo e definir o StreamFormat para “hls”:
PASSO 4: Crie o seu ficheiro PKG e prepare-se para transmitir
Agora que acabámos de configurar o seu canal, clique novamente em “Channels” (canto superior esquerdo do ecrã), depois clique no ícone “Package” (Pacote) designado pela seta vermelha na imagem abaixo e, finalmente, clique em “Confirm Pkg” (Confirmar Pacote) no canto superior central do ecrã. Guarde o ficheiro num local do seu computador a que possa aceder facilmente.
PASSO 5: Aceda à sua conta Dev no ROKU
Inicie sessão na sua conta de desenvolvimento em https://developer.roku.com/home. Em seguida, visualize as diferentes secções da sua conta clicando na seta junto ao seu nome e seleccione “Developer Site”. Será redireccionado para a página abaixo. Clique em “Gerir os meus canais”.
Em seguida, clique em “Adicionar canal”.
Seleccione “Developer SDK” e “Non certified”, como indicado abaixo:
Pode agora selecionar as características desejadas para o seu canal e selecionar o Idioma:
Também pode dar um nome ao seu canal, fornecer uma breve descrição do seu conteúdo e adicionar um poster que será apresentado na Roku Channel Store:
Terá também de introduzir algumas informações de contacto, caso haja um problema com o seu canal de televisão Roku.
Depois de ter introduzido todas as informações necessárias, o último passo antes de submeter o seu canal é carregar o ficheiro PKG que criou anteriormente no InstantTVChannel.
Depois de carregar o seu pacote, aparece a seguinte janela com uma pré-visualização das informações do seu canal, para que possa rever e submeter o seu canal para publicação. Tome nota do “Código de acesso” destacado abaixo:
O passo final é ir a “A minha conta” e clicar em “Adicionar um canal”, como indicado abaixo:
E introduza o código que anotou anteriormente:
Uma mensagem confirmará que o canal foi adicionado com êxito:
PASSO 6: Aceda ao seu conteúdo no seu dispositivo ROKU e verifique se funciona bem
Estamos quase a terminar a configuração de um canal ROKU. Criámos a aplicação e parametrizámos o canal. Agora é altura de o testar.
Aceda ao seu dispositivo ROKU e ligue-o. Em seguida, vá a “Definições” => “Sistema” => “Atualização do sistema”:
Isto permitirá que a sua box ROKU carregue a aplicação no seu sistema.
Já pode aceder ao seu Canal. Está localizado na secção “Página inicial”, na parte inferior da sua lista de canais:
Agora está tudo pronto. Esperamos que tenhas gostado deste ROKU Walkthrough. Para mais tutoriais sobre Streaming e VOD, visite a nossa página dedicada.
É novo no Dacast e está pronto para experimentar a nossa plataforma? Clique no botão abaixo para se inscrever na nossa avaliação gratuita de 14 dias (não é necessário cartão de crédito) e testar todas as nossas funcionalidades por si próprio. E para obter dicas regulares e ofertas exclusivas, pode também juntar-se ao nosso grupo no LinkedIn.
Comece a trabalhar gratuitamente
Boa transmissão!
Nota a nuestros lectores
: Hemos actualizado este tutorial con información actualizada a 2018.
Este tutorial de ROKU te enseñará cómo configurar un canal ROKU en directo y empezar a emitir usando Dacast. ¿Necesitas ayuda con los conceptos básicos de la retransmisión en directo (por ejemplo, la configuración de cámaras y codificadores)? Consulta esta guía.
En este tutorial, te mostraremos cómo crear tu propio canal privado en ROKU, paso a paso.
Para empezar, necesitarás lo siguiente:
- Su cuenta Dacast
- Una cuenta InstantTVChannel (cree una gratuitamente aquí.)
- Una cuenta ROKU (crea una gratis aquí.)
PASO 1: Cree su canal en InstantTVChannel
En primer lugar, accede a la cuenta que acabas de crear en www.instanttvchannel.com. La página principal debería tener este aspecto:
Haga clic en “Canales” en la parte superior izquierda de la pantalla y luego en “Crear nuevo canal”. Aparecerá un recuadro de información en la parte superior central de la página. Asegúrese de seleccionar “Clásico” para el tipo de canal y pulse el botón “Confirmar”.
PASO 2: Elija y edite su tema
Ahora puede hacer clic en “Tema” en la parte superior izquierda de la pantalla. En esta sección, podrás elegir un Título y un Subtítulo para tu contenido, varios Iconos (con el fin de adaptarse a todos los tipos de pantalla, puedes subir tanto imagen SD como HD. La imagen que se muestre a tus usuarios dependerá del hardware que tengan en casa).
La configuración del tema tiene este aspecto:
Y los Ajustes de Imagen/Iconos tienen este aspecto. Utilice la relación de imagen solicitada cada vez si desea que se muestre la imagen:
También tienes la posibilidad de personalizar tu Texto y Estilo configurando todos los detalles.
A la derecha se ofrece una pequeña descripción de cada parámetro. También puede dirigirse a la ventana “Ayuda”, situada en la parte derecha de la pantalla, para obtener más información.
PASO 3: Introduzca la información sobre el contenido de su canal
Ahora que hemos creado nuestro canal y configurado su descripción, iconos y estilo, es el momento de seleccionar el contenido que vas a emitir en tu ROKU App (ROKU lo llama App). Haga clic en “Contenido” en la parte izquierda de la pantalla:
En esta sección elegirás qué contenidos vas a emitir en tu Canal ROKU. Por defecto, sólo se muestra 1 vídeo. Puedes hacer “clic con el botón derecho” en el nombre de tu canal (parte superior izquierda de la pantalla) y hacer clic en “Nuevo vídeo o audio” para añadir más.
Una vez hecho esto, puede parametrizar cada vídeo estableciendo su Título, Descripción, Cartel, Duración, Actores y Director, etc. (Incluso puede proteger su contenido con una Contraseña, no utilizaremos esta función en este tutorial para hacerlo más sencillo).
En la sección “Stream 1” => URL, debe proporcionar el enlace M3U8 a su contenido y establecer el StreamFormat en “hls”:
PASO 4: Crea tu archivo PKG y prepárate para emitir
Ahora que hemos terminado de configurar su canal, haga clic de nuevo en “Canales” (parte superior izquierda de la pantalla), luego haga clic en el icono “Paquete” designado por la flecha roja en la imagen de abajo y, finalmente, haga clic en “Confirmar Pkg” en la parte superior central de la pantalla. Guarde el archivo en algún lugar de su ordenador al que pueda acceder fácilmente.
PASO 5: Ve a tu cuenta Dev en ROKU
Accede a tu cuenta de desarrollador en https://developer.roku.com/home. A continuación, despliegue las distintas secciones de su cuenta haciendo clic en la flecha situada junto a su nombre y seleccione “Sitio de desarrollador”. Le redirigirá a la página siguiente. Haz clic en “Gestionar mis canales”.
A continuación, haga clic en “Añadir canal”.
Seleccione “Developer SDK” y “Non certified” como se muestra a continuación:
Ahora puede seleccionar las características deseadas para su canal y seleccionar el Idioma:
Además, puedes dar un nombre a tu canal, proporcionar una breve descripción de su contenido y añadir un cartel que se mostrará en la Tienda de canales Roku:
También tendrás que introducir algunos datos de contacto por si surge algún problema con tu Canal Roku TV.
Una vez que haya introducido toda la información necesaria, el último paso antes de enviar su canal es cargar el archivo PKG que creó anteriormente en InstantTVChannel.
Una vez que hayas cargado tu paquete, aparecerá la siguiente ventana con una vista previa de la información de tu canal para que puedas revisarlo y enviarlo para su publicación. Por favor, tome nota del “Código de acceso” resaltado más abajo:
El último paso es ir a “Mi cuenta” y hacer clic en “Añadir un canal”, como se muestra a continuación:
E introduce el código que anotaste antes:
Un mensaje le confirmará que ha añadido correctamente su canal:
PASO 6: Accede a tu contenido en tu dispositivo ROKU y comprueba que funciona bien
Ya casi hemos terminado de configurar un canal ROKU. Creamos la App y parametrizamos el Canal. Ha llegado el momento de probarlo.
Ve a tu dispositivo ROKU y enciéndelo. A continuación, vaya a “Configuración” => “Sistema” => “Actualización del sistema”:
Esto permitirá a tu ROKU box cargar la App en su sistema.
Ya puedes acceder a tu Canal. Se encuentra en la sección “Inicio”, al final de la lista de canales:
Ya está todo listo. Esperamos que te haya gustado este tutorial de ROKU. Para más tutoriales sobre Streaming y VOD, visite nuestra página dedicada.
¿Eres nuevo en Dacast y quieres probar nuestra plataforma? Haz clic en el botón de abajo para registrarte en nuestra prueba gratuita de 14 días (sin tarjeta de crédito) y probar todas nuestras funciones por ti mismo. Y para recibir consejos periódicos y ofertas exclusivas, también puede unirse a nuestro grupo de LinkedIn.
¡Feliz streaming!