


How To Manage Team Members on Your Dacast Account?

With the Dacast Team Members feature, you can invite new users (team members or partners for example) to your Dacast account and manage the permissions you want to grant them. So that multiple people can collaborate and share the same account.
In this article, we will explain the number of team members/seats available in your account, the different roles available with this feature, how to add new teammates to your account, and where to find the feature.
How many seats do I have in my account?
Based on your Dacast plan, you will have different numbers of team member seats per default:
- Free trial: 1 seat
- Starter plan: 1 seat
- Event plan: 1 seat
- Scale plan: 3 seats
- Custom plan: 5 seats
Additional seats can be purchased for $10 per user per month.
What are the different roles?
In total, there are 5 different roles, giving each user different permissions:
- Owner: the account owner has full access and can do anything in the account. If there is only one user, he will be the Owner by default. The Owner is the primary contact for the account.
- Admin: can do anything except billing and paywall withdrawals. The Admin has identical permissions to the Owner, except for finance privileges. Besides, an account can have multiple Admins, but only one Owner.
- Editor: the editor can create, edit and delete content from every user.
- Creator: can create, edit and delete their own content but cannot access content owned by other users.
- Custom: as an “Owner” you will be able to create specific roles with specific access, for your multi-users.
For example, an event company sharing its Dacast account with multiple production agencies can decide that each agency can only access its own video content and not the others.
How to add new users to your account?
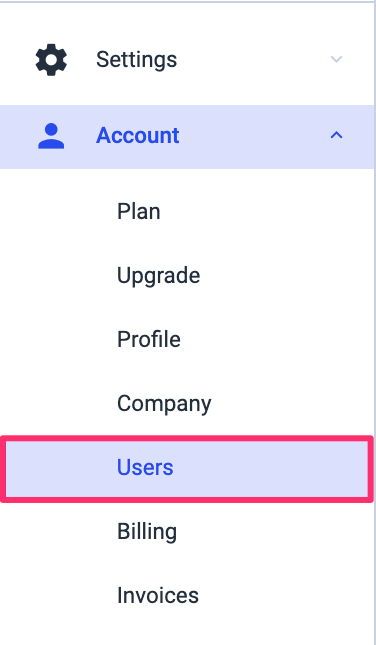
1) In your Dacast account, click in “Account” in your Menu and then “Users” as shown below:
2 ) When clicking on Add User, you will see the following pop-up window:

Enter the user’s email you want to add and select the role you want for this user.

By enabling the Admin role, the user will be able to do anything except billing and paywall withdrawals.
Note that you can always review the permissions later on, as shown in the following steps.
Once you are ready to invite a new user, click on Add to the team.
3) The new invited appears in the list as shown below:

You can always see your different users, their roles, and if they have accepted your invite in the Users section.
Note that if someone has been invited but has not accepted your invite yet, the status will remain “Invited”, and the name and the role won’t appear.
Display videos uploaded by a specific user with filters
We have displayed a new column in the video list that displays which user uploaded a video, hovering over the initials icon, the full name will be displayed. A new ‘users’ section is available from the filter panel, allowing users to select which users they’d like to see. This is available for owner and admin roles.
To do this you will need to:
Go to the VOD section of your account and click on Filter.

Choose the User you want to see, and click the “Apply” button at the end of the panel and see the results.

You should notice a new column on your VOD section called “User”.

How to buy more team member seats for your account?
In case you need to add more team members to your account, you can always purchase additional seats for $10 per user per month.
To do so, click on “Add Seats” (available under Account > Users) as shown below:

The following window should pop up:

You will be able to add seats by clicking on the + button under Add Seats, and then by clicking Next, you will be redirected to the payment confirmation.

Once you are ready with the payment details, click on Purchase, and the new number of seats will be automatically added to your account.
How to manage my users?
As the Owner of the account, you will have the possibility to:
- Edit a user access
- Delete and transfer a user’s content
- Resend an invite
- Change the account Owner
- Set different roles to Custom Users
A. Edit a user access
To change a user role/permissions, click on the three dots icon on the right side of the user access you want to modify, and then click on the Edit option as shown below:

The following window should pop up:

B. Delete a user access
Based on the user activity, you will see the following pop-up window (if the user has not created content). In this case, all you have to do is click on Delete to remove the user. In case the user you want to delete has created content, you will see the following pop-up window:

You will have 2 options: transfer to another user the content or delete the user and his content permanently.
C. Resend an invite
In case you’ve sent an invite to someone but he has not accepted yet, you can always resend an invite by clicking the Resend invite icon option as shown below:

Once you have completed the previous steps, you will see the following pop-up to inform you that the user invite has been resent:

D. Change account owner
In case you need to transfer your owner role to someone else, you can do so by clicking on Account, then Company.
To select the new account owner, click on the dropdown as shown below, then click on Change Owner to keep your selection:

Note that if you make someone else the Account Owner, only that person can transfer this role back to you.
NOTES
For restricted access users:
If you have restricted access to a Dacast account, but you also want to have your own Dacast account, you can create a new account. To do so, you will have to create your own Dacast account with a different email address than the one that has been used for the restricted access you’ve been given.
- Multiple accounts with a single email address:
This use case might be rare, but if you are part of different teams using different Dacast accounts and they added you with the same email address, you would have access to multiple accounts with the same email address.
In this case, you will be able to switch between your accounts as shown below:

To change from one account to another, you will only have to log out and log in again.
If you have any questions on how to upload a video, please contact us.
Not yet a Dacast user, and interested in trying Dacast risk-free for 14 days? Sign up today to get started.