


How to Live Stream a Zoom Meeting via Dacast

Zoom is a video conferencing service widely used by companies and organizations for remote meetings. In this tutorial, we will cover how to connect a Zoom meeting to Dacast. The benefit of Zoom live streaming via Dacast is the access to high video quality and stability offered by our streaming services.
Please note that this tutorial requires you to have a Zoom Pro, Business, Education or Enterprise account to access the “Custom Live Streaming Service” Zoom feature.
We strongly recommend that you test the stream before the beginning of the meeting to minimize any issues so that you can enjoy a seamless streaming experience.
Follow the steps below to learn how to live stream a Zoom meeting with Dacast!
Step 1: Create Your Dacast Live Stream
Log in to your Dacast account and click “Add +” on the left-side vertical menu, then click “Live stream”.
Enter a stream name, then select the type of stream.
Click “Create”:

Your live stream should now appear in your live stream list. You can manage the stream by clicking the “Edit” icon on the right side.
Step 2: Enable the “Live on Custom Live Streaming Service” Option on your Zoom Account
Log in to your Zoom Pro, Business, Education or Enterprise account. On the vertical menu to the left navigate to Admin.
Click “Settings.”

In the section Meeting click “In Meeting (Advanced)”

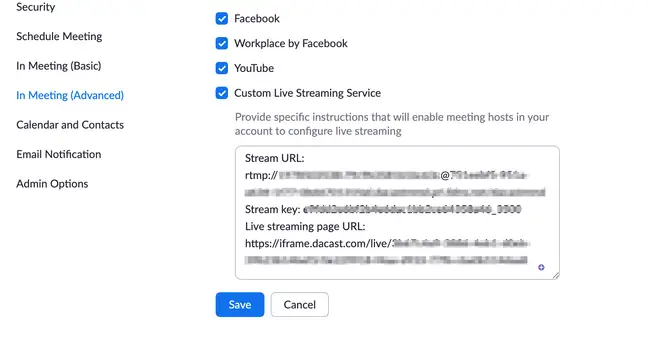
Turn on the option “Allow Live Streaming of Meetings,” and check the sub-option “Custom Live Streaming Service”:

Save the instructions so that the meeting organizer can configure the required settings when scheduling the meeting. You can find these settings in your Dacast account. Edit the live channel you want to use to stream the Zoom meeting. Under the “General” tab, click “Encoder Setup,” and use the copy icon to copy and paste the required values into your Zoom account:

Make sure to use the following format:
| Stream URL: {Stream URL} Stream Key: {Stream Key} Live streaming page URL: You can use your website URL, or the Share Link in the General tab of the live stream. |
Here is how it should look like:
Step 3: Set Up Your Zoom Custom Live Streaming Meeting
On your Zoom account, click “Meetings” then “Schedule a Meeting.”

Enter the required information, and click “Save” to display advanced options.

Once saved, you can see the details. Click the “Live Streaming” tab.

Apply the information in the green box in accordance with the format provided in Step 2:

Click “Save” to save your live streaming settings.
Now, the host will be able to livestream this meeting without having to add these settings after the beginning of the event.
Step 4: Start Streaming
On your Dacast account, make sure that the live stream used for the meeting is set up to “Online”:

Open the Zoom application or web portal, and start your meeting.
At the bottom of the Zoom window, click the “•••” icon and select “Live on Custom Live Streaming Service.”
If the Streaming URL, Streaming key, and Streaming page URL have not been entered at this point, Zoom will open a window where you can paste these values from the Encoder Setup section of your Dacast live stream.
You are now ready to live stream your Zoom meeting straight to your website via Dacast.
For more information, please visit Zoom Custom Live Streaming documentation, or contact our support team. Any questions or need help/access to this feature? Please contact us. Not yet a Dacast user, and interested in trying Dacast risk-free for 14 days? Sign up today to get started.