


Ultimate Guide to Setting Up Your Live Streaming Studio

Have you been live streaming with just a phone or laptop and are ready to take your live streaming setup to the next level? Research shows that more than half of viewers abandon poor-quality streams in less than 90 seconds, so investing in a live streaming studio setup is definitely a smart move.
The good news is that setting up a live streaming studio is pretty easy and doesn’t have to be super expensive either. And we’ll show you how detail-by-detail. In this post, we’ll share everything we know about setting up a live streaming studio to deliver the highest quality streams to your viewers.
Sign up today for a 14-day trial to test out all of our features for free. No credit card is required.
Table of Contents
- When Setting Up a Streaming Studio Makes Sense
- How to Set Up a Streaming Studio
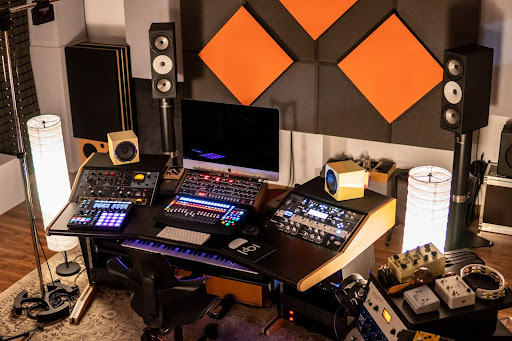
- Studio Space
- Video Sources- Cameras
- Lighting
- High Quality Audio
- Soundproofing
- Hardware Mixers and Switchers
- Streaming Software (Mixers, Switchers, and Encoders)
- Internet Quality and Bandwidth
- Accessories
- Live Streaming Platform
- Final Thoughts
When Setting Up a Streaming Studio Makes Sense
Your smartphone may be enough when you’re dabbling with live streaming to see if it’s for you. But eventually, you may realize you want to start taking live streaming more seriously. That or maybe you’re the type of person who likes to get it “right” from the start. If either of these is you, you’ll want to set up a professional live streaming studio so that others take you more seriously.
If monetization is a goal of yours, having a professional setup can also be a big sign that you take live streaming seriously, which can attract advertisers and even joint venture opportunities (when other live streamers or businesses want to team up with you for specific opportunities). To add to this, your chances of drawing larger audiences greatly increase when you have a professional setup that delivers good audio and good video quality.
That’s why we’re here to help make this happen.
How to Set Up a Streaming Studio
The steps to set up the perfect streaming studio will differ depending on your goals. For example, the setup to live stream video games will be different from what you’ll need if you want to stream yourself singing. But for the most part, there are many foundational things to consider that apply to all setups, which is what this ultimate guide for creating a studio setup for live streaming will help you with.
Let’s jump right into it.
1. Studio Space
Let’s start with some good news right off the bat. You don’t need to rent a fancy studio to have an incredible studio space. You can definitely have a nice and professional studio setup in the comfort of your home. So let’s talk about how.
When choosing your studio space, some things to consider include the amount of natural light coming in, the number of windows in the room, the size of your windows, and if it’s facing loud neighbors. We’ll talk more about lighting and sound, but these are things to start thinking about for now.
As far as setting up an aesthetic background for your live streams, there’s a lot of room to get creative. With this in mind, you’d want to consider two main options here: Real background or fake backgrounds.
- Real background: For a real background, you can consider cool decorations like art 3D diamond wall tiles, a bookcase, a nice painting, or whatever you think exemplifies the brand you’re going for.
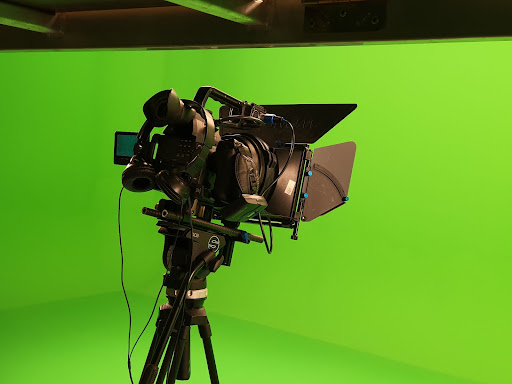
- Fake backgrounds: Another option you can consider is a fake background or chroma keying. This option has become more popular nowadays, especially as a result of COVID. If you want to take the fake background option, you can consider buying a greenscreen (recommendation: Elgato greenscreen) or you can simply use a plain wall as your background to be more economical. Next, you’d use a chroma key software like OBS Studio to display your chosen virtual background.
2. Video Sources – Cameras
Next, let’s talk about cameras. You have three basic camera options: Webcam (or smartphone), Camcorder, or DSLR. Here’s the quick run-down:
- Webcam (or smartphone): Generally, webcams are the most budget-friendly option. Though, some webcams that deliver 4K streaming, like Logitech BRIO 4k webcam, can run around $200. If you choose the webcam route, look for one that can stream at 720p minimum, ideally 1080p. (Recommendation: Elgato Facecam)
- Camcorder: Camcorders generally produce a better quality video than webcams and tend to have longer recording times than DSLR cameras. And in recent years, the capabilities and features that camcorders provide for live streaming have greatly improved. (Recommendation: Though on the pricier end, the Canon XA40 Professional UHD 4K Camcorder or Canon G20 are good options.)
- DSLR: DSLR was initially popular for the number of video features it delivered and for recording higher resolutions. However, camcorders have caught up and can increasingly deliver video at a high quality, even 4K. DSLR used to be notorious for running into heating problems when recording for more extended periods, but that’s greatly improved in recent years. Still, recording limits are a consideration to look out for if you take the DSLR route. DSLR is a good option for low light setups and if you’re going for a cinematic look. (Recommendation: Canon EOS 5D Mark IV).
Generally, for the same price point, DSLR shoots at higher quality. However, a camcorder will be your better option for longer streams (like 24/7 streams).
Despite whichever type of camera you choose, something to consider is the camera’s resolution. You want to find a camera that can capture video at full HD 1080p ideally. If you have the budget and bandwidth available, certainly consider 4K, but 1080p resolution is totally fine.
3. Lighting
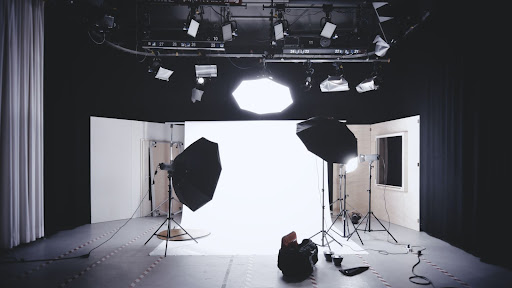
Good lighting can make a world of a difference in the quality of your stream, and it can even make up for a bad camera. The most popular lighting setup for videos is three-point lighting, so let’s talk about that to keep things simple and not overwhelm you.
As the name suggests, there are 3 light sources in this setup.
- Key light: This will be the strongest light of the 3. It should be placed roughly 45 degrees to either the left or right side of you, and it should be pointing down at you at an angle.
- Fill light: This light is generally half as strong as the key light and will be positioned on the opposite side of the key light at also a roughly 45-degree angle. This light aims to “fill” in the shadows on your face with softer light. LEDs are a common choice for fill lights.
- Back light: This light will be placed behind you, slightly off to the side, and slightly tilting down. This light aims to separate you from the background to create a sense of depth.
To find the perfect setup, you’ll have to do some experimenting. For example, exactly how close the lights should be to you will differ depending on factors like if you have windows, how bright it is outside and more. Ideally, you want your room to be as dark as possible to begin your experimentation. Then start by turning on the key light, then the fill light, then the back light (in that order). And adjust as you see fit.
Keep in mind that the ideal setup will differ depending on whether you’re going for a cinematic look or a TV-look, for example.
Recommendations: For roughly $140, the Fancierstudio Lighting Kit 3 Point Light is a good option. Other affordable options to consider are the UBeeSize brand and Viltrox VL-200T. For a bit pricier option, consider the Elgato key light.
4. High-Quality Audio
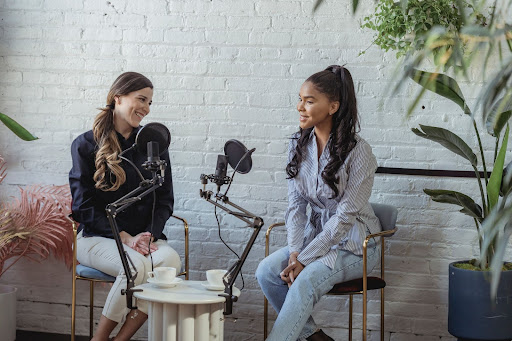
Next, let’s talk about getting the audio right.
Ideally, you don’t want to use the built-in audio in your computer. Computers aren’t built with the intention of specifically producing great audio, so your live streaming audience will for sure notice a difference in audio quality when using the built-in audio vs. an external microphone.
So hopefully, by now, you’re convinced out of using a built-in mic. Now let’s talk about your other options. More specifically, let’s compare XLR vs. USB microphones for live streaming.
For starters, a USB mic will connect directly to your computer, whereas an XLR mic doesn’t. That means when using an XLR mic, you’ll need a mixer or audio interface to act as sort of a middle man. (Side note: XLR mics can also connect to cameras with built-in XLR inputs, but know that the majority of live streamers use microphones that aren’t connected to cameras in any way).
With that said, here are some more factors to consider when comparing XLR vs USB mics for live streaming.
- Price: USB mics are generally more affordable than XLR mics, largely because they don’t last as long.
- Sound quality: Generally, XLR mics produce better sound quality for the same price point.
- Complexity: USD mics, like Blue Yeti, are popular because they are usually plug and play. As mentioned, when you choose an XLR mic, you’ll need a mixer or audio interface, which can be a bit overwhelming for new streamers.
- Number of audio sources: Will you have multiple audio sources, like multiple mics? If so, a USB mic won’t work. You’ll need to choose an XLR mic (or multiple XLR mics) and plug them into a mixer or audio interface.
So overall, a USB mic like Blue Yeti can suffice for a simple professional setup and if you’re streaming alone. But, if you plan to use multiple audio sources, you’re better off with an XLR mic that you’ll plug into a mixer or audio interface that will then plug into the computer.
Recommendations: Audio-Technica AT2020 (USB or XLR), SM7B (XLR), Blue Yeti (USB)
5. Soundproofing
Before we talk about soundproofing, it’s important to note that many streamers confuse the term soundproofing with the concept of sound treatment. Soundproofing is different from sound treatment. And both concepts require different solutions.
For example, many streamers falsely believe acoustic foam is good for soundproofing, but it does practically nothing for soundproofing. The value of acoustic foam is for sound absorption, which has to do with sound treatment.
Sound treatment has to do with absorbing and diffusing sound to minimize echoes. You know how your voice sounds really good in the shower? Well, that’s because there’s a lot of echo, which isn’t an ideal setting for a live streaming studio. On the other hand, soundproofing has more to do with minimizing the amount of sound that comes in and out of your recording studio.
The truth is that soundproofing can require major structural changes to your home, and most experts agree it’s not necessary for a professional quality audio. Sound treatment, on the other hand, is more controllable and plays a larger role in audio quality.
Some common sound treatment solutions are investing in acoustic paneling for your walls and ceilings. The rule of thumb is the thicker the better. Alternatively, as mentioned, you can also invest in acoustic foam panels. With these options, you’ll likely need a hot glue gun or some type of adhesive tape to get the panels on the wall or ceiling.
For those on a really low budget, you can just use furniture like rugs, curtains, sofa, duvets and other common household items. These absorb sound as well. It’s for this reason, believe it or not, many streamers set up a studio in a walk-in closet filled with clothes.
5. Hardware Mixers and Switchers
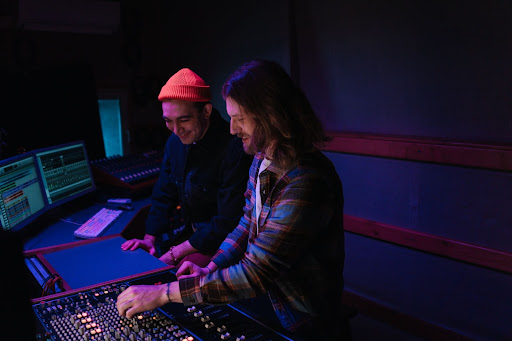
Mixers and switchers are handy when you have multiple sources. For example, if you’re trying to stream with multiple cameras to capture multiple angles. Keep in mind that there are software and hardware options, but we’ll cover hardware mixers and switchers in this section.
You’ll only need an audio mixer if you have multiple sources of audio, like multiple XLR microphones or if you’re streaming a video game. It “mixes” the multiple audio sources for a consistent, pleasant sound. If you’re newer to the concept of mixing, we recommend starting with an analog mixer vs. a digital one, as it’s cheaper and simpler.
Video switchers accomplish the same as audio mixers, but for multiple video inputs, such as if you want to show your audience your video game on the main screen.
Keep in mind that mixers aren’t always required based on the equipment you buy or your goals. For example, as mentioned, some cameras come with built-in XLR inputs allowing XLR microphones to connect to the cameras directly. And in the camera, the audio and video are mixed and sent out via HDMI output straight to the live streaming encoder.
Recommendations: Goxlr, Goxlr mini, ATEM, or ATEM Mini (the mini versions are cheaper)
6. Streaming Software (Mixers, Switchers, and Encoders)
To live stream over the internet, you’ll need an encoder. There are two types of encoders: hardware and software. We recommend using OBS Studio, a free software encoder, to keep things simple.
It’s very common for streaming software, like OBS Studio, to come with software switching and mixing capabilities. So if you have multiple sources that don’t require a physical plug in, such as if you want to upload a pre-recorded video into your stream or if you want to use chroma key backgrounds, then this built-in mixing and switching capabilities will suffice.
Despite whichever live stream studio app you choose, make sure to pay attention to the sources they support and the number of sources they support. For example, with OBS Studio, you’ll need a compatible capture card for video. And it’s a good idea to have a fast video card to reduce choppy audio, especially if you’re live streaming gaming.
7. Internet Quality and Bandwidth
Assuming you’re setting up a home studio, to get a more stable internet connection, it’s a good idea to use an ethernet cord instead of relying on WiFi. Although wireless (WiFi) can get the job done, it’s less reliable. As a very last resort, you can use cellular data too.
Make sure to close apps or programs you’re not using, as these use unnecessary resources that can be better spent on providing a high-quality stream.
Different streaming scenarios call for different ideal internet speeds. For example, if you’re delivering a lecture, you can get away with lower internet speed than streaming a fast-paced game.
There are exceptions, but a general rule to keep things simple is to aim for an upload speed between 0.672 Mbps to 61.5 Mbps and this will generally suffice. To get even more specific, aim for around 5.6 Mbps if you’re going for good quality. To check your upload speed, use this speed test calculator.
8. Accessories
Here is a list of live streaming studio equipment accessories that aren’t always mandatory, but nice to consider.
- A second monitor to see a live chat feed
- Multiple cameras (we recommend you use the exact same cameras to avoid complications)
- Video capture card (you’ll need this if you opt for a software switcher and/or choose a DSLR or camcorder camera )
- Audio interface
- Tripod for your camera
- Cable management to avoid disaster (and possible broken bones)
- Arm to carry your mic (Recommendation: Blue Mic Compass, which is a microphone arm with cable management built-in).
- Headphones
9. Live Streaming Platform

Think of a live streaming platform as what brings it all together.
Live streaming platforms like Dacast equips you with the tools you need to host and deliver professional quality live streams.
Our live streaming studio software integrates with various streaming software solutions like OBS Studio, vMix, VidBlasterX, and Wirecast.
Sometimes you can have everything right but run into streaming quality problems because your server goes down. To beat this, Dacast teams up with multiple CDNs to make sure this doesn’t happen. With the same concept in mind, you can have everything right, but other factors outside your control can weaken the quality of the stream you deliver. A video streaming platform like Dacast addresses a lot of those worst-case scenarios, such as your viewer having a weak internet connection.
Other handy features include:
- 24/7 tech support
- Video security features such as DRM and password protection
- White-label HTML5 player
- Custom branding
- Player API
- Video API
- Real-time analytics
- Multi-bitrate streaming
- Unlimited concurrent viewers
- SVOD, AVOD, and TVOD monetization options
- China video hosting
Pricing starts at $39/ month, but you can try it out free for 14 days.
Final Thoughts
Echo-y audio and grainy videos repel what could be your next group of raving fans. When you’re brand new to streaming, it’s okay to have a basic phone/laptop setup and stream from wherever, but once you realize you want more out of live streaming, you should invest in setting up your own live streaming studio.
And as you can see, it’s not that hard nor costly to set up a professional live stream studio. And perhaps the best part? Having a professional live streaming setup is a big sign to potential viewers or even potential advertising partners that you’re a professional live streamer and investing in you is a good idea.
What’s the first piece of equipment you’re investing in for your live streaming studio? Let us know in the comments below!
Take the first step towards setting up your live streaming studio by giving Dacast a try.