


How to Stream Live Video with Telestream Wirecast Version 8 and Dacast

Telestream has recently released the latest version of Wirecast live streaming software. Telestream Wirecast is a capable, versatile, and affordable encoder. Here at Dacast we are familiar with this software and often end up recommending it as a widely used encoder. Wirecast allows our Dacast broadcasters to stream successfully, so this piece aims to provide extra information to help you use the app successfully.
This article aims to provide a how-to guide for using Wirecast. These instructions should help you make your streaming experience as smooth as possible. Our guide will focus on streaming with Akamai, the largest CDN in the world. Specifically, we’ll focus on streaming with Dacast, which partners with Akamai CDN.
We’ll begin with a brief overview of what Wirecast is, then provide two methods for proper configuration and setup.
About Telestream Wirecast
Wirecast is a cross-platform software encoder that’s available for Mac and PC. The software comes in two versions. Wirecast Studio, for $695, is the basic product. Wirecast Pro, for $995, adds support for HDV inputs, instant replay, support for more capture devices, live scoreboards, and ISO recording of individual sources, among other features.
Version 8 provides a number of new features. The headline feature is Rendezvous, which provides in-app videoconferencing. Rendezvous is compatible with most devices and enables anyone to join simply by clicking a link provided by the broadcaster.
Wirecast 8 also includes advanced 8-track audio mixing, Facebook Live comments, performance improvements, more accurate colors, and support for NDI IP-based workflows.
Various upgrades for Wirecast are available to provide advanced titling and virtual sets to expand your live streaming repertoire.
Using Telestream Wirecast version 8 with your Dacast Account
There are two methods to set up Wirecast with your Dacast account. The first method is a manual configuration, and the second method is based on the Dacast integration within Wirecast.
Manual configuration has the advantage of working with all sorts of different custom RTMP encoders. The same process can be applied to a variety of different software and hardware packages, and it only takes a couple of minutes.
The Dacast integration sign-in setup method is faster but doesn’t work with all platforms. We recommend using this method unless there are changes. Let’s explain how to use both methods.
Manual configuration method
 Here’s how to manually set up Wirecast with Dacast Online Video Platform. There are two parts to this setup. The first part takes place in your Dacast account. In the second part of the setup, you’ll take the details provided in the first part and plug them into Wirecast.
- Log in to your Dacast account.
- Click on “Live Channels” in the sidebar
- Click on the channel you wish to use for the live stream (or create a new live channel). This will bring up the settings for this live stream channel.
- Click “Encoder Setup” in the menu across the top of the screen.
- In the encoder setup screen, you’ll see three panels. Go to the second panel, labeled “Select your encoder,” and click on Telestream Wirecast to select this option.
- The third panel, labeled “Start streaming,” will now show the details required for setting up Wirecast. These details include a Login, Password, Stream URL, Stream Names, and Backup URL.
Ok — you’re done with the first step. Now, let’s move to phase two of this setup process. Open up Wirecast video broadcasting software, then follow these steps:
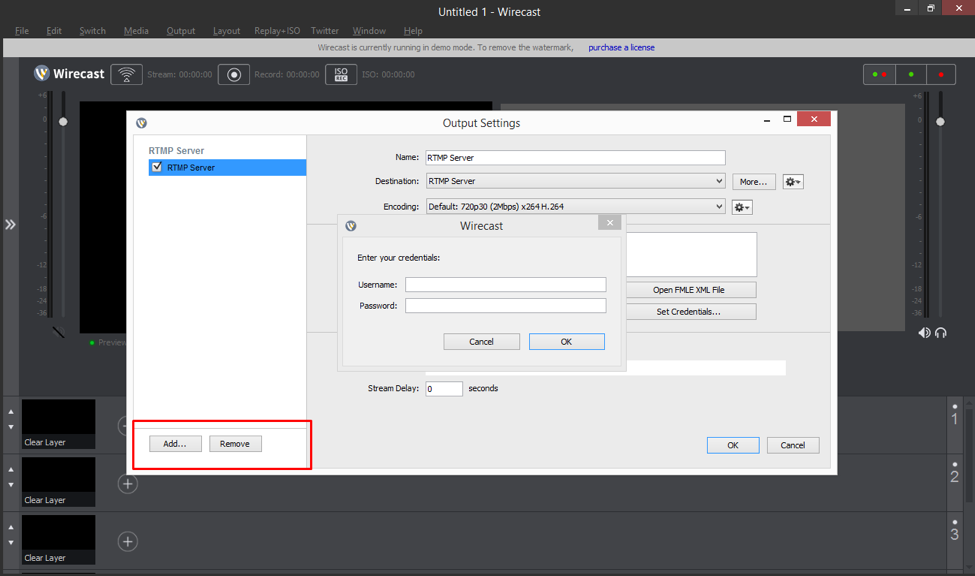
- In the Wirecast menu, click “Output” then “Output Settings.” Alternatively, you can use the shortcuts Command-Y (Mac) or Control-Y (PC).
- In the window that appears, use the dropdown menu to select “RTMP Server.”
- Now, the output settings window will appear. In this window, copy over the settings from your Dacast account. The Stream URL goes into the Address field. The Stream name goes into the Address field. The Login and Password are entered by clicking the “Set Credentials…” button.
At this point, your Wirecast application is now linked to Dacast. There are a few other settings you should customize in order to stream, but we’ll cover those in the next segment, “Other settings to configure,” after we go over the other way to set up Wirecast with your Dacast account.
For more information about how to set up a stream with Wirecast 8, you can check out this video tutorial or see the writing tutorial below.
Dacast integration configuration method
 There is another way to set up Wirecast encoding software with your Dacast account. This is the semi-automatic, login based version. It’s fast and easy compared to the above method.
This setup begins somewhat differently. First, you’ll need to log in to your Dacast account and create a new live channel. If you already have the channel set up that you’ll be streaming live with, you can skip that. In the “Encoder Setup” portion, note the name of your live channel, as well as the 6-digit login and password.
Then, follow these steps:
- Open Wirecast, click “Output” then “Output Settings.” Alternatively, you can use the shortcuts Command-Y (Mac) or Control-Y (PC).
- In the window that appears, use the dropdown menu to select “Dacast Streaming Services.” Click ok.
- You will see a number of settings, including a field for “Username.” Enter the email address linked to your Dacast account into this field. Then click “Authenticate.”
- A window will open asking for your password. Enter your Dacast login password and click ok.
- Wirecast will now connect to your Dacast account. The dropdown menu under the “Username” field should now include a list of all the live channels you’ve created with your Dacast account. Select the live channel you wish to stream to.
- You may be required to enter your 6-digit login and password now. The login and password are entered by clicking the “Set Credentials…” button. You’re now done linking Wirecast 8 broadcast software to Dacast!
Other settings to configure
 Of course, linking Telestream Wirecast to Dacast is only one part of streaming. There are important encoder settings for your live stream that you want to follow closely within Wirecast to make sure your stream is running smoothly.
However, it’s not too difficult to understand with a little diligent study.
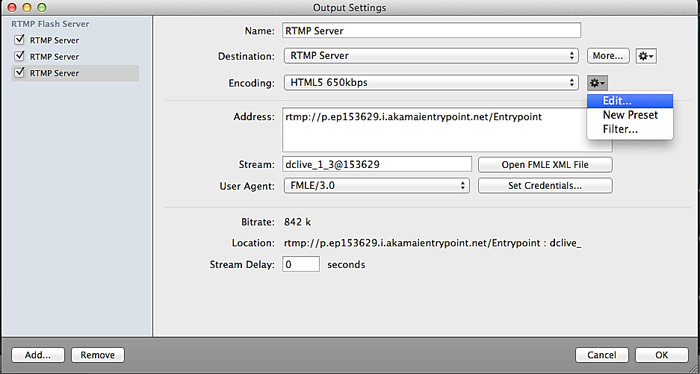
To change the encoding settings, you’ll need to click the small gear icon to the right of the “Encoding” dropdown in the Wirecast Output Settings window. In the small menu that appears, select “View Details.”
The encoder preset window that appears will include a wide variety of settings. To stream with Dacast using an HTML5 channel, ensure that the following settings match these values:
- Under “Video Encoding”:
- Encoder: x264
- Width, height, frames per second, and average bitrate: Your choice (generally based on available bandwidth)
- Profile: Baseline
- Keyframes every: 60 or 90 frames (for 30 frame per second streams), or 120 / 180 frames (for 60 frames per second streams)
- Under “Audio Encoding (AAC)”:
- Channels: Stereo
- Target bitrate: your choice, generally 64 kbps for lower quality streams and 128 kbps for HD streams
- Sample rate: 24.00 kHz
When you’ve configured these settings correctly, click “Save As” then enter a name for these settings. All you need to do now is add video/audio sources, and you’re ready to stream!
Adding video and audio sources
The next step in streaming with Telestream Wirecast is adding video and audio sources.
Sources are added to Wirecast via individual “layers.” Layers in Wirecast work just like they do in Adobe Photoshop or any video editing program. The layers at the top of the list will overlap any content underneath them, like a collage.
This allows you to create more complex outputs. A super basic example would be this: put your logo on the top layer, then use the second layer for your live video feed. Voila! You now have a branded stream.
An image, live video feed from a camera or video card, audio feed from a microphone, or pre-recorded shot can be added to Wirecast as a source. To add a source, simply click the “+” icon to the right of the “Clear Layer” in the bottom of the application screen. Use the menu that appears to select your source, and it will automatically appear in the layers.
To learn more about layers in Wirecast, click here.
Conclusion
Wirecast 8 looks like a great update to the beloved live streaming app. Just a week after release, some Dacast customers are already using this version, and we’re sure more will be in the near future. Hopefully, this article has helped you learn how to properly set up your Wirecast app with Dacast.
Do you have further questions or comments about broadcasting live video with Dacast using Wirecast? We’d love to hear from you in the comment section below. For regular live streaming tips and exclusive offers, you can join the Dacast LinkedIn group.
New to Dacast and interested to try out the white-label streaming platform for yourself? Why not sign up for a 14-day free trial (no credit card required)? That way, you can test out all the features before making a commitment. We’d love to get you set up today!