


How to Use vMix Streaming with Dacast

vMix offers a variety of products that are centered around video production.
This particular guide is focused on their Windows-only encoder: the vMix Live Production Software. For this tutorial, we are using version 24 of the software. To ensure your live streaming setup is compatible, check out our post on the minimum vMix system requirements.
What is an Encoder?
Video encoding is a process used to convert the RAW video files captured by a camera into digital files suitable for live streaming over the internet.
vMix is an example of a software encoder that is used for live streaming. This means that the encoder feeds digital video files to the streaming platform in real-time.
vMix offers a powerful encoder with many options. It’s particularly efficient at streaming with lower consumption of CPU power. This capability is noteworthy, as many encoders often monopolize available resources when you use them on a laptop or a desktop.
One of the unique aspects of vMix is that it makes it possible to stream to up to three destinations at the same time.
You can use vMix to encode live events, such as webinars, company-wide meetings, and podcasts.
Required Encoder Settings
The following encoder settings are required for live streaming with Dacast, regardless of your selected resolution and bitrate:
| VIDEO CODEC | H.264 (x264 may work) |
| FRAME RATE | 25 or 30 |
| KEYFRAME INTERVAL | 3 secs (or 3x frame rate) |
| SCANNING | Progressive |
| ENCODING BITRATE | Constant (CBR) |
| AUDIO CODEC | AAC |
| AUDIO BITRATE | 128 kbps |
| AUDIO CHANNELS | 2 (Stereo) |
| AUDIO SAMPLE RATE | 48 kHz (48,000 Hz) |
Before to begin we invite you to take a look at the following encoder settings recommendations for live streaming with Dacast.
Get Started with vMix: Adding Inputs
If you haven’t already, start by downloading vMix. To download vMix, click here. Next, launch the vMix program. You should see a basic layout that looks like this: 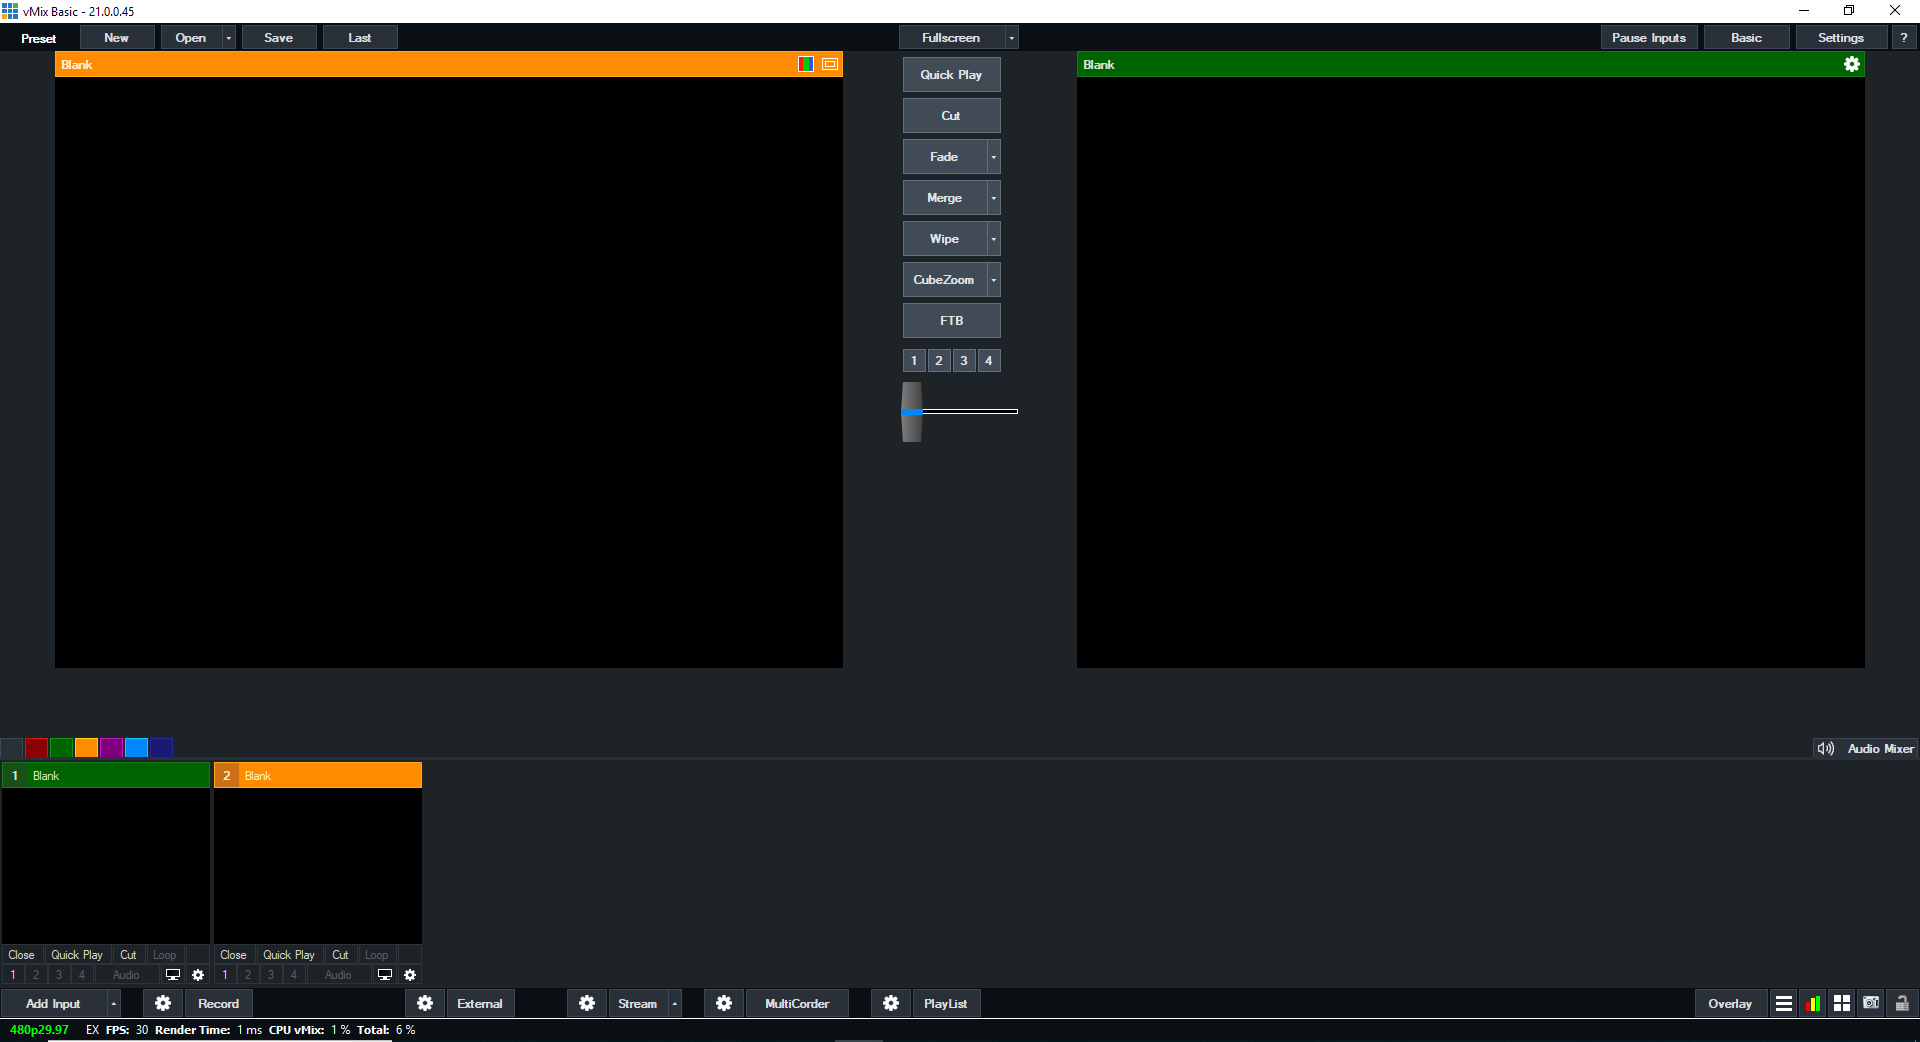 Before you configure stream settings, you first need to add an input. Depending on your broadcasting needs, an input can include a camera, a video file, or even a still image.
To do this, click the ADD INPUT button located toward the bottom of your screen in this layout:
![]()
![]() This will open a new window titled “INPUT SELECT.” It comes with over a dozen input options.
This will open a new window titled “INPUT SELECT.” It comes with over a dozen input options. 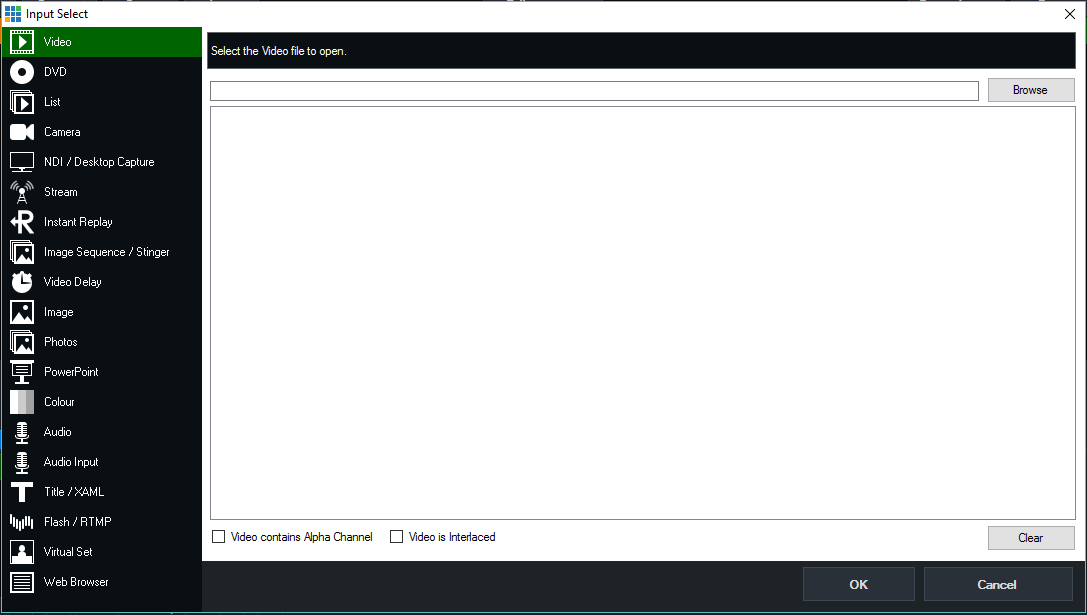 Most users will opt for the Camera input. If this is what you choose, your computer should automatically detect any compatible camera that is connected. It would also detect a camera with a capture card. It will present these options in the drop-down menu.
Keep in mind that you’ll need to manually set the resolution to one that your camera supports. Sometimes these settings are auto-detected, but not always. Luckily, the encoder will tell you if it is not set up properly.
For example, if you select an HD resolution on a built-in webcam, you will get an error message like this:
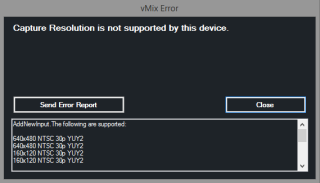 In the case above, the encoder tells you to use 640×480 as the maximum resolution. At that point, you can make that change in the RESOLUTION SETTINGS and then click “OK.”
From here, return to the main layout. You can click to add more inputs at this time if needed. vMix is set up to make it easy to change sources. For example, broadcasters can quickly transition from live streaming to previously recorded video.
 It is important to note the layout shown above at this point in the process. The left side works as a “staging environment.” The right shows what’s currently broadcasting.
There is also a switch, located in the center below the Zoom and FTB buttons. This feature allows you to switch between these areas. For example, want to switch to the Green Check above? Click the switch (the slider) to do so. Besides, above the green check, you will see alternate transition options. You can access these options to employ a specific effect in your transition.
Configuring Streaming Settings
Once you have set up your input, you need to configure your stream. This will establish your eventual destination, in this case streaming live content via the internet. To do this, first, click the gear icon found to the left of the word STREAM located at the bottom of the layout.
 At this point, you will see the STREAMING SETTINGS window as shown below.
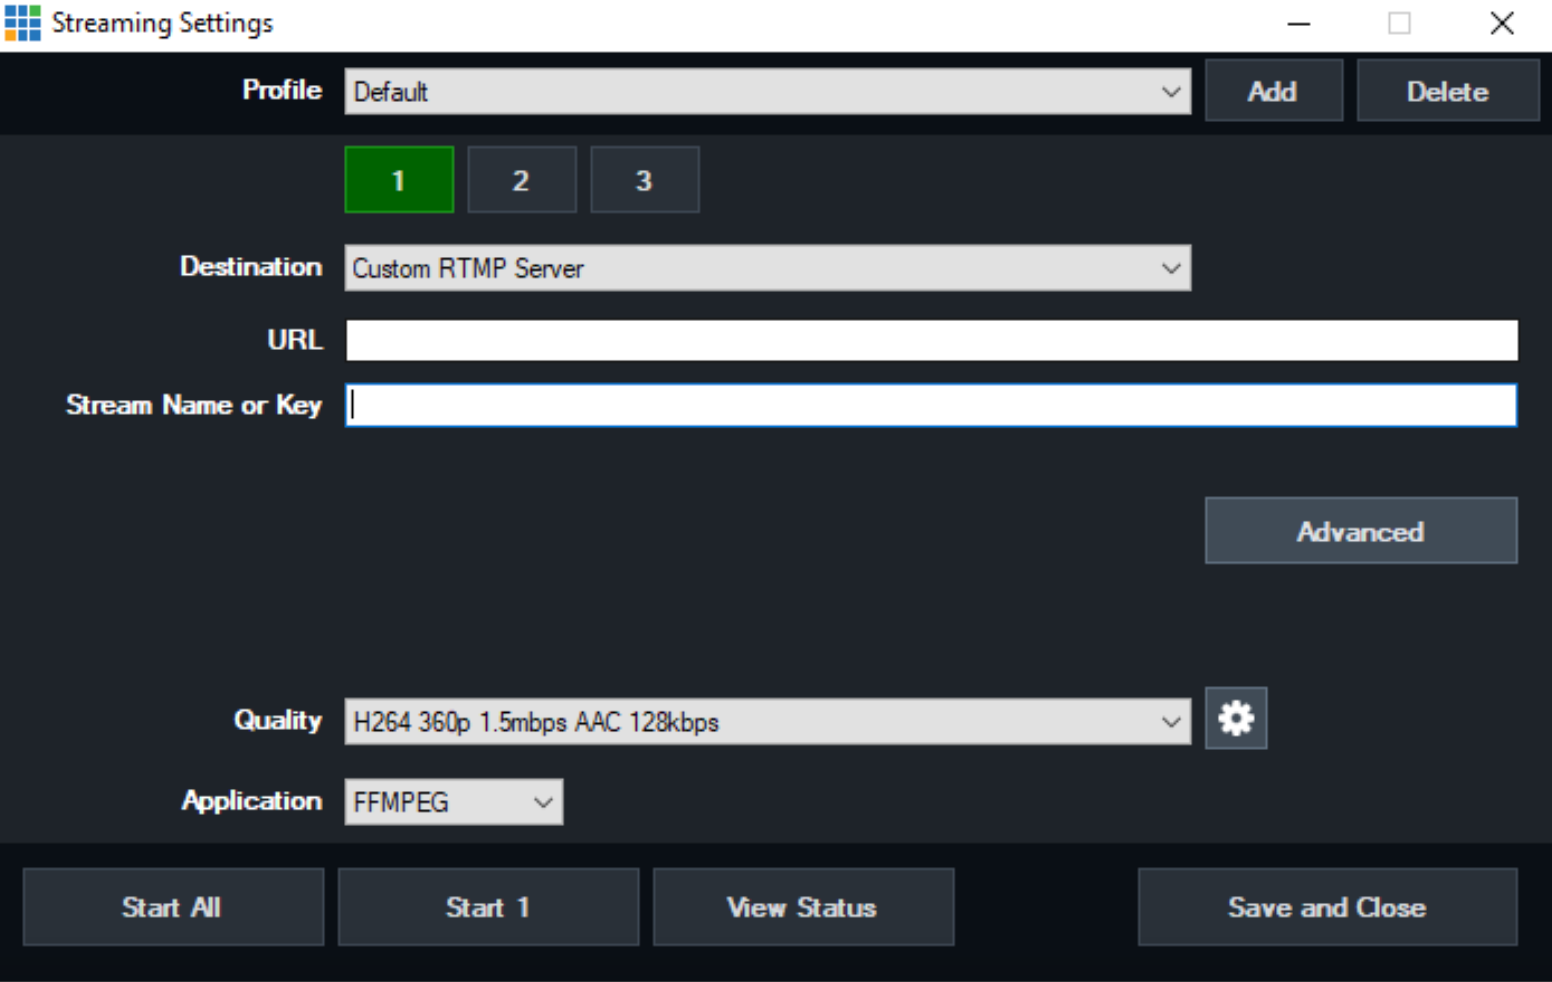
Live Stream with a Custom RTMP Server Method
We’ve broken this process into the steps required within your Dacast account and those steps required within vMix.
Step 1: Within your Dacast Account
If you haven’t done so already, create a live stream now. Move through to the ENCODER SETUP part, which includes the steps demonstrated below:
- Go to your live stream and click the “Encoder Setup” button.

- In the RTMP Encoders dropdown select vMix as shown below:

Keep this page open as you will need the information to fill in your vMix encoder.
Step 2: Within vMix encoder
Click Custom RTMP Server from the drop-down menu for DESTINATION.
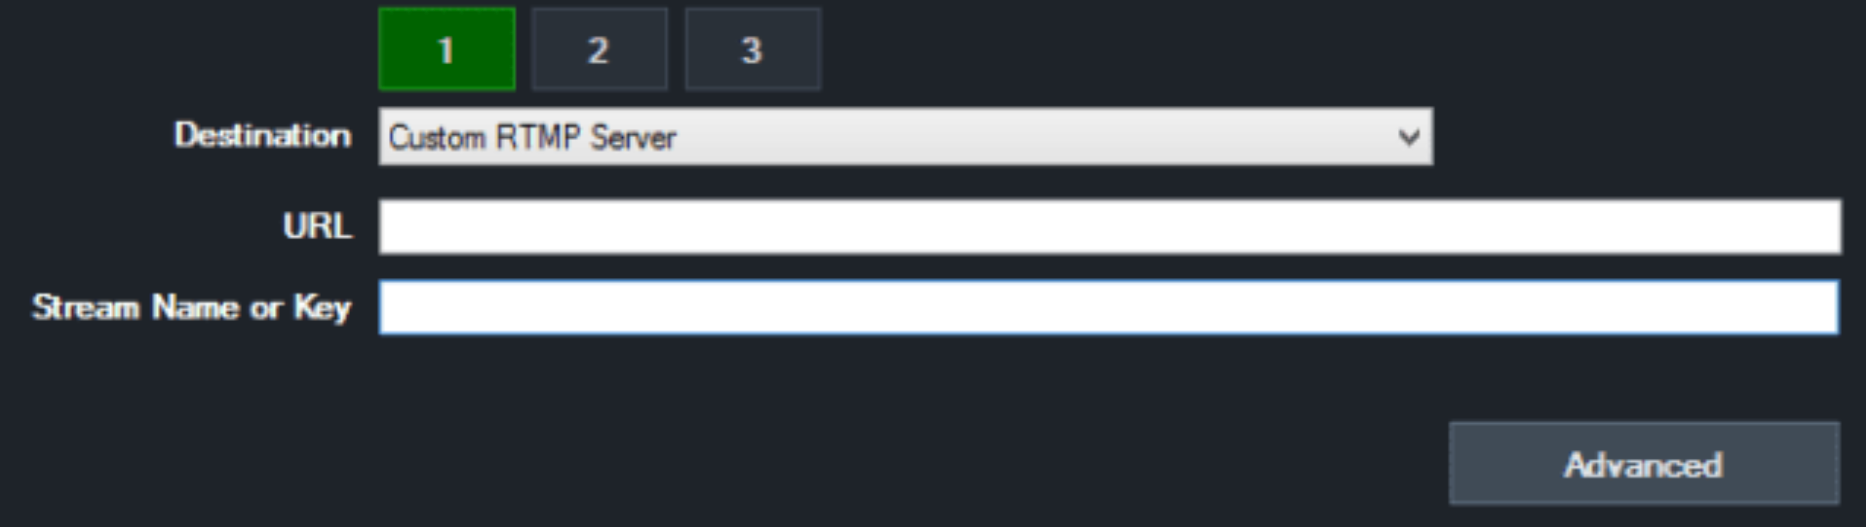 First, you need to copy and paste the URL and Stream Name or Key information from your Dacast account into your vMix encoder.
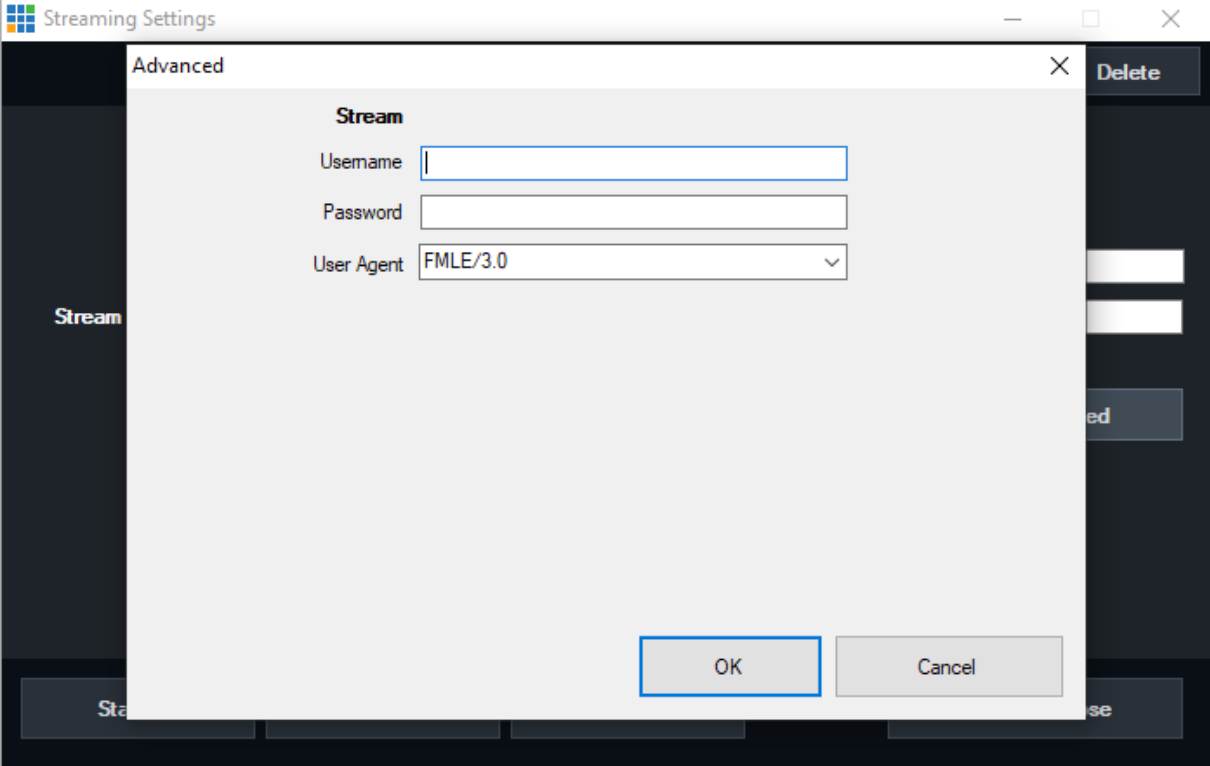
In the Advanced screen, you will copy and paste the Username and Password information from your Dacast account. When you filled the information, click “OK.”
Start Streaming
After completing these steps, you are ready to live stream with Dacast.
As mentioned above during the Dacast destination method, you may want to change the quality setting. The default here is 1500 kbps. You should choose a setting best suited for your upload speed and intended audience.
Once you are satisfied with all of your streaming settings, click “SAVE AND CLOSE” or “STREAM.”
To test the stream, return to your Dacast account, and in the general tab of your live stream under “Sharing” you will have two options to see your live stream.
You will be able to see your stream by copy and pasting the “Share Link” into your browser, or by clicking on the “Preview” button as shown below:

You should see your live stream within a minute. If you are having issues please check the encoder is configured correctly.
Start Troubleshooting Live Streaming Issues:
It can be quite frustrating when issues arise in the middle of a live stream. We’ve witnessed first-hand the complications that can arise, and we know that the average broadcaster can’t don’t have the financial or technical means to address all of those issues.
We’ve put together a thorough guide with our top 10 tips to help you troubleshoot live streaming issues and identify the root of the problems. Using the troubleshooting framework we’ve laid out, will get your stream back on track in no time. If you are still having issues please contact our support team in chat or via email at support@dacast.com.
Not yet a Dacast user, and interested in trying Dacast risk-free for 14 days? Sign up today to get started.