


Best Encoder Settings for VidBlasterX Broadcast Software

There are a few key elements to live streaming. These include a camera, a video capture card, an internet connection, an online video platform, and a hardware or software encoder. This article will consider one broadcast software in particular: VidBlasterX.
Specifically, we’ll look at the features of this encoder, how it works, and how to program this broadcast software to live stream on the Akamai cdn network. These settings should also help anyone delivering an HLS stream from a RTMP ingest stream.
Let’s get down to business!
VidBlasterX Broadcast Software: An Overview
VidBlasterX is a software encoder, also called broadcast software. This means it is a software that takes a video input, transcodes it into a format suitable for live streaming, and delivers it to a server or a cdn network for distribution.
The “software” part means that VidBlasterX is an application that you can install on general purpose computers. VidBlasterX is available for the Windows operating system. Are you using a Mac operating system? If so, then you might want to check out this article about the best video broadcast software for Mac.
VidBlasterX also includes a variety of mixing, editing, and video production features. We’ll cover these in the next section.
VidBlasterX: Main Features
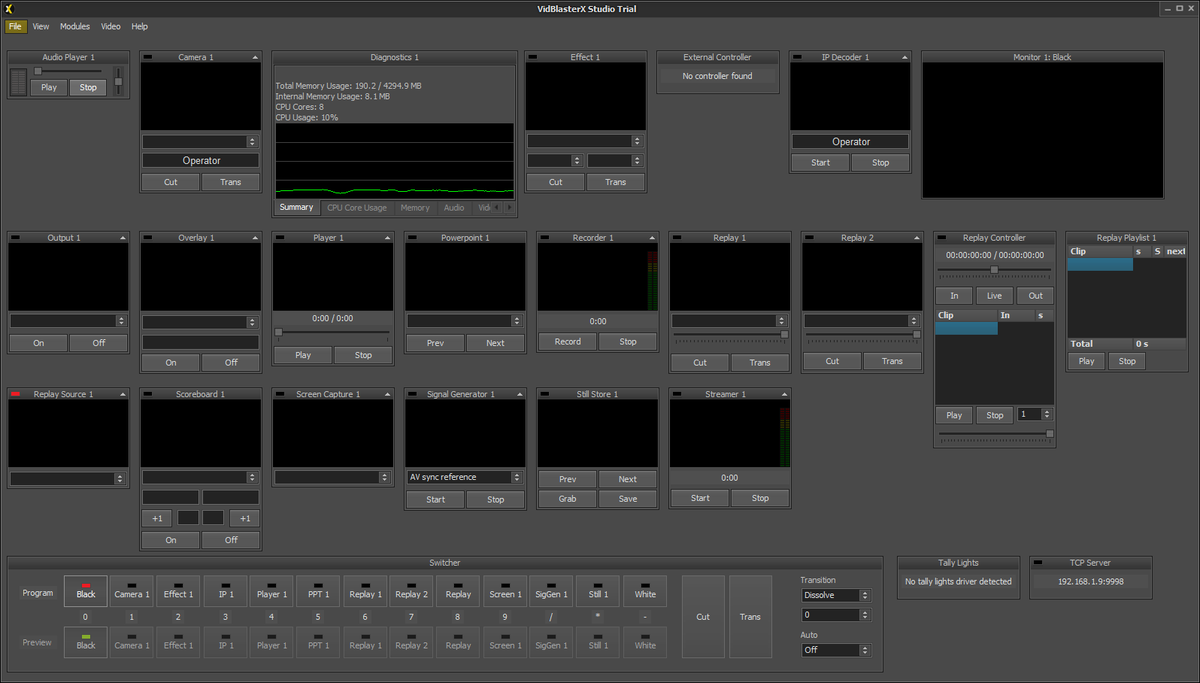
Live streaming and recording
The main functionality of VidBlasterX, for our purposes here, is live streaming. VidBlasterX is an RTMP-compatible live video production software that allows you to stream to most OVPs, as well as to Facebook and Youtube.
For studio use, VidBlasterX also supports video routing, recording streams to local disks, displaying on a monitor of your choice, and outputting to a Blackmagic DeckLink video card.
Low latency
VidBlasterX calls itself an “ultra-low latency” product. It uses features like audio rate matching and SyncLok (see below) to reduce delays in transmission.
SyncLok
Most broadcast-quality video cameras and production equipment contain timing software and/or hardware. These devices sync the clocks on each device to reduce problems with mismatched frames and slightly offset audio. VidBlasterX contains a proprietary function called SyncLok that mimics this functionality.
High resolution

VidBlasterX supports resolutions up to 4K for streaming, recording, and production.
Modular audio mixer
The audio mixer built into VidBlasterX allows you to mix multiple audio sources, monitor peaks and levels, adjust gain, and add other effects.
Video effects such as chroma key
VidBlasterX also features a number of video effects. These include chroma key, also called the “green/blue screen” effect, which allows you to use virtual sets. Other effects allow you to size and position multiple video sources into a single program feed.
Overlays and “lower thirds”
One way to add value to a broadcast is to overlay information on the screen. This could include items like the title of a song, the name of a speaker, or the score of a sports game. VidBlasterX support overlays and “lower thirds” using images, graphics, and animations of various types.
Multiview
The Multiview feature in VidBlasterX allows you to monitor video from one or multiple source modules. This feature includes options to set an alias for each source (e.g. “camera back left” rather than an ambiguous “source 1”) and a tally light to track which source is live.
Macros and custom scripting language
For broadcasters who need complex operations, VidBlasterX includes support for macros and a scripting language of its own. This allows you to create programmatic interactions with the application, automate certain operations, setup custom hotkeys to trigger custom events, and integrate the app into existing workflows.
Modular user interface
VidBlasterX’s specificity is its modular design. VidBlasterX functionality is delivered via a series of modules. Each supports a different feature or option. These modules can be added, removed, and rearranged from the user interface, allowing total customization.
Modules also are important in regards to pricing for VidBlasterX broadcast software. With that in mind, let’s examine these modules in a bit more detail.
Customizing with Modules
 There are three different editions, or versions, of VidBlasterX. The Home edition costs $9 per year, and it allows use of up to seven modules at once. The Studio version costs $99 per year, and it increases that limit to 25 modules. The Broadcast version costs $999 per year, and it supports up to 50 modules simultaneously.
A free trial of the fully functional Studio edition is available to new users. However, this free trial does add a watermark to all output channels, like the Wirecast encoder does.
Here is a list of VidBlasterX modules:
- Audio Mixer
- Camera Module
- IP Input
- NDI Input
- Screen Capture
- Monitor
- Multiview
- Player Module
- Still Store
- Character Generator
- Powerpoint
- Recorder
- Streamer
- Display Output
- DeckLink
- NDI Output
- Virtual Video Output
- Replay
- Scoreboard
- TCP Server
- Diagnostics
- Signal Generator
Live Streaming Setup with VidBlasterX Broadcast Software
When you download VidBlasterX and open it for the first time, the default profile will load with a set of modules. This allows you to quickly and easily start your stream. Later, of course, you can customize your set of modules according to your needs.
Linking to the Dacast OVP
The first step for setting up VidBlasterX with Dacast is to create a live channel in your Dacast account. *Note: This is only necessary if you haven’t already done so. Here’s how it’s done the first time:
- Login to your Dacast account at Dacast.com.
- Click on the “Live Channels” button, and then the “plus sign” in the list of channels to create a new channel.
- Follow the provided instructions, then navigate to the “encoder setup” section in the live channel settings in your Dacast account. Leave this window open for now.
Link to Dacast
Now we’re ready for the next step, which is a bit more complicated. This involves linking VidBlasterX to your Dacast account. Don’t worry, we’ll walk you through it step by step!
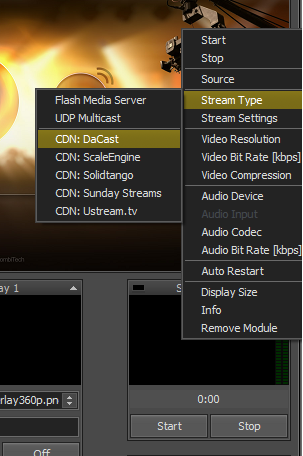
 Right-click in the “Streamer 1” module, which is found in the lower right.
- In the menu that appears, navigate to “Stream Type,” and select “CDN: Dacast” from the options that appear.
- Next, right-click once again on the same “Streamer 1” module.
- Navigate to “Stream Settings.” This will pop up a window asking for your username and password. (This is the same information you use to login to your Dacast account.) Enter your Dacast credentials, then click OK.
- For a third time, right-click in the “Streamer 1” module. Navigate to “Stream Settings,” then “Channel,” and then click on “Get/Refresh List.” This will call up a list of live streaming channels associated with your Dacast account.
- Use the same Channel menu to select the channel of your choice. You can also use this right-click menu to select the source for your stream. For example, you can select the “Camera 1” module as your source, or you can choose another module such as the “Program” monitor.
- To preview your stream, visit the Dacast backend for your channel and click “Preview.” The stream may take a minute to start up.
- When you’re ready, click the “Start” button in the right-click menu to begin streaming!
Other Settings for VidBlasterX Broadcast Software
You can use the same right-click menu in the “Streamer” module to change other settings for your broadcast software. Settings that you should customize for your situation include:
- Video resolution, bit rate, and compression
- Audio device, codec, and bitrate
For more information on how to stream using VidBlasterX, you can also consult their site..
Conclusion and Next Steps
VidBlasterX is a highly capable video broadcast software suite. It’s a wide range of features can be intimidating when you’re getting started. Whether you’re new to streaming or have the experience, we hope this article helps you to get started with this broadcast software without any problems!
Once you’ve learned the basics, I recommend that you do some test streams. Explore the app, test out different features, and see what you can do. You should be creating excellent live streams in no time.
Any questions or comments? Let us know by leaving a note below this post. We’ll get back to you as soon as we can. Another great place to ask for help is VidBlaster’s large and active Facebook community, where people can ask questions, share ideas, and get support with issues.
For regular tips on live streaming, feel free to join our LinkedIn group.