


TriCaster Streaming: How to Live Stream with Dacast

Why Use TriCaster?
Dacast is completely compatible with flash-supporting encoders, including the NewTek TriCaster. Getting set up to record over a TriCaster is easy! Just follow the steps below.
Note: this tutorial is made for a TC1 and Advanced Edition Version 2 & 3. For more information, please visit NewTek knowledge base.
TriCaster Streaming Tutorial
Step 1: Launching TriCaster
After launching TriCaster, click the “New” button to launch a new session. Once this new session appears, you will see a series of options in which you can enter the session name, video standard, and resolution before clicking “Start Session.”
After this step, you will see a screen with four options: Live Production, Manage, Graphics, and Edit. Make sure to highlight “Live Production” and then click “Start Live Production” to begin.
Clicking here launches the main interface of TriCaster with views for all the monitors, a timetable below, and other applications.
Step 2: TriCaster Stream Configuration
Click the gear icon next to “Stream/Encode” to open the Stream Configuration window.
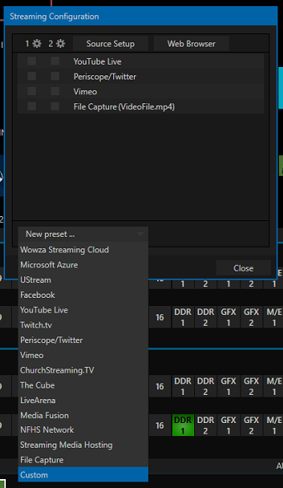
At the bottom of the Streaming Configuration window, click the arrow next to “New preset” to display the drop-down menu and select “Custom”:
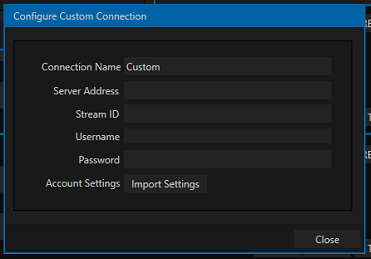
You will see the following Configure Custom Connection window, where you can change the Connection Name:
For more information on how to best configure your encoder, we invite you to read our Encoder Setup Guide.
Step 3: Finding Stream Details in Dacast
To find the Server Address, Stream ID, Username, and Password required by TriCaster, log in to your Dacast account from a separate computer.
Go to the “Live Streams” section. Create a new live stream, enter a name, and choose the type of stream according to its destination (Standard for web, mobile devices and TV, Compatible for native apps, or Premium to stream to China – Compatible and Premium available soon). You can also select a previously created stream.
In the General tab, make sure that your live stream is Online. Click “Encoder Setup” on the top right corner. Copy the “Server” link, “Stream Key”, “Username” and “Password” by using the “Copy to clipboard” icons:

Step 4: Enter Stream Details in TriCaster
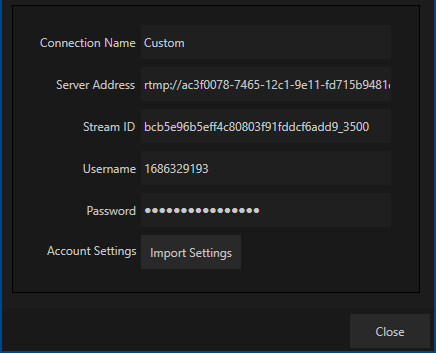
Back in the TriCaster Configure Custom Connexion window, paste the “Server” link in “Server Address” and the “Stream Key” in “Stream ID”. Paste the username and password. Then click “Close”:
When you are ready to broadcast, click the “Stream / Encode” button next to the gear where you configured the options. You will know that your stream has started when the timer is blue and the time starts to run:
![]()
![]()
You are now ready to live stream through Dacast! You can check that your stream is running smoothly by going back to your Dacast account and clicking on “Preview” in your stream.
Any questions or need help/access to this feature? Please contact us.
Not yet a Dacast user, and interested in trying Dacast risk-free for 14 days? Sign up today to get started.
Additional Resources
- Live Stream Encoder Configuration and Required Dacast Settings
- Intro to Live Streaming: A Walkthrough
- Live Stream Recording Tutorial
- Is My Live Stream Auto-Recorded or Saved on the Video Platform?
- What Is the Best Video Broadcasting Software for Event Production?
- Does Dacast Support Broadcasting Via My Own Encoder?
- How to Setup an RTMP Encoder for Live Video Streaming
- What is an Encoder? What Are the Best Settings to use on Dacast’s Platform?