


How to Stream and Use OBS Studio with Dacast for macOS

In this OBS tutorial, we will cover how to connect OBS Studio to the Dacast streaming solution and set up a live stream using this free, open-source live stream encoding software. This guide is for macOS users.
Please note that this tutorial is not based on the Dacast version of OBS Studio that is available in your Dacast account.
Let’s get into the step-by-step process of encoding with OBS Studio or check out the following video tutorial:
Step 1: Add details to Broadcast Setting / Connect to Dacast
Open the settings of OBS Studio: 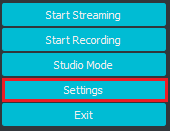 Go to the “Stream” tab. Select “Custom Streaming Server.”
You should see 2 fields: URL and Stream Key. You will find these two pieces of information in your Dacast account.
Open your Dacast Channel, and select the “Encoder Setup” button to the right.
Fill in “URL” and “Stream Key” with your Dacast Stream URL and Stream Name, respectively.
Then, fill out the “Username” and “Password” fields using the Login and Password of the live channel.
Check out this encoder setup screenshot:

Step 2: Add Audio and Video Sources
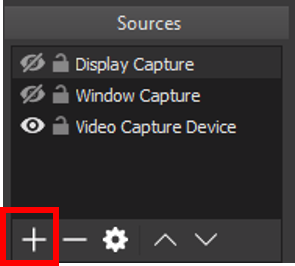
At this point, you are set up to broadcast with OBS to Dacast. From here, you can add multiple sources (camera, audio, display capture, etc.) by clicking the “+” button in the “Sources” (bottom of the screen) and remove them by clicking the “-“:
 You can also add (“+”) and remove (“-“) “Scenes.” Scenes are preset sources that you can mix together. OBS Studio allows you to assign hotkeys to switch between the multiple Scenes you’d have created. To do so, go to the “Hotkeys” tag of OBS’s “Preferences”. Before starting the stream, make sure all the following settings match the picture below.
- Keyframe interval = 3 seconds (and nothing else)
- Rate control = CBR
- Profile = baseline
Step 3: Start Streaming
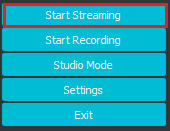
Once you have configured all of your OBS Studio settings, click on the “Start Streaming” button:
That’s it – now you are ready to start streaming on OBS! If you are still having issues please get in touch with our support team in chat or via email support@dacast.com.
Additional Resources:
1. More on Video Transcoding
Encoding is a process used to convert the RAW video files captured by a camera into digital files suitable for live streaming over the internet. OBS Studio is an example of a software encoder that is used for live streaming. This means that the encoder feeds digital video files to the streaming platform in real-time.
2. Required Encoder Settings:
The following encoder settings are required for live streaming with Dacast, regardless of your selected resolution and bitrate:
| VIDEO CODEC | H.264 (x264 may work) |
| FRAME RATE | 25 or 30 |
| KEYFRAME INTERVAL | 3 seconds |
| SCANNING | Progressive |
| ENCODING BITRATE | Constant (CBR) |
| AUDIO CODEC | AAC |
| AUDIO BITRATE | 128 kbps |
| AUDIO CHANNELS | 2 (Stereo) |
| AUDIO SAMPLE RATE | 48 kHz (48,000 Hz) |