


Best OBS Settings for Streaming in 2026 (Twitch, YouTube, Facebook, Dacast)

By Dacast Editorial Team | Reviewed by Jon Whitehead, COO at Dacast | Updated May 2026
OBS Studio is an encoder. Its job is to produce a stream that an ingest server can receive, transcode, and deliver at scale. The settings that matter : CBR, keyframe interval, bitrate, are not arbitrary platform requirements. They are constraints imposed by the delivery architecture downstream: the CDN’s segment expectations, the ABR ladder’s rendition targets, and the ingest server’s buffering tolerance.
This guide covers OBS settings from that perspective. Platform presets for Twitch, YouTube, Facebook Live, and Dacast RTMP are included but so is the reasoning behind them. If you understand why a 2-second keyframe interval is required for HLS segment alignment, why CBR outperforms VBR for live ingest, and why your bitrate ceiling is set by your upload headroom and not your platform’s maximum, you can configure OBS correctly for any RTMP destination, not just the ones listed here. Settings in this guide are validated for OBS Studio 32 and Dacast RTMP ingest.
TL;DR: Best OBS Settings for Streaming in 2026
For a stable, professional live stream, use OBS Studio 32 with Advanced Output Mode, stream in H.264 video + AAC audio, and set CBR (Constant Bitrate) with a 2-second keyframe interval. Most broadcasts perform best at:
- 720p at 30 FPS → 2,500–5,000 Kbps
- 1080p at 30 FPS → 4,500–6,000 Kbps
- 1080p at 60 FPS → 6,000–9,000 Kbps (platform-dependent)
Use hardware encoders (NVENC, AMD AMF, Intel Quick Sync, or Apple VideoToolbox) whenever available to reduce CPU load. Keep your total bitrate (video + audio) within 70–80% of your tested upload speed to avoid dropped frames and buffering. If you are streaming into a professional CDN-backed platform like Dacast rather than a social platform, see the “Why These Settings Exist” section, the infrastructure reasoning behind these numbers matters for your workflow.
We updated this article to reflect the best OBS Studio settings for the latest OBS Studio 32. Additions include OBS 1080p and 1440p presets, destination-specific bitrate/keyframe guidance, and quick tips for using browser sources in OBS.
Table of Contents
- What is OBS Studio?
- Why OBS Settings Matter in 2026
- Why These Settings Exist
- Quick Start: Best OBS Settings for Most Streams (2026)
- How to Configure Your OBS Studio Settings
- OBS Settings by Platform (2026 Limits That Matter)
- OBS into Dacast: What Happens After Your Encoder
- Best OBS Encoder Settings by Hardware (2026)
- Best OBS Bitrate Settings by Resolution (2026)
- Upload Speed Rule: Avoid Dropped Frames
- OBS Advanced Output Mode (Recommended Defaults)
- Low-Latency Streaming in 2026: WHIP & WebRTC
- Troubleshooting OBS Streams With Built-In Tools
- Workflow Boosters for OBS (Optional)
- OBS Recording Format Settings (MKV vs MP4)
- FAQ
- Conclusion
What is OBS Studio?
OBS (Open Broadcaster Software) helps you build professional scenes (camera, screen share, overlays) and stream to multiple destinations—once you dial in the right output settings for your platform and hardware.
OBS supports RTMP ingest, which is how most platforms receive your live feed from an encoder. RTMP (Real-Time Messaging Protocol) carries your encoded stream from OBS to your streaming platform (for example, Dacast, YouTube, or a custom RTMP endpoint).
To go live, you need an encoder—either software (OBS) or a hardware encoder—to convert your camera feed into a stream-ready format your platform can deliver to viewers.
OBS includes scene switching, multiple sources, transitions, and audio/video filters—powerful tools, but they also increase CPU/GPU load if you overbuild scenes.
OBS Studio 32.0.2 runs on Windows 10/11, macOS 12+ (Intel + Apple silicon), and modern 64-bit Linux. Keep graphics drivers and OS updates current for best encoder stability.
Dacast users can also use Dacast’s OBS setup resources to speed up RTMP configuration—but the core settings in this guide apply to any platform.
Why OBS Settings Matter in 2026
In 2026, OBS settings matter because platforms and networks are less forgiving than they used to be. The goal isn’t “max quality” : it’s stable, platform-compliant quality that performs well for real viewers.
In 2026, OBS settings matter because your encoder output determines every stage of delivery that follows. The CDN cannot compensate for an unstable contribution feed. The ABR ladder cannot produce clean renditions from a VBR stream with misaligned keyframes. Platform ingest servers cannot buffer a bitrate that exceeds your upload headroom. The goal is delivery-compatible quality: a stream that arrives at the ingest server intact, transcodes cleanly into an ABR ladder, and plays back reliably across devices and network conditions.
Your OBS configuration must account for:
- Platform limits: Twitch/YouTube/Facebook enforce bitrate caps and keyframe timing. Exceed them and you’ll see buffering, drops, or ingest errors.
- Encoder behavior: NVENC/AMF/QSV/VideoToolbox can stream cleanly with low CPU load—but the wrong preset (or heavy scenes) can still cause skipped frames.
- Network headroom: You need room for jitter and bandwidth dips, especially on long broadcasts.
- Workflow compatibility: Consistent ingest settings (CBR + keyframes) improve playback, recording, and ABR delivery in professional RTMP workflows.
The best OBS settings in 2026 balance quality + stability + compliance.
What’s New in OBS Studio 32 (2026 Update)
OBS Studio 32 improves reliability and maintenance without changing the fundamentals (codec, bitrate, keyframes).
Notable OBS 32 updates for streamers:
- More sensible default streaming bitrate (reduces “bad default” setups)
- Built-in plugin management (easier updates and cleanup)
These updates make OBS more dependable for long sessions, especially when paired with platform-safe presets.
Where to Find These Settings in OBS (Quick Click-Path)
- Settings → Output: set Output Mode = Advanced
- Output → Streaming: choose Encoder, set CBR, Bitrate, Keyframe Interval (2s)
- Settings → Video: set Base/Canvas, Output/Scaled Resolution, FPS
- Settings → Audio: set Sample Rate = 48 kHz and confirm device routing
Why These Settings Exist
Most OBS tutorials state the rules. This section explains the delivery infrastructure reason behind each one, which makes the settings transferable to any RTMP destination, including professional CDN-backed platforms like Dacast.
| Setting | The rule | The infrastructure reason |
| CBR(Constant Bitrate) | Always use CBR for live streaming. Never VBR for RTMP ingest. | Ingest servers and CDNs buffer incoming streams based on expected data rate. VBR creates rate spikes that exceed buffer allocation, causing dropped frames and ingest instability, especially on long broadcasts. CBR gives the delivery stack a predictable signal to work with. CBR = Constant Bitrate (delivers a consistent data rate regardless of scene complexity). |
| 2-second keyframe interval | Set to 2 seconds. Never leave on ‘auto’. | HLS divides video into segments (typically 2–6 seconds). Each segment must begin with a keyframe for independent playback. If your keyframe interval doesn’t align with HLS segment boundaries, ABR quality switching breaks : viewers experience stuttering when the CDN shifts between quality levels. The 2-second interval provides clean boundaries at every common HLS segment duration (2s, 4s, 6s). |
| Bitrate ceiling | Keep total OBS bitrate within 70–80% of tested upload speed. | Streaming bitrate is a network contract: your encoder promises to deliver X Kbps continuously. If your network cannot sustain delivery (jitter, congestion, ISP throttling), the ingest server sees gaps it interprets as encoder failure. The 70–80% headroom rule absorbs short-term fluctuations without triggering ingest errors. This applies regardless of what your platform’s published maximum is. |
| Hardware encoder(NVENC/AMF/QSV) | Use hardware encoding whenever available. Fall back to x264 only when necessary. | Live encoding is a sustained load. x264 on CPU degrades under load over time, especially during complex scenes on long broadcasts. Hardware encoders offload the encode pipeline to dedicated silicon, maintaining stable output bitrate. This matters more for a 3-hour pay-per-view event than a 10-minute test stream. |
| H.264 as default codec | Use H.264 for all RTMP destinations unless you have confirmed platform support for AV1 or HEVC. | H.264 is supported by every RTMP ingest server, CDN, and downstream player in production. AV1 and HEVC offer better compression but require Enhanced RTMP support on the ingest side. Using AV1 without confirmed ingest support produces a stream that encodes cleanly on your end but may fail silently at the delivery layer. |
Quick Start: Best OBS Settings for Most Streams (2026)
Use these presets if you want a stable stream without tuning every detail.
Preset A: 1080p / 30 FPS (most professional streams)
- Output Mode: Advanced
- Encoder: NVENC / AMF / QSV / VideoToolbox (hardware)
- Rate Control: CBR
- Video Bitrate: 4,500–6,000 Kbps (Twitch creators typically stay near ~6,000 video)
- Keyframe Interval: 2 seconds
- Audio: AAC, 160 Kbps, 48 kHz (320 only if you have headroom)
Preset B: 1080p / 60 FPS (high motion: sports/gaming)
- Output Mode: Advanced
- Encoder: Hardware
- Rate Control: CBR
- Video Bitrate: 6,000–9,000 Kbps (YouTube commonly tolerates higher; Twitch usually does not)
- Keyframe Interval: 2 seconds
- Audio: AAC, 160 Kbps, 48 kHz
If upload is limited or unstable, drop to 720p/30 before pushing bitrate higher.
Preset C: 720p / 30 FPS (Low-End PC / CPU-Only)
- Output Mode: Advanced
- Encoder: x264, set preset to “veryfast” or “superfast” to reduce CPU load
- Rate Control: CBR
- Video Bitrate: 2,500–3,500 Kbps
- Keyframe Interval: 2 seconds
- Audio: AAC, 128–160 Kbps, 48 kHz
- Note : If CPU usage exceeds 80% during a broadcast, lower output resolution to 1280×720 before reducing FPS or bitrate. Simplify OBS scenes, remove unnecessary browser sources and overlays.
How to Configure Your OBS Studio Settings
There is a precise way to configure the OBS Studio settings for live streaming on an HTML5 live channel. Here’s a quick tutorial on OBS stream optimization, and each will be discussed in more detail further down.
1. Open Settings
In OBS, click Settings (bottom-right). 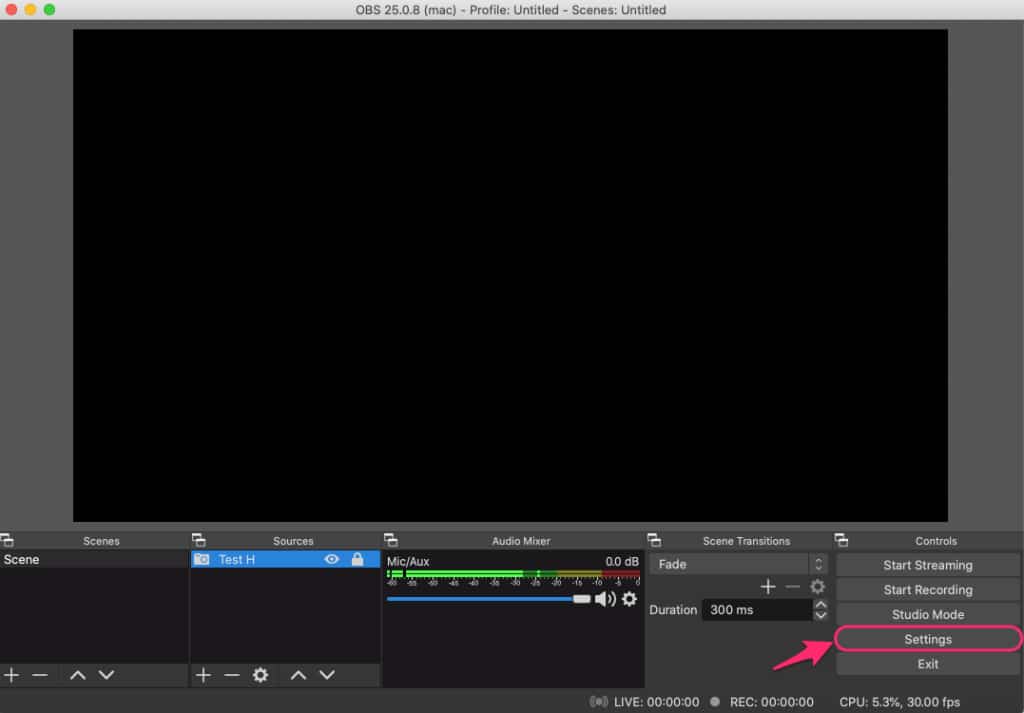
2. Set Output Mode to Advanced
Go to Output → Output Mode → Advanced. This unlocks the controls that matter for live streaming: encoder, bitrate, rate control (CBR), and keyframes.
3. Configure Streaming Output (the core settings)
Go to Output → Streaming and set:
- Encoder: NVENC / AMF / QSV / VideoToolbox (use hardware if available)
- Rate Control: CBR
- Keyframe Interval: 2 seconds
- Bitrate: choose from the platform preset in this guide (example: 4,500–6,000 Kbps for 1080p/30)


4. Set Video Resolution + FPS
Go to Video and set:
- Base (Canvas) Resolution: your production layout (often 1920×1080)
- Output (Scaled) Resolution: what you actually stream (720p or 1080p are most common)
- FPS: 30 (default) or 60 (high motion, if platform + upload allow)
5. Set Audio for Streaming
Go to Audio and set:
- Sample Rate: 48 kHz
Then in Output → Audio, use: - Codec: AAC
- Bitrate: 160 Kbps (use 320 only if content benefits and you have upload headroom)
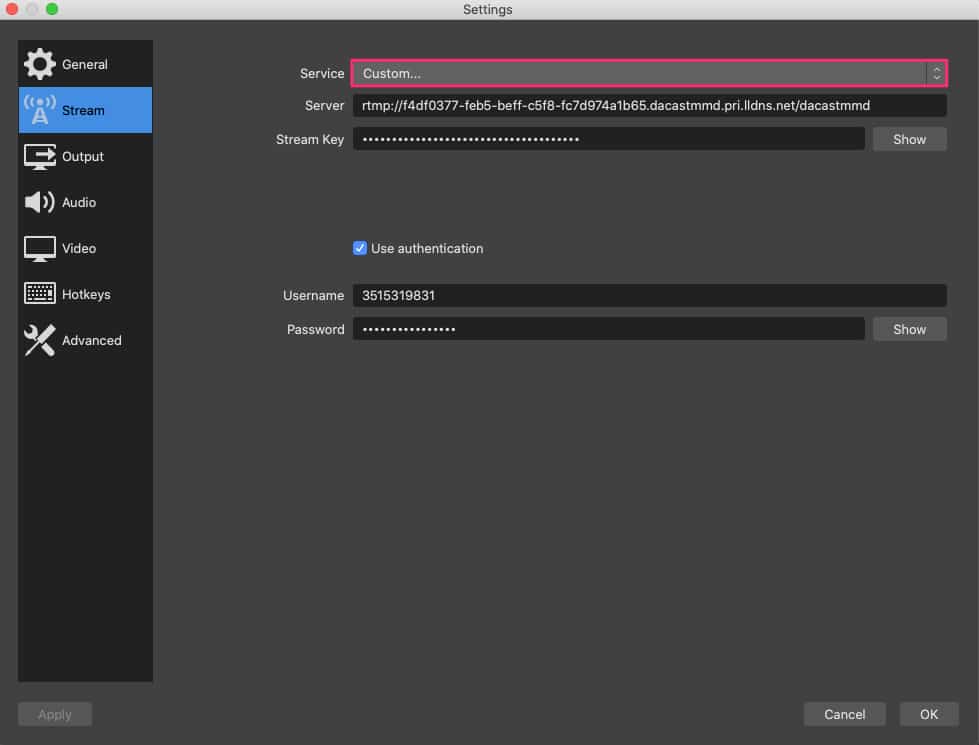
6. Connect to Your Streaming Platform (RTMP / Stream Key)
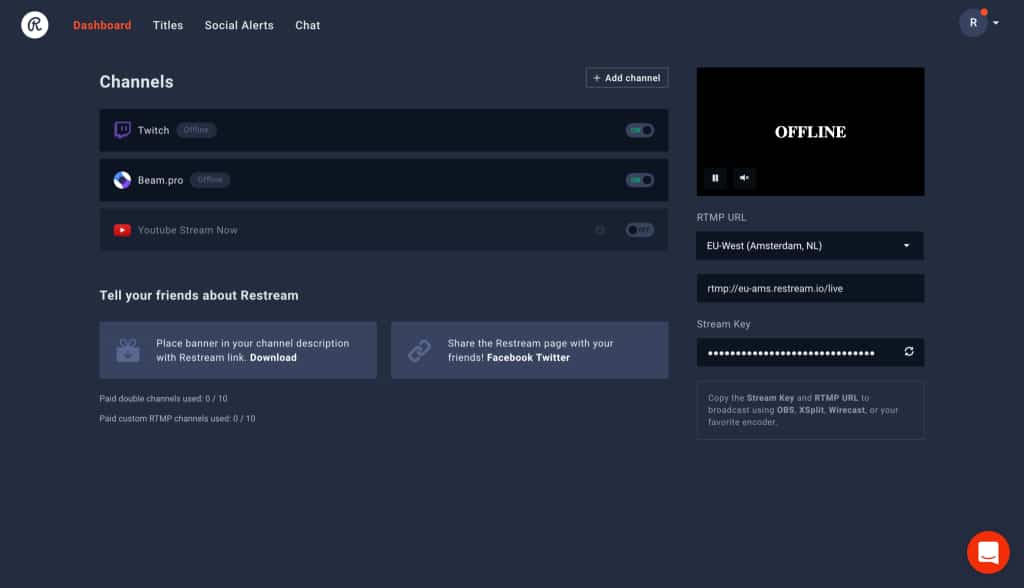
Follow these steps to fetch these credentials on Dacast:
- Go to your Dacast account, and open or create the channel you want to live stream with OBS. Open your “Encoder Setup” to adjust the OBS encoder settings.
- Select the “Stream Name,” click copy, and go back to OBS to paste the key in the Stream Key field.
- You have to do the same for “Server,” copied in the Stream URL. Repeat this for the username and password.
If you still have questions about configuring your OBS Studio settings, check out our OBS quickstart tutorial or watch our video on choosing the best OBS Studio settings.
For a full guide on how to use OBS for professional video streaming, see our dedicated article.
OBS Settings by Platform (2026 Limits That Matter)
Platform settings reflect each destination’s delivery architecture, not just its maximum allowed bitrate. This table shows what each platform expects from your encoder and what it does with your stream after ingest.
| Platform | Safe bitrate(1080p) | Keyframe | Ingestprotocol | ABRdelivery | Codecsupport | Broadcaster note |
| Twitch | ~6,000 Kbps | 2s | RTMP | Platform-side | H.264(AV1 beta, Partners only) | Platform enforces bitrate cap strictly. Stream above 6,000 and expect ingest rejections. Leave 10% headroom below the cap. |
| YouTube Live | 4,500–9,000 Kbps | 2s | RTMP / Enhanced RTMP | Platform-side | H.264; AV1 + HEVC via Enhanced RTMP | More tolerant of higher bitrates than Twitch. Enhanced RTMP enables AV1 – only use with confirmed stable setup. |
| Facebook Live | 4,500–9,000 Kbps | 2s | RTMP | Platform-side | H.264 | Enforcement is inconsistent. If unstable, reduce resolution before bitrate. 1080p/30 is the practical ceiling. |
| Dacast RTMP | 4,500–6,000 Kbps(1080p top rendition) | 2s | RTMP | Dacast multi-CDN(HLS ABR) | H.264 | Dacast transcodes your RTMP feed into an HLS ABR ladder. Your OBS bitrate sets the ceiling for the highest rendition. CBR + 2s keyframes are critical for clean HLS segment boundaries in the transcoding pipeline. |
| Custom RTMPendpoint | Depends on ingest config | 2s | RTMP | CDN-dependent | H.264 standard | When streaming to a custom RTMP endpoint, 2s keyframe + CBR apply universally. Confirm max ingest bitrate with your infrastructure provider. |
OBS into Dacast: What Happens After Your Encoder
Most OBS guides end at the encoder. For broadcasters streaming into Dacast, understanding the downstream pipeline matters because it determines how your OBS settings affect viewer experience, not just ingest stability.
| Stage | What happens / why your OBS settings matter | |
| 1 | OBS encodes | Your encoder outputs a single H.264 stream at your chosen CBR bitrate (e.g., 6,000 Kbps). This is your contribution feed : one quality level, one bitrate. |
| 2 | RTMP ingest | Dacast’s ingest server receives your stream. CBR ensures the server can buffer predictably. The 2-second keyframe interval aligns with HLS segment boundaries in the transcoding pipeline. |
| 3 | Cloud transcoding | Dacast transcodes your single-bitrate contribution feed into multiple renditions (ABR ladder) : typically 360p, 480p, 720p, and 1080p depending on your source bitrate. Your OBS bitrate sets the ceiling for the highest rendition. |
| 4 | CDN delivery | The ABR ladder is packaged as HLS and distributed via Dacast’s multi-CDN infrastructure. The CDN routes each viewer’s request to the nearest available server. |
| 5 | Viewer experience | Viewers receive the rendition that matches their device and network conditions, not your contribution bitrate. This switching is automatic and transparent. Your OBS settings determine the quality of the top rendition, which is the ceiling for every viewer. |
Practical implication: streaming at 3,000 Kbps into Dacast caps your highest ABR rendition at approximately 720p. If you want a 1080p top rendition available to viewers, your OBS contribution bitrate needs to support it (4,500–6,000 Kbps). This is why bitrate selection for a CDN-backed workflow is an infrastructure decision, not a platform compliance exercise.
Best OBS Encoder Settings by Hardware (2026)
Use a hardware encoder whenever available. It reduces CPU load and improves stability for long streams.
NVIDIA NVENC (recommended for NVIDIA GPUs)
- Encoder: NVENC (H.264)
- Rate Control: CBR
- Preset: P5/P6 (Quality)
- Multipass: Single
- Psycho-visual Tuning: On
- Look-ahead: Off (enable only if you’ve tested and have GPU headroom)
AMD AMF (AMD GPUs)
- Encoder: H.264 (AMF)
- Rate Control: CBR
- Preset: Balanced / Quality
Tip: avoid GPU-heavy browser sources if you see rendering lag.
Intel Quick Sync (QSV)
- Encoder: H.264 (QSV)
- Rate Control: CBR
Strong choice when you don’t have a discrete GPU.
Apple VideoToolbox (macOS)
- Encoder: Apple VT H.264
- Rate Control: CBR
Great for long streams on Apple silicon.
When to use x264
Use x264 mainly when hardware encoding isn’t available or you’ve tested and confirmed CPU headroom.
Best OBS Bitrate Settings by Resolution (2026)
When streaming into a platform that transcodes your feed (Dacast, YouTube, Facebook), your OBS bitrate is your contribution ceiling, the highest rendition the platform can produce. Set your OBS bitrate to match your intended top rendition, not your average viewer’s connection speed. The platform creates lower renditions automatically.
240p (ULD)
Bitrate: 300–700 Kbps | FPS: 24–30 | Profile: Baseline | Audio: 64 Kbps AAC
360p (LD)
Bitrate: 500–1,200 Kbps | FPS: 24–30 | Profile: Baseline/Main | Audio: 96 Kbps AAC
480p (SD)
Bitrate: 1,200–2,500 Kbps | FPS: 30 | Profile: Main | Audio: 128 Kbps AAC
720p (HD)
Bitrate: 2,500–5,000 Kbps | FPS: 30 (60 if stable) | Profile: High | Audio: 160 Kbps AAC
1080p (FHD)
Bitrate: 4,500–9,000 Kbps | FPS: 30–60 | Profile: High | Audio: 160–320 Kbps AAC
1440p (QHD)
Bitrate: 8,000–16,000 Kbps | FPS: 30–60 | Profile: High | Audio: 320 Kbps AAC
| Rendition | Resolution | Video Bitrate (Kbps) | FPS | H.264 Profile | Audio (Kbps) |
|---|---|---|---|---|---|
| ULD | 240p | 300–700 | 24–30 | Baseline | 64 |
| LD | 360p | 500–1,200 | 24–30 | Baseline/Main | 96 |
| SD | 480p | 1,200–2,500 | 30 | Main | 128 |
| HD | 720p | 2,500–5,000 | 30–60 | High | 160 |
| FHD | 1080p | 4,500–9,000 | 30–60 | High | 160–320 |
| QHD | 1440p | 8,000–16,000 | 30–60 | High | 320 |
Upload Speed Rule: Avoid Dropped Frames
A stable live stream depends on how much headroom your network has, not just your advertised upload speed. In real-world streaming, temporary bandwidth drops, network jitter, and background traffic can cause dropped frames even when average speeds appear sufficient. As a rule, your total streaming bitrate (video + audio) should stay within 70–80% of your tested upload bandwidth. For example, if your upload speed is 12 Mbps, your combined OBS bitrate should not exceed 8–9 Mbps. This headroom helps absorb short-term fluctuations and keeps your stream stable during longer broadcasts. Streaming above this threshold even briefly can result in dropped frames, buffering, or forced quality reduction by the platform, regardless of your encoder settings.OBS Advanced Output Mode (Recommended Defaults)
Advanced Output Mode gives you control over the settings that determine stream stability and platform compliance. 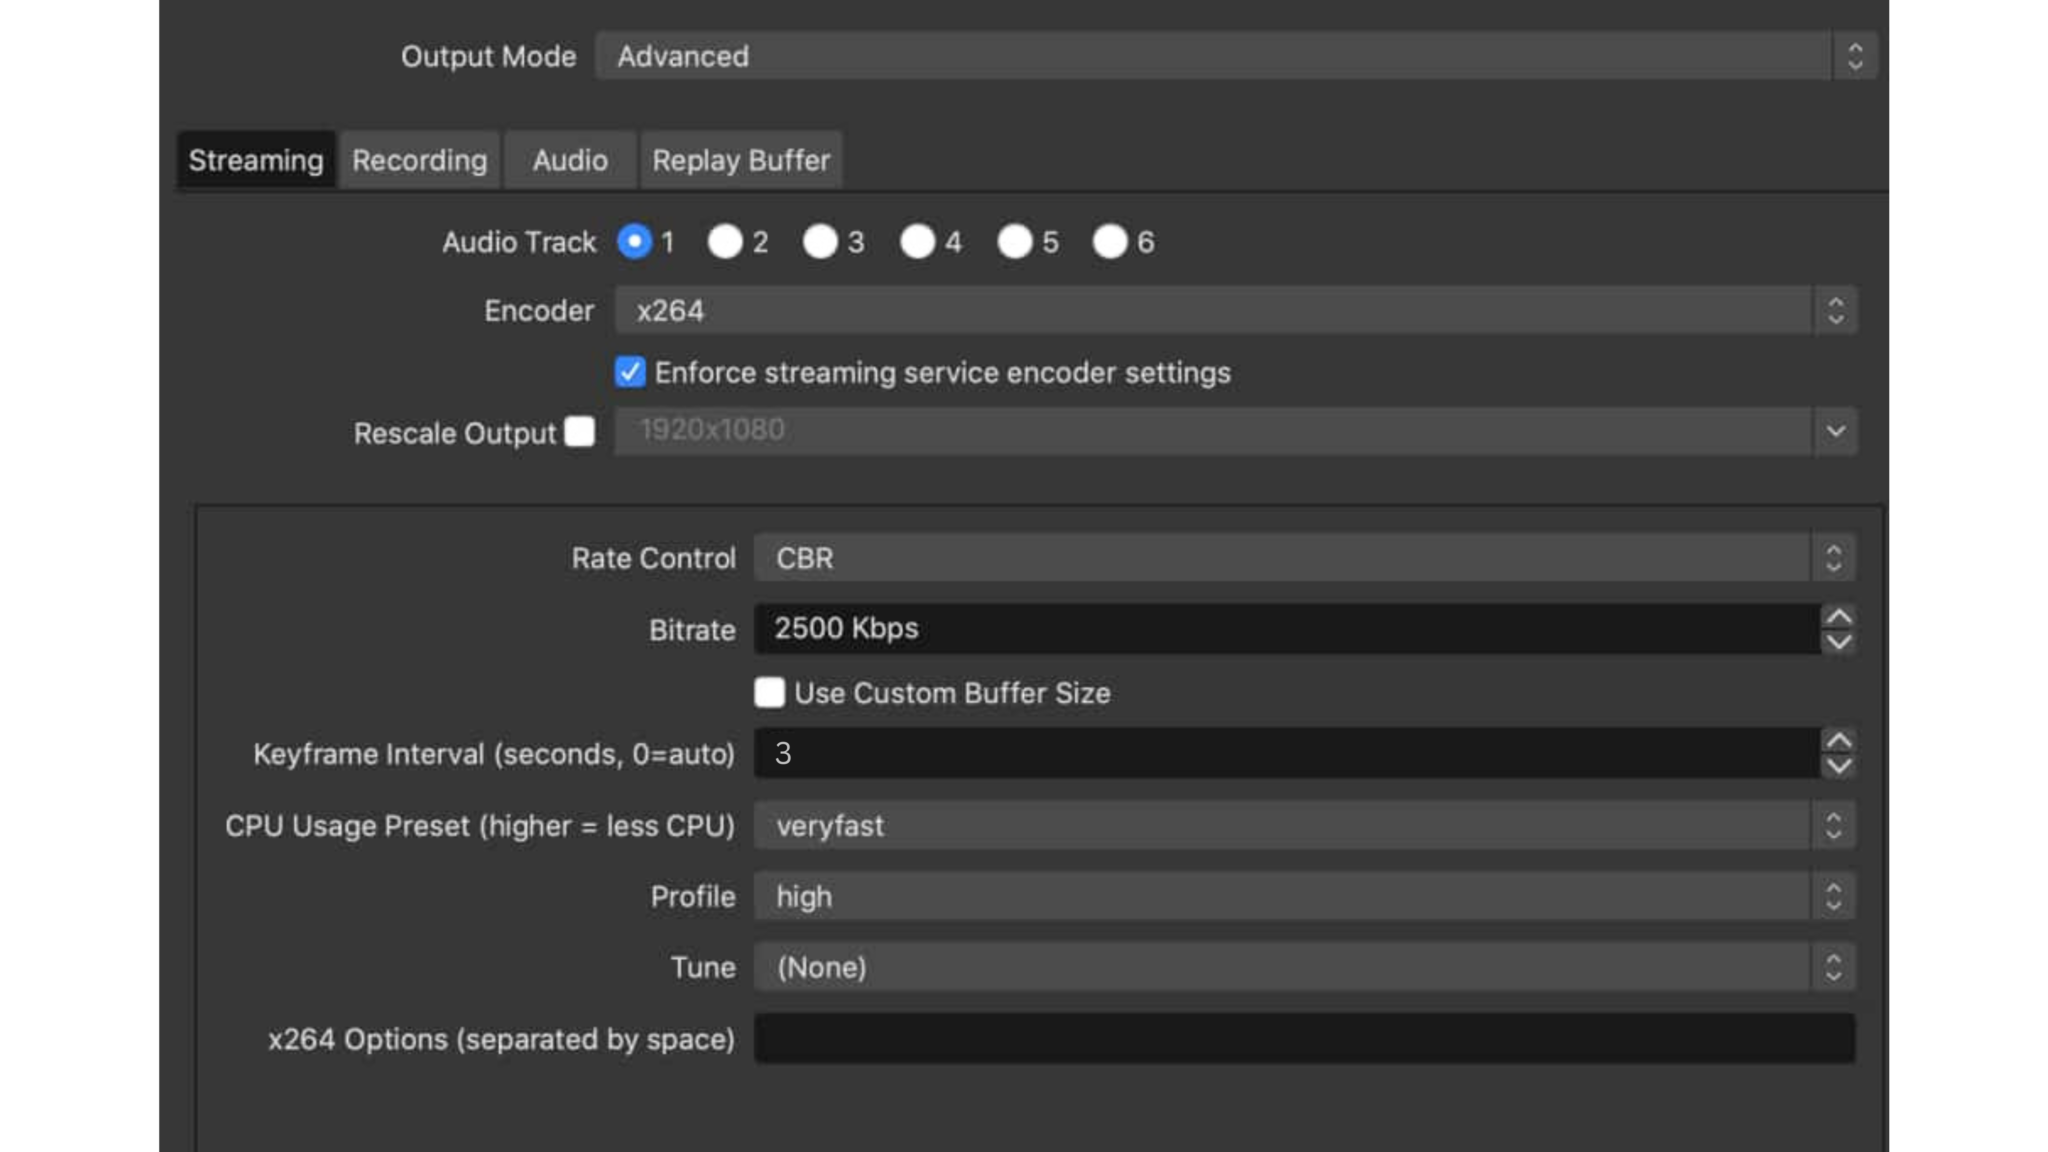
Use these defaults for most live streams:
- Output Mode: Advanced
- Rate Control: CBR
- Keyframe Interval: 2 seconds
- Encoder: hardware (NVENC / AMF / QSV / VideoToolbox) when available
- Audio: AAC, 160 Kbps, 48 kHz (increase only if content benefits and you have upload headroom)
If you use x264, choose a faster preset when CPU load is high, and lower resolution or FPS before pushing bitrate.
Low-Latency Streaming in 2026: WHIP + WebRTC vs RTMP
If you need sub-second latency, WebRTC workflows via WHIP are increasingly standard for interactive streams in 2026. OBS Studio 31+ supports WHIP natively, enable it under Settings > Stream > Service > WHIP and enter your endpoint URL. For most professional broadcasts (pay-per-view, corporate events, government sessions), RTMP ingest + HLS ABR delivery remains the correct default for stability, scalability, and CDN compatibility.
Troubleshooting OBS Streams With Built-In Tools
When streams fail, identify where the issue is: network, encoding, or rendering.
OBS Stats Dock
Open View → Docks → Stats and watch:
- Dropped Frames (Network): upload/jitter problem
- Skipped Frames (Encoding): encoder overload
- Missed Frames (Rendering): GPU rendering bottleneck (scene complexity)
OBS Log Analyzer
Upload your log after a session to flag common issues (overload, rendering lag, misconfigured output) and validate whether your changes fixed the root cause.
Workflow Boosters for OBS (Optional)
The features below can improve efficiency and reduce on-air mistakes, but they are optional and do not affect stream quality or platform compliance.
- Studio Mode: Allows you to preview scenes before pushing them live, helping prevent accidental transitions during broadcasts.
- Hotkeys: Useful for quick actions such as switching scenes, muting audio sources, or starting and stopping streams without using the mouse.
- Video Sources: Keep scenes and source counts as simple as possible. Complex scenes and multiple browser sources can increase GPU load and contribute to rendering lag.
These tools are best used to streamline live production workflows once your core OBS settings (bitrate, resolution, encoder, and platform limits) are already dialed in.
OBS Recording Format Settings (MKV vs MP4)
If you record while streaming, format choice affects whether you lose the file after a crash.
- MKV: safest (recording usually survives interruption)
- MP4: compatible but can corrupt if the session ends unexpectedly
Best practice: record MKV → remux to MP4 after the stream using OBS.
OBS Studio vs. Streamlabs OBS vs vMix
| OBS Studio 32 | Streamlabs Desktop | vMix | |
| Cost | Free, open-source | Free (paid creator tiers) | $60–$1,200 one-time |
| Best for | Professional control, precise encoder config, CDN/RTMP workflows | Beginner creators, social platform streaming | Multi-camera, professional broadcast production |
| Encoder control | Full Advanced Output Mode, every setting accessible | Abstracted, fewer raw settings exposed | Full control + hardware mixer and NDI integration |
| CPU overhead | Efficient with hardware encoders | Higher due to creator overlays and tools | Higher, production-grade software |
| Plugin ecosystem | Extensive (community) | Limited to built-in tools | Limited |
| Dacast compatibility | Fully compatible, recommended | Compatible via RTMP | Compatible via RTMP |
| Use for Dacast | Primary recommendation for RTMP ingest | Acceptable for basic RTMP | Recommended for multi-camera professional events |
FAQs
A good OBS bitrate for 1080p live streaming depends on your frame rate and platform:
– 1080p at 30 FPS → 4,500–6,000 Kbps
– 1080p at 60 FPS → 6,000–9,000 Kbps
For recording, a higher bitrate of 20,000–50,000 Kbps is recommended for better quality.
For 1440p (Quad HD) live streaming, use:
– 1440p at 30 FPS → 8,000–12,000 Kbps
– 1440p at 60 FPS → 12,000–16,000 Kbps
For recording, use 30,000–50,000 Kbps for optimal quality.
The best OBS settings depend on your resolution, frame rate, and available bandwidth. Here’s a recommended setup for smooth and high-quality streaming:
– Resolution: 1920 × 1080 (1080p)
– Bitrate: 6,000 Kbps (Twitch max) / 8,000 Kbps (YouTube recommended)
– Frame Rate: 60 FPS (for smooth motion)
– Encoder: NVENC (if using NVIDIA GPU) or x264 (if CPU is strong)
– H.264 Profile: High
– Rate Control: CBR (Constant Bitrate)
– Keyframe Interval: 2 seconds
– Audio Bitrate: 160–320 Kbps
If your upload speed is limited, lowering the bitrate to 4,500 Kbps at 30 FPS can help maintain stability.
Yes, but with limitations. A higher bitrate improves video quality, but:
– Streaming platforms have bitrate limits (Twitch max: 6,000 Kbps for non-partners, YouTube allows up to 51,000 Kbps for 4K).
– Your internet upload speed must support the bitrate (recommended: 2x your chosen bitrate for stability).
– Viewers need a strong connection, too high a bitrate may cause buffering.
For recording, higher bitrates (20,000–50,000 Kbps) ensure better quality, especially for post-production editing.
Several factors could cause poor stream quality in OBS:
– Bitrate too low for resolution : check the bitrate table and increase for your target rendition
– Upload speed insufficient : total OBS bitrate must stay within 70–80% of tested upload speed
– Wrong encoder : switch to hardware (NVENC/AMF/QSV) before troubleshooting x264 on CPU
Resolution or FPS mismatch : lower output resolution before reducing FPS if bandwidth is constrained
– CPU or GPU overload : close other applications, simplify OBS scenes, limit browser sources
– Platform bitrate cap exceeded : Twitch enforces ~6,000 Kbps; streaming above it causes ingest instability
For clear, professional audio, use the following settings:
– Sample Rate: 48 kHz (matches most professional audio gear)
– Bitrate: 160 Kbps (standard quality) / 320 Kbps (high-quality streams & recordings)
– Audio Format: Stereo
– Noise Suppression: Enabled (for background noise reduction)
– Compressor: Enabled (to balance volume levels)
– Gain Control: Adjusted to prevent distortion
For microphone quality improvement, add filters such as Noise Gate, Compressor, and EQ adjustments.
The best browser for OBS Studio streaming depends on the platform and system performance. Google Chrome, Mozilla Firefox, and Microsoft Edge are all popular choices, but:
– Google Chrome → Best for compatibility but high RAM usage.
– Mozilla Firefox → More RAM-friendly, but may have WebRTC limitations.
– Microsoft Edge → Best performance for Windows users with low CPU/RAM usage.
For web-based stream control (like OBS web integrations or browser sources), Chrome or Edge is recommended for better compatibility with OBS plugins.
High CPU usage in OBS Studio can lead to dropped frames and lag. To mitigate this:
– Lower Output Resolution: Reducing the output resolution (e.g., to 1280×720) decreases the amount of data processed, easing CPU load.
– Adjust Encoder Settings: If using ‘x264’, select a faster preset like ‘superfast’ or ‘ultrafast’. This reduces CPU usage at the expense of some video quality.
– Limit Frame Rate: Setting the FPS to 30 can significantly cut down CPU demands compared to higher frame rates.
– Simplify Scenes: Minimize the number of active sources and avoid complex scenes with multiple overlays or effects.
– Close Unnecessary Applications: Ensure no other high-CPU applications are running in the background during streaming or recording.
– Use Hardware Encoding: If available, switch to hardware encoders like ‘NVENC’ (for NVIDIA GPUs) or ‘Quick Sync’ (for Intel CPUs) to offload encoding tasks from the CPU.
– Set resolution to 1280×720
– Use 30 FPS for smoother performance
– Choose NVENC (if available) or x264 with “veryfast” preset
– Bitrate: 2500–3000 kbps with CBR
– Keep scenes simple and limit overlays
Check out our ultimate guide on how to stream on kick with OBS, where we’ll walk you through everything you need to know to get started on Kick using OBS.
For Twitch, use CBR, a 2-second keyframe interval, and keep your video bitrate at or below 6,000 Kbps. Resolutions up to 1080p at 60 FPS are supported, but many streams are more stable at 1080p/30 depending on upload speed. Hardware encoders like NVENC are recommended to reduce CPU load.
YouTube Live supports a wider range of resolutions and bitrates than most platforms. For 1080p streams, a bitrate between 4,500 and 9,000 Kbps is typical, with a 2-second keyframe interval. YouTube also supports newer codecs like AV1 and HEVC through Enhanced RTMP, though H.264 remains the safest default for broad compatibility.
Yes. Facebook Live supports streaming up to 1080p at 60 FPS, with recommended bitrates generally ranging from 4,500 to 9,000 Kbps and a 2-second keyframe interval. Using CBR and staying within Facebook’s enforced limits helps prevent buffering and dropped frames.
Yes. All settings in this guide are validated for Dacast RTMP ingest. Using platform-safe bitrates, consistent keyframes, and hardware encoding allows Dacast to deliver streams reliably through its global CDN, enable adaptive bitrate playback, and support live recording and monetization workflows.
When your RTMP destination transcodes your stream (Dacast, YouTube, Facebook), your OBS settings determine the quality ceiling of the output ABR ladder, not the final viewer bitrate. Use H.264, CBR, a 2-second keyframe interval, and a contribution bitrate that matches your intended top rendition: 4,500–6,000 Kbps for a 1080p ceiling, 2,500–4,000 Kbps for 720p. Hardware encoding (NVENC, AMF, QSV) is strongly recommended for sustained broadcasts. Your audio settings (AAC, 160 Kbps, 48 kHz) are independent of transcoding and should be set for the highest quality your upload headroom supports.
Conclusion
The best OBS settings for professional streaming are the ones your delivery architecture requires, not the ones your platform allows. CBR and 2-second keyframes exist because HLS delivery and CDN ingest depend on them. Your bitrate ceiling is set by your upload headroom and your intended ABR top rendition.
If you are streaming into a CDN-backed platform like Dacast where your RTMP contribution feed is transcoded into an HLS ABR delivery stack and distributed via multi-CDN infrastructure, these settings are the foundation of a reliable, scalable broadcast workflow.
Start with the Quick Start presets, validate with OBS Stats, and adjust based on your tested upload headroom and target top rendition. For additional details on streaming settings with OBS Studio, you can always check out our tutorials on how to stream using Dacast OBS for Mac or Dacast OBS for Windows.
Not yet using our streaming solutions, and ready to give our platform a try? Our video hosting and live streaming platform are both feature-rich and affordable. We encourage you to take advantage of our risk-free trial and test out all of our features free for 14 days (no credit card required)!
Get Started For Free
For exclusive offers and live streaming tips, you can also join our LinkedIn group. Thanks for reading, and best of luck with your live broadcasts.