


How to Optimize for HTML5 Video Streaming & HTML5 Video Tag [2025 Update]

HTML5 adaptive streaming is the new standard in high-quality video playback today. You’ve likely heard of HTML5 video streaming and are curious about what it is and what it means.
In a nutshell, HTML5 video streaming allows for the manipulation of multimedia content using <audio> and <video> HTML tags. The latter creates a native HTML5 video player with additional customization options for displaying video content. Don’t let the technicality scare you. Broadcasters everywhere can upload secure videos and deliver the highest quality video and live video content with some basic understanding and straightforward code. Live-streaming videos and securely uploading videos has never been more accessible for those without a tech background.
In this article, we cover HTML5 video streaming. We outline what an HTML5 video player is, the benefits and more. We also discuss the benefits of HTML5 live streaming. Furthermore, we tell you how to embed a player for HTML5 streaming and optimize an HTML5 streaming tag.
Table of Contents
- What Is HTML5 Video Streaming and How Does It Work?
- What Is an HTML5 Video Player?
- Benefits of HTML5 Video Streaming
- Challenges of HTML5 Video Streaming
- HTML5 Video Tags
- HTML5 Video Hosting
- HTML5 Multicast Video Streaming
- HTML5 Video Optimization
- HLS Protocol for HTML5 Video Streaming
- How to Embed a Player for HTML5 Streaming
- How to How to Optimize an HTML5 Video Stream Tag
- How to Add a Background Video to HTML5
- Additional HTML5 Tags for Improved Streaming
- FAQs
- Conclusion
What Is HTML5 Video Streaming and How Does It Work?
During the early 1990s, when the Internet was still in its infancy, the first web browsers only supported static HTML pages. These pages were simple text documents with hyperlinks that allowed users to navigate from one page to another.
Around 1994, the first images appeared on websites as the <img> HTML tag was introduced.
Then, in 1995, audio and HTML video tags were created, which allowed web developers to embed multimedia content on their websites.
However, it wasn’t until 2010 that HTML5 video streaming became widely adopted. That’s because earlier versions of HTML didn’t support the HTML video tag, and browsers couldn’t play videos without a plugin like Adobe Flash Player or Microsoft Silverlight.
When HTML5 was released, it included a new <video> tag that allowed browsers to play videos without the need for any plugins natively. HTML5 also introduced several other features that made developing websites and web applications more accessible.
Some of the benefits of improved software technology include the following:
- Better video quality
- Reduced buffering
- More functional video player
Something else you need to know is HTML5 multicast video streaming, a type of live streaming that uses the HTML5 <video> tag to send a single video stream to multiple viewers. With the help of a CDN, live streaming HTML5 video, you can stream your content to viewers worldwide.
There are three methods for online video streaming:
- Proprietary format
- Intermediate player
- HTML5 video streaming
Let’s check them out.
1. Using a Proprietary Format
The first method of online video streaming was common in the early days of the internet but is pretty much obsolete now. Nevertheless, it’s essential to mention and review, as it’s a vital part of live streaming history.
With a proprietary format, video content would use a format for streaming videos exclusive to that site. That’s because, in the early days, when broadcasters first started sharing videos via the internet, most web browsers didn’t have any built-in video players.
Instead, websites would use a proprietary format, such as .mov, .rm, or wmv. Then, they would provide their video player and place the video on the web page itself.
Some videos use a dedicated player such as Apple QuickTime for .mov files. However, sharing videos was difficult in the early days of video streaming.
2. Using an Intermediate Player
Another popular method for live streaming video content is by using an intermediate player. One of the most popular intermediate players is YouTube.
YouTube came onto the scene in 2005 and has remained popular ever since. YouTube helped mainstream streaming video, and it’s an excellent example of a popular website that uses an intermediate player.
When users upload a video file to YouTube, viewers access the content through YouTube’s embedded player. Likewise, viewers can share the audio and video content via a YouTube code.
However, modern browsers now include embedded video players of their own. That means that it’s not always necessary for a website to provide the player, so the use of intermediate players is declining.
3. Using HTML5 Video Streaming
The most modern method of video streaming is HTML5 video streaming. It’s the most innovative approach to streaming video.
With HTML5 video streaming, the website hosting the content uses native HTTP to stream the media to viewers directly.
Content tags (e.g., HTML <video> tag) are part of the HTML code.
Thus, using the HTML <video> tag creates your browser’s native HTML5 video player. These tags guide the HTTP protocol on what to do with this content. For example, HTTP displays the text, and an audio player plays audio content. That’s how HTML5 video streaming works and how you can embed a video with HTML5 using native HTTP.
Also, HTML tags have various attributes, or parameters, which provide further detail on how to present the content. For example, with the <img> tag, you can specify the size of the image.
More recently, HTML5 has expanded the media capabilities of basic HTML.
For example, enhancements to the <img> tag and the new <video> tag provide content creators with more flexibility and ease in presenting media content. In addition, understanding different HTML video tags allows for more customization with your presentation.
This flexibility of HTML video tags allows broadcasters to deliver media without worrying about which browser a given visitor uses.
What Is an HTML5 Video Player?

For years, Adobe’s Flash video player was the primary method of delivering video via the internet. However, Flash is now considered an outdated streaming protocol. Most modern browsers, such as Chrome, stopped supporting the Adobe Flash player at the end of 2022.
Part of why Adobe Flash player became obsolete is because it isn’t supported on mobile devices. With most people accessing the internet through mobile devices, this helped to contribute to the demise of Adobe Flash player. The most common video streaming technology is now HTML5 video players and HLS delivery streaming protocols.
HTML5 is a more modern streaming solution. It can be used to stream videos directly from a website. One of the biggest advantages of HTML5 is that it supports mobile streaming on all devices.
HTML5 video streaming provides a simpler way to use video on web pages. Before its publication as a markup language in 2014, videos could only play in a browser with plugins like Flash. By using HTML5, developers no longer worry about which browser or extension their visitors use, allowing for greater video access.
Additionally, HTML5 simplifies video delivery by providing support for various attributes, elements, and tags to assist with the structure of your webpage.
These support features include articles, sections, and multimedia tags that support adding video and audio formats to your content.
Benefits of HTML5 Video Streaming
With HTML5, web developers can now add video and audio to a web page without plugins. That has numerous benefits, including:
- Reduced Development Time and Costs: Previously, different plugins had to be used for different browsers. That required more development time to ensure compatibility with popular browsers. All major browsers support HTML5, so development time is reduced.
- Increased Mobile Support: One of the main benefits of using HTML5 is that it supports mobile devices. That wasn’t possible with Flash, so HTML5 provides better access to video streaming on all devices.
- Fewer Resources: HTML5 doesn’t require additional plugins or software, unlike other video streaming solutions. That means it uses fewer resources, which benefits both users and developers.
- Improved Accessibility: Using HTML5 video tags also provides better support for people with disabilities. For example, screen readers can now access video content previously hidden in Flash videos.
- Simple to Add Apps/Tools/Links: Adding apps and links is much easier and quicker when using an HTML5 video player. That’s because you don’t have to worry about which browser your visitors are using.
- Faster Rendering and Processing: HTML5 videos load faster than Flash videos since they don’t need to be downloaded first. That results in less waiting time for users and less strain on servers.
HTML5 video is so accessible most people don’t even realize they are using it. As a result, it has become the video player of choice.
Challenges Of HTML5 Video Streaming
While HTML5 streaming has numerous benefits for broadcasters and viewers alike, it’s not without its shortcomings.
For one, HTML5 needs a specific format and protocol to function. As mentioned earlier, one format that HTML-5 uses and has been gaining popularity is Dynamic Adaptive Streaming over HTTPS or MPEG-DASH.
Unfortunately, not all browsers and devices natively support MPEG-DASH. So, you may need a transcoder to convert your stream to other formats like HLS or RTMP for streaming platforms.
Another challenge is that when live streaming with HTML5, you may require additional bandwidth and resources to ensure high-quality streams. This makes this type of streaming more costly compared to plug-in-based streaming.
HTML5 Video Tags
HTML5 video tags are essential for HTML video streaming on the web. They allow you to embed videos directly into your website without relying on external plugins. The `<video>` tag is the core component, enabling you to play video files across different devices and browsers seamlessly.
To optimize your HTML5 video streaming, consider using the right codecs and formats. Common formats like MP4, WebM, and Ogg are widely supported, ensuring smooth playback. Implementing adaptive bitrate streaming can enhance user experience by adjusting video quality based on the viewer’s internet speed.
For HTML5 video live stream, you’ll need to set up a media server that supports streaming. You can use HTML5 code for live streaming video to link to your video source. Additionally, using the `src` attribute allows you to HTML5 stream video from URL, making it easy to access live feeds.
Explore various HTML5 video streaming examples to understand how to implement features like captions, controls, and playlists. By utilizing HTML5 video tag streaming, you can create a user-friendly experience that keeps your audience engaged with high-quality content, whether it’s for live events or pre-recorded videos.
HTML5 Video Hosting
HTML5 video hosting has become a popular choice for delivering content online. It offers a reliable way to showcase videos on websites without requiring additional plugins. With HTML5 multicast video streaming, you can broadcast to multiple viewers simultaneously, making it ideal for live events or presentations.
To get started with HTML streaming video, you’ll need an HTML5 video streaming player that supports various video formats. This flexibility ensures a smooth viewing experience across different devices. An HTML5 live streaming example can help you understand how to integrate video players into your site effectively.
To achieve optimal performance, consider HTML5 video optimization techniques. Start by compressing video files to reduce loading times without sacrificing quality. Use adaptive bitrate streaming to adjust video quality based on the viewer’s internet connection, ensuring a seamless experience.
When setting up your HTML5 live streaming, make sure to test the HTML5 live streaming video player on various devices and browsers. This way, you can ensure compatibility and provide viewers with the best possible experience. By following these steps, you can maximize the impact of your HTML5 streaming video and engage your audience effectively.
HTML5 Multicast Video Streaming
With HTML5 multicast video streaming, users to deliver video content efficiently to multiple viewers simultaneously. This technology enhances the user experience, especially for live events, by using the HTML5 video tag to embed videos directly into web pages. This tag supports various video formats, ensuring compatibility across devices.
To optimize HTML5 video quality, it’s essential to consider a few key factors. First, choose the right codec and resolution for your videos to balance quality and file size. Using adaptive bitrate streaming can help deliver the best possible experience by adjusting the video quality based on the viewer’s internet speed.
Another critical aspect is to minimize HTML5 video buffering. This can be achieved by hosting videos on a reliable platform with sufficient bandwidth, such as HTML5 video hosting services. These platforms often provide tools for efficient streaming and help ensure smooth playback.
Also, for HTML5 live video, use a content delivery network (CDN) to distribute the stream globally, reducing latency and improving viewer experience. By following these practices, you can effectively enhance your HTML5 video streaming performance and provide an enjoyable viewing experience.
HTML5 Video Optimization
HTML5 video optimization is necessary for ensuring smooth playback and a great user experience. First, choose the right video format; MP4 is widely supported and provides good quality with manageable file sizes. To further enhance performance, compress your videos without sacrificing quality using tools like HandBrake or FFmpeg.
Next, use adaptive bitrate streaming to deliver the best quality for different network speeds. This approach allows users with slower connections to enjoy videos without buffering. Implement lazy loading to defer loading videos until they are in view, which can significantly improve page load times.
Also, ensure that your HTML5 video player is responsive, allowing it to adapt to various screen sizes and devices. Adding fallback options, like a message for unsupported browsers, ensures users always have a way to access content. By following these steps, you can optimize HTML5 videos for better performance and user satisfaction.
HLS Protocol for HTML5 Video Streaming
In recent years, HLS has become a common protocol for streaming video over HTML5 players.
If you’re new to the term, HLS is an acronym for HTTP Live Streaming. HLS is a media streaming protocol that delivers visual and audio media to viewers online.
These technological advancements have been advantageous for both broadcasters and viewers. In particular, broadcasters can modify both HTML5 and HLS to their specifications. Additionally, these protocols are safer, more reliable, and faster than earlier technologies.
First launched by Apple in 2009, broadcasters often prefer HLS streaming for its broad support on multiple browsers and devices.
Other older protocols include:
- RTMP stands for Real-Time Messaging Protocol. It’s a proprietary protocol developed by Adobe that was commonly used for streaming audio and video data.
- HDS is an acronym for HTTP Dynamic Streaming. It’s similar to HLS but was developed by Adobe as a part of the Flash platform.
- MSS is an acronym for Microsoft Smooth Streaming. It’s a proprietary protocol developed by Microsoft and was commonly used in Silverlight applications.
- MPEG-Dash is a more recent protocol that’s based on ISO standardization.
While HLS is the most widely used streaming protocol, MPEG-Dash is gaining popularity due to its standardized format.
You can read more about HLS in general and HLS streaming with an HTML5 video player in our post on HLS streaming protocols.
How to Embed a Player for HTML5 Streaming
Now that you understand the history and purpose of HTML5 video players, we’ll dive into a few approaches to HTML5 streaming.
To begin, let’s discuss the three main ways to embed videos on your website:
- Use the HTML5 <video> tag directly in your browser
- Create your player
- Choose a ready-made HTML5 player
- Embed a Video with HTML5
1. Embed a Video with HTML5

When you’re setting up HTML5 video streaming on your website, you must declare the following:
- A <video> tag
- The URL of the video
- Any stylistic requirements you might want to customize (for a more appealing video player than the standard player)
*Note: It’s important to note that the <video> tag is a simple piece of code you can add to your web pages.
The standard <video> tag provides the following functionality:
- Specify the width and height of the player
- Display or hide video controls, including play/pause, volume, full-screen toggle, and seek slider
- Set a poster image to display while the video is downloading or not to play
- Provide a set of videos in different HTML5 video formats so that each browser can play a format it supports
- Include closed-caption subtitles or captions in multiple languages
- Tell the browser whether to start downloading the video when the page loads or only when the user presses “Play.”
- Control autoplay settings
- Decide whether to play content once or in a loop.
- Indicate if you’d like to play the video without sound (muted). For example, automated videos on Facebook display the mute option overlaid on the video.
*Note: We’d like to point out that although the HTML5 <video> tag is considered the most widely supported video player element, not every version of every browser supports it.
Suppose users visit your site using earlier versions than the following browsers. In that case, they won’t be able to watch any videos displayed using HTML5:
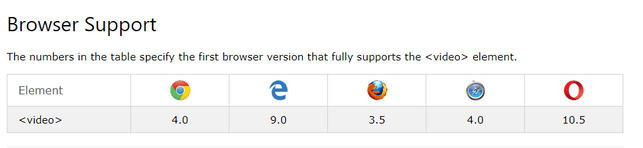
- Microsoft Edge.
- Chrome: Version 4.0 and above
- Mozilla Firefox: Version 3.5 and above.
- Safari: Version 4.0 and above.
- Opera: Version 10.5 and above.
It’s also important to note that HTML5 video streaming requires technical knowledge and dedicated resources. Therefore, it’s best to opt for an existing HTML5 player if you lack the knowledge to manipulate HTML5 code, but we’ll discuss this option further in this post.
2. Develop Your HTML5 Player

Another option for embedding video content on your website is via your HTML5 video player. However, building a custom HTML5 video player requires a combination of HTML and CSS coding. It also requires knowledge of the HTML5 Media API.
The player’s appearance is basic without specifying any code that styles the HTML5 video player. It also depends on the browser from which the video plays.
Providing a consistent interface for HTML5 video streaming on your site is also helpful for branding and visual presentation.
Again, it’s important to note that HTML5 video streaming is a reasonably technical option suitable for people with requisite coding knowledge. Otherwise, an existing HTML5 player built by a dedicated team through a live-streaming API is a better option if you lack the technical know-how.
3. Use an Existing HTML5 Player
We highly recommend using an existing HTML5 player if you’re new to broadcasting.
As mentioned above, many HTML5 players already exist and can be easily customized by broadcasters to represent their brand without deep technical knowledge. Moreover, this allows users who don’t have the technical knowledge for HTML5 video streaming to broadcast their chosen video.
Here are some viable video players available today:
- VideoJS is a free, open-source HTML5 player that uses Javascript and CSS. More than 400,000 websites across the web use this particular player.
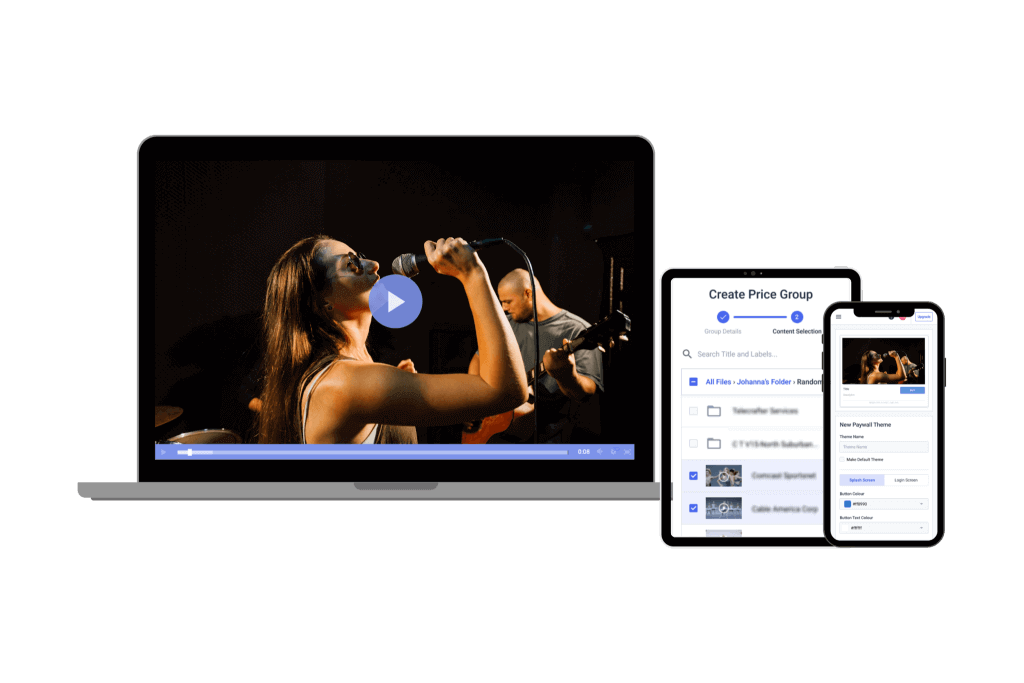
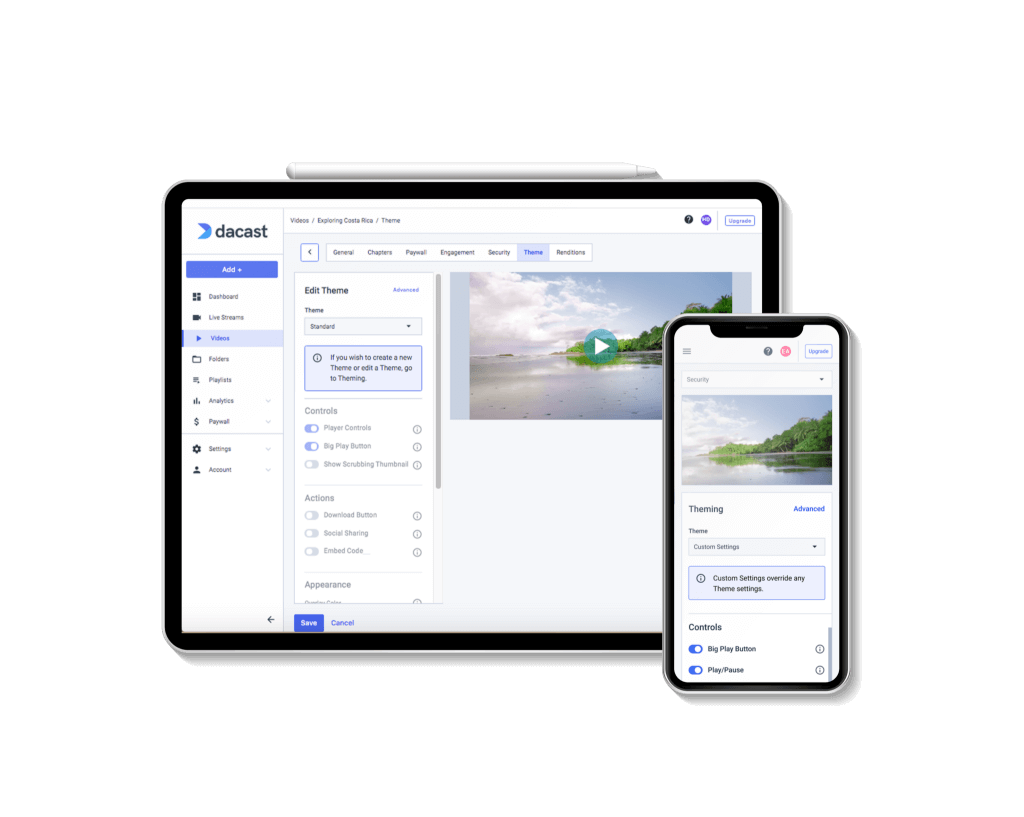
- Some HTML5 players use VideoJS as their base and add more functionality to the primary player. An example is the Dacast all-device video player, which offers functionality to stream live video and a customizable player skin.
- JW Player is a for-pay HTML5 player that supports 4K video and adaptive bitrate streaming.
- Other solutions include Flow Player, jPlayer, and Mediaelement.js.
Native HTML5 video doesn’t support RTMP app streaming or HDS protocols. However, JW does support these two protocols. So, as mentioned above, if you plan to use a solely HTML5 video player, HLS is probably the best protocol for you.
We’d also like to point out that some existing HTML5 video players, including the one from Dacast, are built for low-latency streaming. Any video you stream with a Dacast player automatically uses low-latency streaming. So no matter your viewer’s internet connection, they will be able to watch your content.
How to Optimize an HTML5 Video Stream Tag
There are a few ways to get the most out of the HTML5 <video> tag.
The first thing to pay attention to is your format. Using standard formats allows users to play videos easily. MP4 (MPEG-4) is the most widely-used format. However, Ogg and WebM formats are becoming more widely known.
WebM is now supported by recent versions of Chrome, Firefox, Opera, Safari on OS/X, and Microsoft Internet Explorer 9 and up (requires WebM MF components). With this development, multiple formats mean easier viewing.
A significant optimization hack in video delivery is to lower the lag time or latency. Today, video is the most popular form of content consumption. Users spend mere seconds waiting for videos to start playing.
Broadcasters will also want to optimize your control settings. Here’s a quick breakdown of a few common settings to pay attention to:
- Physical size and resolution: Set the maximum physical size to provide control over uploads and lower lag time. For example, using a 1280×720 frame is usually plenty for most videos.
- Length: Trim videos to capture the most compelling frames.
- Quality and Bitrate: Adjust these settings to decrease file size without significantly impacting perceived HTML5 video quality.
- Video-Codec: Generally, you can use the default settings to normalize and optimize the video for the web. However, in some cases, you want to set the codec to lower the file size manually.
- Compression: Always compress video files before using them on your site.
- Provide fallback options: In case your HTML5 video is not supported on a website or certain devices, provide fallback options for better compatibility. For instance, you could provide a static image with a link to download the videos or specify optional formats for specific browsers.
How to Add Video Background to HTML5
If you want to engage a first-time visitor on your site, in the best-case scenario, you have 20 seconds. One of the ways to achieve this is by using video backgrounds.
A video background can be a great way to immediately grab your viewer’s attention while providing valuable information about your brand, product, or service.
Video backgrounds can create an immersive experience that draws users into your site when used correctly. However, if not done carefully, they can be highly distracting and significantly increase your page’s load time.
You can add video background HTML to your site using the <video> tag and a few lines of CSS.
First, upload your video to a web-safe format like .mp4. You can use an online converter if necessary.
Next, add the following code to your HTML file between the <head></head> tags:
<video autoplay loop muted>
<source src=”your-video.mp4″ type=”video/mp4″>
</video>
And then add the following CSS code to your HTML file between the <style></style> tags:
video {
position: fixed;
right: 0;
bottom: 0;
min-width: 100%;
min-height: 100%;
width: auto;
height: auto;
z-index: -100;
background: URL(your-image.jpg) no-repeat;
background-size: cover;
}
Replace “your-video.mp4” and “your-image.jpg” with the appropriate file names and locations.
You can also add additional video sources by adding more <source> tags between the <video></video> tags in your HTML file. That’s helpful if you want to provide different video versions for different devices.
Conversely, you can use a video hosting platform like Dacast to stream your video instead of hosting it on your servers. That can save you time and money while delivering a better streaming experience to your viewers.
Additional HTML5 Tags for Improved Streaming
The <video> tag is not the only tool in your HTML5 toolbox for optimizing videos. For example, listing the <source> tags along with their corresponding <type> tags in an optimized order can improve your video performance.
That’s demonstrated in this sample HTML5 code for live video streaming:
<video width=”480” controls>
<source scr=”https://myweb.org/webm/video1.webm” type=”video/webm”>
<source scr=”https://myweb.org/mp4/video1.mg4” type=”video/mp4”>
<source scr=”https://myweb.org/ogg/video1.ogv” type=”video/ogv”>
<track kind=”captions” src=”sampleCaption_he.vtt” scrlang=”he”>
</video>
Keep in mind that a browser will play the first supported format type. In other words, the first entry in the list is the default. Chrome and Firefox will play the WebM video, while predecessors to Microsoft Edge will skip to the MP4 video.
You should list the most supported and smallest video first to ensure that the file plays by default. Use the HTML5 Video Player to check which format your browser supports.
You may also want to include a <track> tag to provide captions or subtitles for your video. That’s helpful for viewers who are deaf or have hearing difficulties or if you’re streaming a live event in a foreign language.
The <track> tag should include a kind attribute set to “captions” or “subtitles” and an src attribute that points to the .vtt file containing your captions or subtitles.
Use the HTML5 Fullscreen API to provide a better viewing experience for your viewers. That allows them to view your video in full-screen mode without leaving your site.
To use the Fullscreen API, you’ll need to add the allow full screen attribute to your <iframe> tag. You can also use a JavaScript function to toggle full-screen mode on and off.
Using some additional HTML5 tags will help you customize your video player. Here are a few options:
- <width> tag controls the width of the video that plays.
- <controls> tag is a Boolean attribute that allows users to access playback controls.
- <track> tag creates a transcript to increase content accessibility.
- <embed> tag creates a container for external media.
Lastly, if you want the video to start automatically, use the <autoplay> video element.
FAQs
1. How is HTML5 different from HTML?
HTML5 is the latest version of HTML (Hypertext Markup Language), designed to improve web functionality and multimedia support. The major difference is that HTML5 natively supports audio and video playback through the <audio> and <video> tags, eliminating the need for external plugins like Adobe Flash. Additionally, HTML5 introduces better mobile compatibility, semantic elements, and improved performance for web applications.
2. What does HTML5 stand for?
HTML5 stands for Hypertext Markup Language version 5. It is not a programming language but a markup language that structures web content. HTML5 introduced new elements and APIs to enhance video playback, graphics, interactivity, and mobile responsiveness, all without requiring third-party plugins.
3. What is an HTML5 player?
An HTML5 player is a web-based media player that plays video and audio using HTML5, CSS, and JavaScript. Unlike older technologies that required plugins like Flash, an HTML5 player works in modern browsers and supports various streaming protocols (HLS, DASH, WebRTC). Some popular examples include:
- Free/Open-Source: Video.js, Plyr, MediaElement.js
- Commercial/Paid: JW Player, Flowplayer, THEOplayer
4. Is HTML5 video player free?
Some HTML5 video players are free, while others require payment for advanced features.
- Open-source (free) players provide a customizable codebase for developers. Examples: Video.js, Plyr.
- Paid (commercial) players offer premium features like DRM protection, analytics, and customer support. Examples: JW Player, THEOplayer.
Choosing between free and paid depends on your needs. Open-source players offer flexibility, while commercial players provide better security, support, and scalability.
5. What are the benefits of using an HTML5 video player?
Using an HTML5 video player has many advantages, including:
- Cross-browser compatibility: Works in Chrome, Firefox, Safari, Edge, and more.
- Mobile-friendly: Supports video playback on smartphones and tablets without additional plugins.
- Faster performance: Uses hardware acceleration for smoother video playback.
- Supports adaptive streaming: Works with HLS (HTTP Live Streaming) and DASH protocols for high-quality streaming.
- SEO benefits: HTML5 videos can be indexed by search engines, improving discoverability.
- Accessibility features: Supports captions (<track> tag), keyboard navigation, and assistive technologies.
- Lower resource consumption: Unlike Flash, HTML5 video players consume fewer system resources, improving page load times and user experience.
Conclusion
As we’ve outlined, the power of HTML5 video streaming is in how much better it engages visitors than text alone does. This benefits broadcasters and businesses alike by retaining viewers. However, they must optimize HTTP live streaming to ensure smooth and compatible video delivery.
Using the HTML5 media tags we’ve provided ensures that your content remains accessible. Furthermore, with our optimization tips, you can heighten engagement and keep viewers returning. Your live video streaming, too, will be much better.
Whether it be live video streaming or implementing monetization to each video file, Dacast can help. Dacast is a professional-grade video streaming platform trusted by broadcasters and organizations worldwide. With advanced features and built-in optimization at flexible and affordable prices (including China video hosting), we’ll help you start streaming professionally in minutes.
The best part is you can start streaming today with our 14-day free trial.
After reading, what’s your take on embedding video using HTML5? Do you have questions you’d like us to answer here or in future articles? Let us know via the chat section!
You can also join our LinkedIn group for exclusive offers and regular tips on live streaming.