 Connect
 Events
 Business
 Organizations
 Entertainment and Media
 API
API Tools
Tools Learning Center
 Support
 Support Articles
Best OBS Studio Settings for Live Streaming [2025 Update]

As live video streaming becomes more prevalent in our day-to-day lives, many businesses are experimenting with broadcasting. For those new to live streaming, this involves learning to deal with the many technicalities involved in streaming live video. Some of them are calibrating live streaming settings according to optimal video bitrates and managing stream output quality, sound output quality, and CPU usage when you record videos.
Open Broadcaster Software (OBS) is one such tool that makes the technical side of streaming simpler to manage. Why should broadcasters learn more about OBS bitrate settings? Knowing the best OBS studio settings is how you can elevate your live streams to professional-grade broadcasts. Learning to play around with OBS studio settings for live streaming also gives you greater control over the elements that make up your streaming content, such as video resolution, rather than relying on the default settings alone.
It’s pretty easy to create high-quality live streams today, but successful live broadcasts require a little know-how and technical experience or understanding. Learning output quality settings and how they impact your video content enables you to create better live streams within the internet latency and set-up capabilities you have available.
One critical technical topic related to broadcasting is live stream encoding software and the encoding process. Encoding is essential to professional live streaming for several reasons.
This guide walks you through the best OBS studio settings for streaming and professional broadcasting. We’ve put together our top tips for OBS stream optimization, but first, let’s review what OBS Studio is and what it does.
Once we’ve covered the basics, we’ll outline the best stream settings for OBS Studio broadcasts.
We updated this article to reflect the best OBS Studio settings for the latest OBS Studio 31.0.2 version released in early 2025. Additions include OBS studio settings for 1080p and 1440p resolutions, as well as the best browsers to use for streaming with OBS.
Table of Contents
- What is Encoding?
- What is OBS Studio?
- Why Do OBS Settings Matter?
- How to Configure Your OBS Studio Settings
- Best OBS Studio Settings for Streaming Audio and Video
- Online Video Platform Specific Setting Requirements
- OBS Output Settings
- Best OBS Bitrate Settings
- Bitrate and Internet Speed
- Advanced Output Mode
- Hotkeys
- Video Sources
- OBS Recording Format Settings
- OBS Studio vs. Streamlabs OBS
- FAQ
- Conclusion
What is Encoding?
Encoding refers to converting analog video signals from a camera into digital signals that can be transmitted over the internet to viewers. It allows broadcasters to take raw video footage and prepare it for live streaming.
Simply put, encoders allow you to convert your video files from RAW to digital to prepare them for transmission from your camera to your live streaming platform host. Along with a recording device and reliable internet, a functional encoder is a must for broadcasters.
The analog video signals your camera generates will be converted into digital signals that can be transmitted over the internet to a CDN (content delivery network) and then to your viewers.
Without encoding, you can’t transfer your live-streaming content from your device to your viewers over the internet. The encoded content is decoded on the viewer’s end, which helps them watch your content.
Encoders come in the form of both software and hardware. Software encoders are typically free or low-cost, but hardware encoders can get quite expensive.
Research shows that 67% of viewers rank video output quality as the most important factor in a live stream. As a broadcaster, you can ensure high-quality video content for your viewers by choosing the best OBS encoder settings before you go live.
And that’s because your video bitrate determines the live stream audio and video output quality the viewers will see. So, you must get your OBS bitrate settings right to deliver the best quality content to your viewers.
What is OBS Studio?

OBS stands for Open Broadcaster Software, and it’s an invaluable resource for anyone looking to maintain exceptional video recording quality in the content they create. For broadcasters and content creators, regardless of their experience level in video-making, multi-platform streaming with OBS is easy to use for full-screen recording, casting, and streaming. The only investment required is the time to learn optimal OBS studio settings for live streaming and video recording.
OBS Studio is a free, open-source RTMP-enabled encoder software perfect for new and experienced broadcasters. This open-source live streaming software allows users to capture and stream live video from any Mac, Windows, or Linux computer.
RTMP stands for “Real-Time Messaging Protocol,” and it is part of the technology that makes live streaming possible. An RTMP streaming platform’s primary role is to deliver content from an encoder to an online video host. This RTMP function is referred to as “ RTMP ingest.” The RTMP protocol bridges the gap between its encoding and streaming functions for OBS.
As we mentioned, professional live streaming requires either a software or hardware encoder. This equipment works to encode a live video feed into the correct format for streaming through your online video platform (OVP).
OBS Studio offers many great features for new broadcasters just getting the hang of live streaming. The software has a set of OBS-specific system requirements to ensure the most optimal live broadcasting experience. These settings include mixing multiple sources with custom transitions, using audio/video filters and correction tools, and more.
The latest version of OBS is OBS Studio 31.0.2 was released on March 7th, 2025. It is free to download for macOS 11 or newer and supports both macOS(Intel) and macOS(Apple Silicon), Windows 10 and 11, and Ubuntu 20.04 operating systems or newer. For the Linux version, FFmpeg is required.
OBS Studio is especially easy to use for Dacast users since we’ve created a custom OBS Studio portal that is free to access. But before we learn how to configure the best stream output settings in OBS, let’s understand why they matter in the first place.
Why Do OBS Settings Matter?
Choosing the right OBS streaming presets can make a huge difference in the output quality of your recording. If your settings are too low, your video may be blurry, pixelated, or choppy. However, adjusting the settings to high may make your video too large, take up too much space, or be difficult to upload and share. Finding the right balance is key.
It’s particularly important to get your OBS settings right when you plan to use it while live streaming. That’s because live streams should be light enough for your viewers to watch in real-time. If you set up OBS to only upload the stream in the highest settings, your viewers are bound to experience some OBS live stream troubleshooting. They will have to deal with dropped frames or long periods of buffering.
By default, OBS drops video frames to keep your stream playing instead of having it buffer. This happens when your connection to your live streaming service is unstable or unable to keep up with your set bitrate. And that’s where full control over the OBS studio bitrate comes in. By choosing the right OBS bitrate settings, you can ensure your audio and video output quality is the best for the viewers based on their data speeds.
How to Configure Your OBS Studio Settings
There is a precise way to configure the OBS Studio settings for live streaming on an HTML5 live channel. Here’s a quick tutorial on OBS stream optimization, and each will be discussed in more detail further down.
1. General Settings
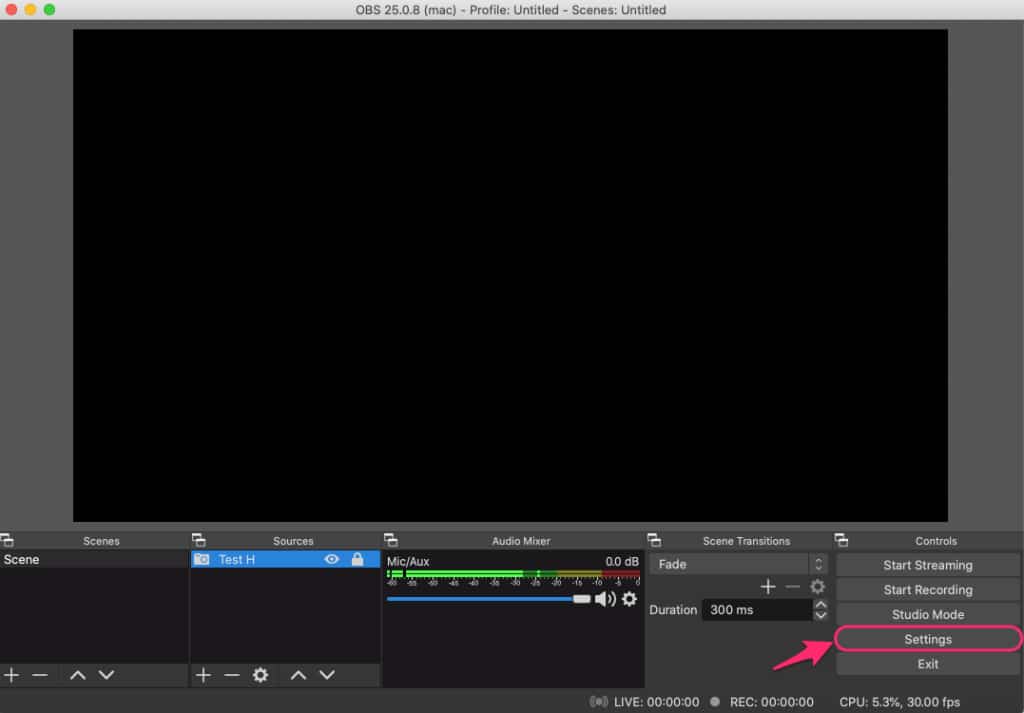
Launch OBS Studio and click “Settings” in the bottom-right area of the screen. The first tab on the left side is labeled “General,” containing settings that affect your experience on the platform but not the quality of your audio and video. You can choose your language and a light, dark, or grey theme here, or activate the system tray for easy application access on your taskbar, tweak Preview and Multiview options, and the layouts used in OBS Studio Mode.
Switch the “Output” mode to “Advanced” to view more options:
2. Video Settings
You need to adjust the OBS video output settings to get that pixel-perfect live stream. To do that, set the video bitrate to 4,000 Kbps, which is the ideal video OBS frame rate setting for full HD (1080p) at 30 frames per second:

3. Audio Settings
Any kind of live-streaming requires high-quality audio. You should adjust the OBS audio configuration to the highest bitrate value to give your audiences the best sound. Increase the audio bitrate to 320 Kbps. However, most platforms recommend that your broadcast non-music streams to 160 Kbps.
4. Keyframe Interval
Adjust the OBS frame rate settings so more data is sent. Adjust the keyframe interval to 2 (every two seconds) to act as a base for any small changes in the upcoming frames.
5. CPU Usage Presets
It’s now time to check and adjust the OBS CPU usage preset. Your streaming quality will be much better if the settings of this parameter are set to low, but it will strain your hardware significantly. If you feel your device is not powerful enough, increase this parameter to maintain a smooth broadcast.
6. OBS Studio Mode
This powerful feature can easily confuse you if you don’t understand its purpose. The OBS Studio Mode allows you to change scenes in the background while you are live. The good thing is that your viewers won’t see you making any of the changes.
Click on the “Studio Mode” in the Controls Dock to access this feature. Your preview screen should split into two separate screens. On the right is the live-view scene, which shows what your viewers see. On the left is your editing screen, where you can edit and change any of the elements in the scene while live streaming. You can switch between the scenes and choose the transition style at any given moment.

Once the scene editing is done, click on the “Transition” button. This will make the scene being edited the live scene by swapping the left and right screens. The advantage of this feature is that the viewers cannot see if the OBS Studio mode is enabled and are unaware of any changes you are making.
7. Output Settings
On the left side, you will see the “Output” tab. This menu allows you to customize the format and encoding settings for your streams and videos. To start, click it to switch the mode to “Advanced” to view more advanced obs settings for live streams.
To complete the OBS streaming presets, please follow these steps:
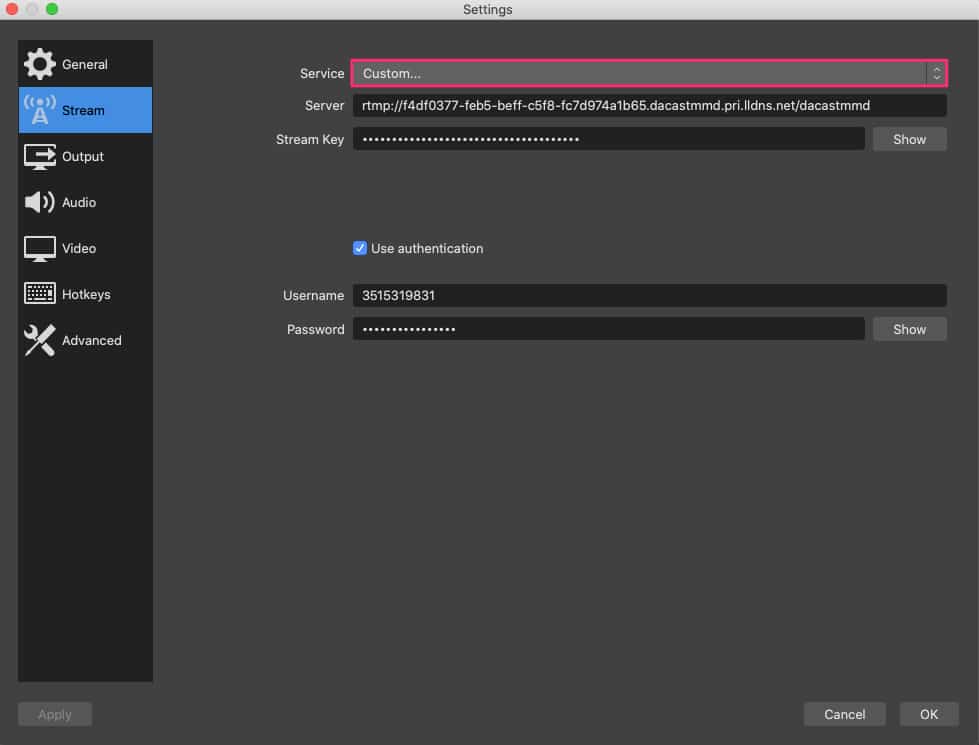
- Select the “Stream” tab to select your streaming service, which, in our case, is Dacast. To access it, click the next tab labeled “Stream” in the OBS Studio settings window.
- For “Stream Type,” you should see “Custom…” by default. If not, please select it.
- Enter the streaming credentials provided by your online streaming service, including the stream URL (server), stream key, username, and password. You can find these credentials on your OVP’s streaming encoder setup page.
Follow these steps to fetch these credentials on Dacast:
- Go to your Dacast account, and open or create the channel you want to live stream with OBS. Open your “Encoder Setup” to adjust the OBS encoder settings.
- Select the “Stream Name,” click copy, and go back to OBS to paste the key in the Stream Key field.
- You have to do the same for “Server,” copied in the Stream URL. Repeat this for the username and password.
If you still have questions about configuring your OBS Studio settings, check out our OBS quickstart tutorial or watch our video on choosing the best OBS Studio settings.
Option with iFrame Embed Code
<iframe src=”https://iframe.dacast.com/vod/3b67c4a9-3886-4eb1-d0eb-39b23b14bef3/08cebf46-2960-07df-89bf-4479e6b4be0e” width=”590″ height=”431″ frameborder=”0″ scrolling=”no” allow=”autoplay” allowfullscreen webkitallowfullscreen mozallowfullscreen oallowfullscreen msallowfullscreen></iframe>
Option with JS Embed Code
<script id=”3b67c4a9-3886-4eb1-d0eb-39b23b14bef3-vod-08cebf46-2960-07df-89bf-4479e6b4be0e” width=”590″ height=”431″ src=”https://player.dacast.com/js/player.js?contentId=3b67c4a9-3886-4eb1-d0eb-39b23b14bef3-vod-08cebf46-2960-07df-89bf-4479e6b4be0e” class=”dacast-video”></script>
Option with Share link
https://iframe.dacast.com/vod/3b67c4a9-3886-4eb1-d0eb-39b23b14bef3/08cebf46-2960-07df-89bf-4479e6b4be0e
Best OBS Studio Settings for Streaming Audio and Video
Choose the best OBS video output settings for your video encoder to achieve the highest quality streaming possible. Changing quality settings to optimize streaming is easy with OBS Studio. Simply use the Video tab and Audio tab to configure these settings.
Your encoder is responsible for the audio output quality recorded from multiple sources: your external microphone and audio track. It also ensures the video output quality of your live streams is as high as possible, depending on the OBS CPU usage preset.
Here are a few of the best OBS settings for live streaming audio and video content, including the bitrate settings.
1. Online Video Platform Specific Setting Requirements
Different online video platforms have different encoder setting requirements. That’s because each video or multi stream platform uses different technology to bring streams to life. Another reason is differences in requirements such as stream output quality, video resolution, and the built-in CPU usage preset in the broadcaster’s system. That’s why selecting your OVP according to your needs and desired output as a broadcaster is important.
Dacast, for example, has a few required OBS hardware encoding settings that apply to this and any other encoding software you may use.
These required live encoder settings include:
| VIDEO CODEC | H.264 (x264 may work) |
| FRAME RATE | 25 or 30 |
| KEYFRAME INTERVAL | 3 secs (or 3x frame rate) |
| SCANNING | Progressive |
| ENCODING BITRATE | Constant Bitrate (CBR) |
| AUDIO CODEC | AAC |
| AUDIO BITRATE | 128 Kbps |
| AUDIO CHANNELS | 2 (Stereo) |
| AUDIO SAMPLE RATE | 48 kHz (48,000 Hz) |
2. OBS Output Settings
Open the “Output” tab in your OBS Studio account to change your stream output settings in OBS. It contains streaming and recording settings where you can set your bitrate for the video and audio, type of encoder, recording quality, recording format, and the recording path, among other things. You can also choose the output mode.
The output settings tab is selected as “Simple” in the default settings. To adjust the OBS stream optimization and ensure your live stream is stable and fully functional, we recommend you follow the configuration settings shared in the “Encoder Setup” window, pictured below:

Customizing these settings through the Video and Audio tabs will ensure higher audio and video quality settings in OBS for your stream. In the Output mode, you only need to focus on the video and audio bitrate to optimize the best OBS resolution for streaming.
The OBS audio and video bitrate settings are in low definition by default. Control your stream quality by selecting the optimal video bitrate to broadcast high-quality video.
For the best streaming quality output, here are our tested and verified OBS bitrate settings for different video resolutions:
3. Best OBS Bitrate Settings
Here are the recommended OBS Studio settings for various ingestion resolutions, including SD (Standard Definition), LD (Low Definition), and ULD (Ultra Low Definition) alongside HD and QHD.
1. Ultra Low Definition (ULD) – 240p
- Resolution: 426 × 240
- Bitrate: 300–700 Kbps (streaming) / 2,000+ Kbps (recording)
- Frame Rate: 24 or 30 FPS
- Encoder: x264 (CPU) or NVENC/AMD (GPU)
- H.264 Profile: Baseline
- Audio Bitrate: 64 Kbps
2. Low Definition (LD) – 360p
- Resolution: 640 × 360
- Bitrate: 500–1,200 Kbps (streaming) / 3,000+ Kbps (recording)
- Frame Rate: 24, 30, or 60 FPS (depending on stability)
- Encoder: x264 (CPU) or NVENC/AMD (GPU)
- H.264 Profile: Baseline or Main
- Audio Bitrate: 96 Kbps
3. Standard Definition (SD) – 480p
- Resolution: 854 × 480 (or 720 × 480 for 4:3 aspect ratio)
- Bitrate: 1,200–2,500 Kbps (streaming) / 5,000+ Kbps (recording)
- Frame Rate: 30 FPS (recommended) or 60 FPS (if bandwidth allows)
- Encoder: x264 (CPU) or NVENC/AMD (GPU)
- H.264 Profile: Main
- Audio Bitrate: 128 Kbps
4. High Definition (HD) – 720p
- Resolution: 1280 × 720
- Bitrate: 2,500–5,000 Kbps (streaming) / 10,000+ Kbps (recording)
- Frame Rate: 30 FPS (standard) or 60 FPS (smoother motion)
- Encoder: x264 or NVENC/AMD (if using a GPU)
- H.264 Profile: Main or High
- Audio Bitrate: 160 Kbps (standard) or 320 Kbps (high quality)
5. Full HD (FHD) – 1080p
- Resolution: 1920 × 1080
- Bitrate: 4,500–9,000 Kbps (streaming) / 20,000–50,000 Kbps (recording)
- Frame Rate: 30 FPS (standard) or 60 FPS (if bandwidth allows)
- Encoder: x264 (CPU) or NVENC/AMD (GPU)
- H.264 Profile: High
- Audio Bitrate: 160–320 Kbps
6. Quad HD (QHD) – 1440p
- Resolution: 2560 × 1440
- Bitrate: 8,000–16,000 Kbps (streaming) / 30,000–50,000 Kbps (recording)
- Frame Rate: 30 FPS (recommended for stability) or 60 FPS (if bandwidth allows)
- Encoder: NVENC, AMD, or x264 (if CPU can handle it)
- H.264 Profile: High
- Audio Bitrate: 320 Kbps
To get a better visual output, Here is a summary of the best OBS bitrate settings in a table format:
| ULD | LD | SD | HD | FHD | QHD | |
| Resolution | Ultra-Low Definition | Low Definition | Standard Definition | High Definition | Full High Definition | Quad High Definition |
| Ingestion Resolution | 240p | 360p | 480p | 720p | 1080p | 1440p |
| Video Bitrate (Kbps) | 300 – 700 | 500 – 1200 | 1200 – 2500 | 2500 – 5000 | 4500 – 9000 | 8000 – 16000 |
| Frame Rate (FPS) | 24 or 30 | 24, 30 or 60 | 30 or 60 | 30 or 60 | 30 or 60 | 60 FPS |
| Width (px) | 426 | 640 | 854 | 1280 | 1920 | 2560 |
| Height (px) | 240 | 360 | 480 | 720 | 1080 | 1440 |
| Encoder | x264 or NVENC | x264 or NVENC | x264 or NVENC / AMD | x264 or NVENC / AMD | x264 or NVENC / AMD | NVENC, AMD, or x264 |
| H.264 Profile | Main | Main | High | High | High | High |
| Audio Bitrate (Kbps) | 64 | 96 | 128 | 160 – 320 | 160 – 320 | 320 |
For the OBS audio configuration, use the Audio tab to easily customize these settings. Add any audio device, such as desktop audio or external microphone. You can get away with OBS bitrate settings as low as 64 Kbps if you only stream audio. However, up your audio bitrate settings to 192-320 Kbps for better audio quality output.
Your listeners will get a clear live stream sound if you set your audio to a higher bitrate. This is particularly important when they’re streaming videos in higher resolutions. That’s why the audio bitrate needs to keep up with the video bitrate as the resolution increases.
We recommend downloading OBS Lua, an OBS streaming bitrate calculator. It’s a useful tool offering the best OBS bitrate settings for your streaming needs.
4. Bitrate and Internet Speed
Your internet speed must be at least double your OBS bitrate to produce a high-quality stream. Otherwise, you’ll run into buffering issues. The video quality settings in OBS are not the only element that defines the overall experience your content delivers to viewers. Avoiding OBS live stream troubleshooting and buffering should be as equally important as high video and audio quality output.
For example, if your internet upload speed is 2000 Mbps, then your OBS setting for streaming, audio, and video bitrates should not exceed 1000 Mbps. Search “internet speed test” on Google and click “RUN SPEED TEST” to test how fast your internet is. You can test your internet connection speed by visiting testmy.net.
Knowing your target audience is equally important when determining the bitrate for your audio and video files. Watching on their laptops or on their smartphones while on the move means you have to give them the option to lower the bitrates as their data speeds could fluctuate.
You can opt for adaptive bitrate streaming, which enables you to dynamically change the bitrate of your live stream based on the data speed of the viewer. This way, they won’t have to face prolonged buffering periods and will have a smooth streaming experience.
5. Advanced Output Mode
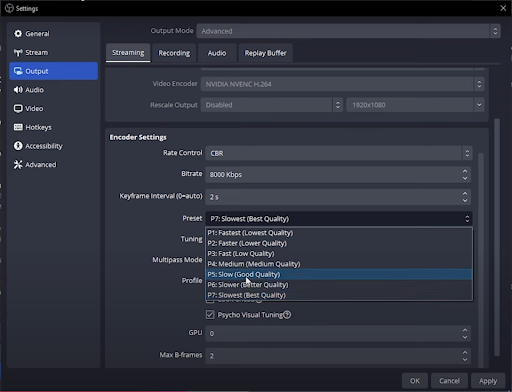
Advanced settings and rate control can also be accessed and changed through the Output tab to produce better-quality streams. If you select the “Advanced” output mode, you can access more options for the best OBS network settings.
Some of the settings available here include options for streaming, recording, audio, and replay buffers. You can set your bitrate, choose your encoder, and adjust the OBS CPU usage preset. To ensure a quality stream output, you should use the following settings:
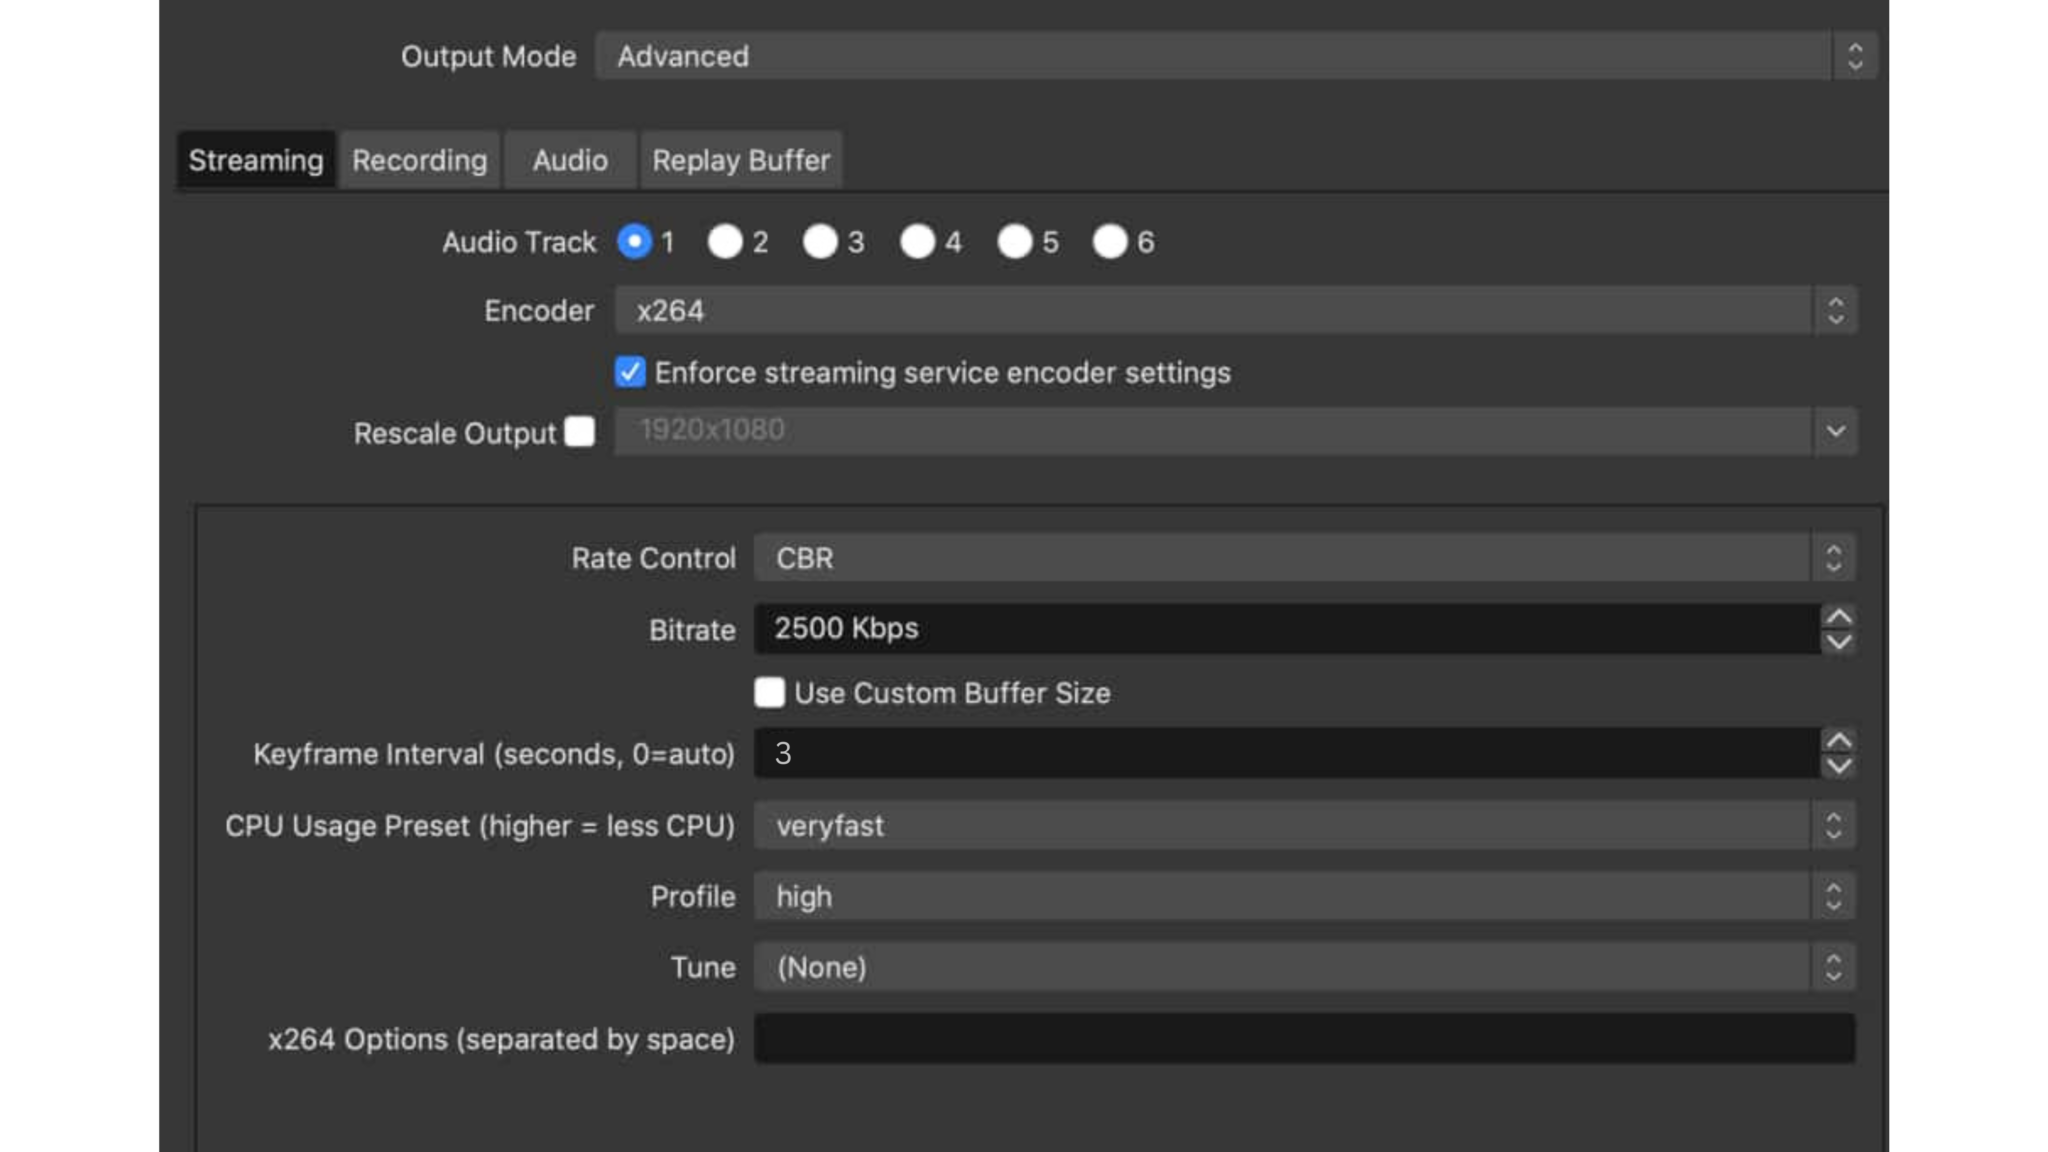
Pay close attention to the following settings:
- Your output mode is set to “Advanced”
- The rate control is set as “CBR” or constant bitrate
- The keyframe interval is equal to 3
- Use “x.264” for the encoder.
You can also choose ABR (adaptive bitrate), VBR (variable bitrate), and CRF (constant rate factor). ABR is particularly helpful in situations where your viewers have fluctuating internet speeds.
6. Hotkeys
Hotkeys allow you to set up different scenes within your live stream encoding software. That way, you can create OBS scene transitions during your live broadcast. How you configure your hotkeys will depend on your specific needs. For example, you could set up unlimited hotkeys for specific overlays and inputs.
The several OBS Studio default hotkeys are turned off by default. You can check out the documentation for using hotkeys for streaming with OBS Studio on GitHub.
7. Video Sources
To add a video source, click on the “+” button in the “Sources” widget. You can select a display capture, screen recorder, video capture device, image, recorded video, etc. When you’re ready to stream live, click “Start Streaming”.
8. OBS Recording Format Settings
Recording streaming video and audio is a handy feature that lets broadcasters re-use live-streamed content with OBS Studio. Easily access this tool by clicking “Start Recording” in OBS Studio’s Controls widget in the lower right-hand corner.
The recording feature enables stream recording with OBS to a local drive as you stream. We recommend you enable this setting if you haven’t set up an auto-archiving feature with your live streaming platform.
MKV is the ideal OBS recording format due to its versatility, support for multiple codecs, and easy conversion to MP4 for editing or sharing. MP4 is also a great option, especially if you prioritize widespread compatibility and smaller file sizes. For more on this topic, check out our pros and cons guide to using MKV vs MP4.
Click “File” on the top left-hand side of the screen to access your stream recording with OBS and choose “Show Recordings.” If you’re using Windows, it’ll send the stream recording directly to your computer’s “Videos” folder.
OBS Studio vs. Streamlabs OBS
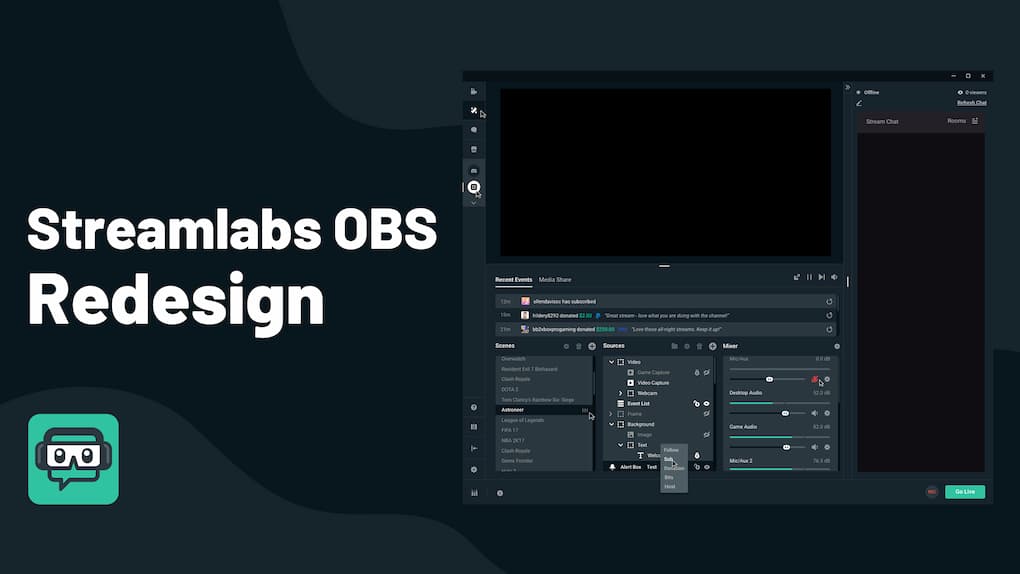
Streamlabs OBS is a free and open-source streaming software similar to OBS Studio. It’s designed for stream layout editing, replay buffers, selective recording, and remote streaming control.
You can multistream with OBS streaming on YouTube, Facebook, Twitch, and TikTok. You also have the option to create an RTMP server to live stream to any endpoint of your choice. This helps you reach a wider audience as viewers across different platforms can watch your streams as they happen.
You can also invite guests to join your live streams through the Collab Cam feature. It enables you to bring much-needed engagement to your streams, with the free plan permitting 1 guest, while the paid plan allows up to 11 guests or cameras. Streamlabs OBS also offers lots of customizable transitions and overlay themes that you can add to your live stream to change its look.
Additionally, Streamlabs OBS offers a highlighter that lets you create highlight videos for short video formats like YouTube Shorts, TikTok clips, and Reels. You can easily cut and stitch parts of your videos to make them publish-ready. Engaging your viewers with streaming widgets like polls, games, and chats is also possible.
That said, multistreaming isn’t available on the free plan. However, users can upgrade to Streamlabs Ultra to access this and other premium features. The upgrade costs $19/month or $149/year.
Streamlabs Ultra is particularly helpful for creators. It has options for accepting tips by creating a custom page and domain for it. You also get 10 GB of storage space, 3+ destinations for multistreaming, a YouTube thumbnail, and a Twitch panel maker.
Streamlabs OBS is a better option for beginners or broadcasters with little technical know-how since it has a graphical user interface (GUI). On the other hand, OBS Studio has a command-line interface (CLI) that requires users to use coded commands to execute functions.
Although Streamlabs is easier to use and provides the option to upgrade to access premium features, many broadcasters prefer OBS Studio since it is more extensible.
FAQ
1. What is a good OBS bitrate for 1080p?
A good OBS bitrate for 1080p live streaming depends on your frame rate and platform:
- 1080p at 30 FPS → 4,500–6,000 Kbps
- 1080p at 60 FPS → 6,000–9,000 Kbps
For recording, a higher bitrate of 20,000–50,000 Kbps is recommended for better quality.
2. What is a good OBS bitrate for 1440p?
For 1440p (Quad HD) live streaming, use:
- 1440p at 30 FPS → 8,000–12,000 Kbps
- 1440p at 60 FPS → 12,000–16,000 Kbps
For recording, use 30,000–50,000 Kbps for optimal quality.
3. What is the overall most recommended combination of settings for OBS live streaming?
The best OBS settings depend on your resolution, frame rate, and available bandwidth. Here’s a recommended setup for smooth and high-quality streaming:
- Resolution: 1920 × 1080 (1080p)
- Bitrate: 6,000 Kbps (Twitch max) / 8,000 Kbps (YouTube recommended)
- Frame Rate: 60 FPS (for smooth motion)
- Encoder: NVENC (if using NVIDIA GPU) or x264 (if CPU is strong)
- H.264 Profile: High
- Rate Control: CBR (Constant Bitrate)
- Keyframe Interval: 2 seconds
- Audio Bitrate: 160–320 Kbps
If your upload speed is limited, lowering the bitrate to 4,500 Kbps at 30 FPS can help maintain stability.
4. Is a higher bitrate better on OBS?
Yes, but with limitations. A higher bitrate improves video quality, but:
- Streaming platforms have bitrate limits (Twitch max: 6,000 Kbps for non-partners, YouTube allows up to 51,000 Kbps for 4K).
- Your internet upload speed must support the bitrate (recommended: 2x your chosen bitrate for stability).
- Viewers need a strong connection—too high a bitrate may cause buffering.
For recording, higher bitrates (20,000–50,000 Kbps) ensure better quality, especially for post-production editing.
5. Why is my OBS stream quality so bad?
Several factors could cause poor stream quality in OBS:
- Low Bitrate – Increase your bitrate for better quality.
- Weak Internet Connection – Ensure your upload speed is at least double your bitrate.
- Wrong Encoder Settings – Use NVENC (if NVIDIA GPU) or optimize x264 settings.
- Incorrect Resolution or FPS – Match the resolution and FPS to your system’s capabilities.
- High CPU Usage – Close unnecessary programs and lower settings if OBS is lagging.
- Platform Limitations – Some platforms limit bitrate or resolution for certain users.
To improve quality, adjust bitrate, optimize encoder settings, and ensure stable internet speed.
6. What are good audio settings for OBS?
For clear, professional audio, use the following settings:
- Sample Rate: 48 kHz (matches most professional audio gear)
- Bitrate:
- 160 Kbps (standard quality)
- 320 Kbps (high-quality streams & recordings)
- Audio Format: Stereo
- Noise Suppression: Enabled (for background noise reduction)
- Compressor: Enabled (to balance volume levels)
- Gain Control: Adjusted to prevent distortion
For microphone quality improvement, add filters such as Noise Gate, Compressor, and EQ adjustments.
7. What is the best browser to use for OBS Studio Streaming?
The best browser for OBS Studio streaming depends on the platform and system performance. Google Chrome, Mozilla Firefox, and Microsoft Edge are all popular choices, but:
- Google Chrome → Best for compatibility but high RAM usage.
- Mozilla Firefox → More RAM-friendly, but may have WebRTC limitations.
- Microsoft Edge → Best performance for Windows users with low CPU/RAM usage.
For web-based stream control (like OBS web integrations or browser sources), Chrome or Edge is recommended for better compatibility with OBS plugins.
8. How can I reduce OBS Studio’s CPU usage during recording or streaming?
High CPU usage in OBS Studio can lead to dropped frames and lag. To mitigate this:
- Lower Output Resolution: Reducing the output resolution (e.g., to 1280×720) decreases the amount of data processed, easing CPU load.
- Adjust Encoder Settings: If using ‘x264’, select a faster preset like ‘superfast’ or ‘ultrafast’. This reduces CPU usage at the expense of some video quality.
- Limit Frame Rate: Setting the FPS to 30 can significantly cut down CPU demands compared to higher frame rates.
- Simplify Scenes: Minimize the number of active sources and avoid complex scenes with multiple overlays or effects.
- Close Unnecessary Applications: Ensure no other high-CPU applications are running in the background during streaming or recording.
- Use Hardware Encoding: If available, switch to hardware encoders like ‘NVENC’ (for NVIDIA GPUs) or ‘Quick Sync’ (for Intel CPUs) to offload encoding tasks from the CPU.
9. What are the best OBS Studio settings for a low-end PC?
- Set resolution to 1280×720
- Use 30 FPS for smoother performance
- Choose NVENC (if available) or x264 with “veryfast” preset
- Bitrate: 2500–3000 kbps with CBR
- Keep scenes simple and limit overlays
10. How can you live stream on Kick with OBS?
Check out our ultimate guide (updated in May 2025) on how to stream on kick with OBS, where we’ll walk you through everything you need to know to get started on Kick using OBS.
Conclusion
Choosing the right OBS encoder settings can be confusing at first. Hopefully, you’ll be able to configure the best OBS settings for an ideal streaming experience using the tips we’ve discussed here. It helps that OBS Studio is free software that allows testing of its features without investing any money.
We believe you’ll have a smooth experience if you follow these recommendations on the best OBS studio settings for live streaming to get started. With these recommended video settings as your starting point, getting comfortable doing live streams should be straightforward and enjoyable. As you get comfortable with the platform, you’ll be able to adjust the OBS streaming performance tweaks.
For additional details on streaming settings with OBS Studio, you can always check out our tutorials on how to stream using Dacast OBS for Mac or Dacast OBS for Windows.
Not yet using our streaming solutions, and ready to give our platform a try? Our video hosting and live streaming platform are both feature-rich and affordable.
We encourage you to take advantage of our risk-free trial and test out all of our features free for 14 days (no credit card required)!
Get Started For Free
For exclusive offers and live streaming tips, you can also join our LinkedIn group. Do you still have questions, comments, or feedback? Let us know in the comment section below, and we’ll get back to you. We love to hear from our readers!
Thanks for reading, and best of luck with your live broadcasts.