


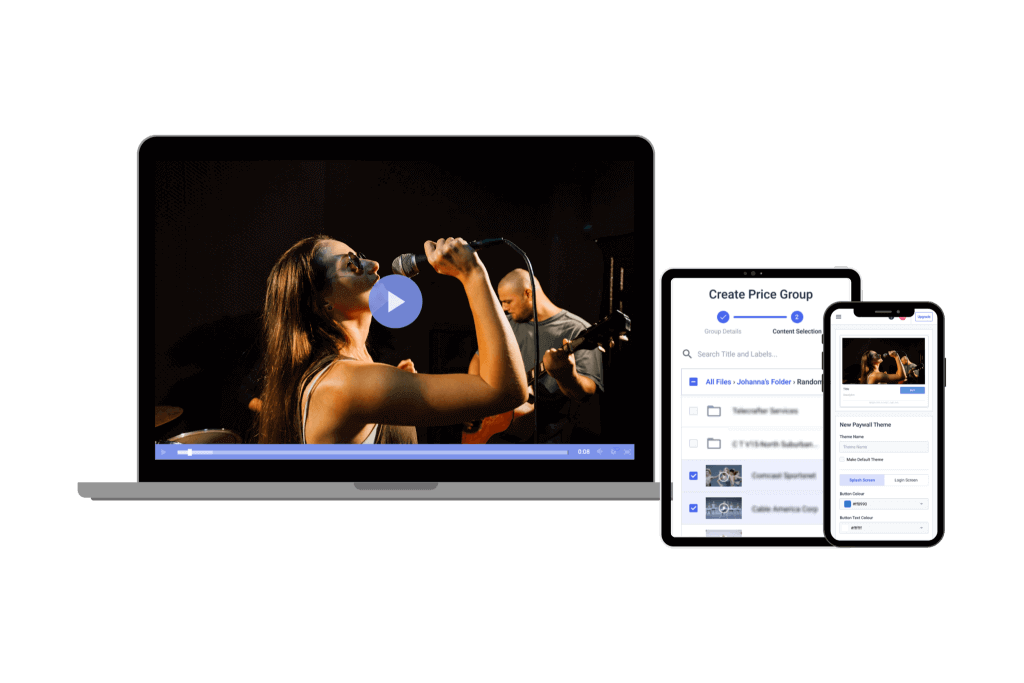
How To Stream Live From Your iPhone in 2025 (Step-by-Step for Businesses)

Apple iPhones continue to have some of the best cameras on the smartphone market, making them a solid portable device. From 2007 to early 2018, over 2.2 billion iPhones were sold, with millions more sold each year. The iPhone is a revolutionary tool for communication and creativity, so it is essential to know how to live stream using an iPhone.
In this article, we’ll discuss how you can use the iPhone as a business tool for mobile live streaming. For those looking to get started, owning an iPhone is a great investment. You might have to get a few mobile live-streaming accessories though. Just as in the case of Android smartphones, the trick is mastering the basics of your iPhone.
We’ll teach you how to live stream on an iPhone using an iOS application and with RTMP (real-time messaging protocol) ingestion from your Dacast account.
Then, we’ll share a few of the best live-streaming apps for iPhone that you can easily download and use in a few clicks.
*This post has been updated to reflect the most recent and accurate information available in April 2025.
Table of Contents:
- How to Live Stream on an iPhone
- iPhone Live Streaming for Businesses: Use Case Examples
- Live Streaming With iPhone Camera
- iPhone Streaming Setup
- How to Record a Live Stream on iPhone
- In-Depth App Comparison
- Troubleshooting Common Issues
- Streaming Quality Optimization
- Practical and Advanced Tips for Live Streaming from Your iPhone
- Comparative Analysis with Other Devices
- How to Live Stream with Dacast from Your iPhone
- Advanced Live Streaming Tips
- Additional Tips for Creating a Quality Live Stream from Your iPhone
- FAQs
- Conclusion
How to Live Stream on an iPhone
To live stream on an iPhone, start by choosing a platform, such as YouTube, Facebook, or Instagram. Many platforms offer apps that allow easy iOS live-stream features directly from your phone. Once you’ve selected your platform, download and install the app, then sign in to your account.
Next, ensure you grant the app permission to access your iPhone streaming features, including the camera and microphone. You can adjust these permissions in the Settings app under Privacy. Once set, open the app and locate the live stream option. Most apps will have a clear “Go Live” button that allows you to start the broadcast.
For better video quality, consider using an external microphone or a tripod to stabilize your phone. Live streaming with an iPhone camera provides good quality for most situations, but for professional streams, you might want additional gear.
Now you’re ready to live stream from your iPhone and share your content in real-time!
Live Streaming With iPhone Camera

Live streaming from an iPhone is easier than ever, thanks to its advanced camera technology. The newest iPhones are equipped with powerful cameras that deliver high-quality video, making them perfect for live streaming from the iPhone. Whether you’re a beginner or an experienced streamer, learning how to stream on iPhone is simple.
To live stream with an iPhone, you can easily turn your device into a powerful streaming tool. First, you’ll need to choose a platform like YouTube, Facebook, or Instagram to live stream from your iPhone. Simply open the app, log in, and look for the “Go Live” option. Then, allow the necessary permissions for camera and microphone access.
If you’re wondering how to stream from an iPhone using a more advanced setup, you can explore third-party apps like Stream iOS or Streamlabs. These apps allow you to live stream from your iPhone to multiple platforms at once, giving you more control over your stream.
For better video quality, you may want to learn how to use an iPhone as a streaming camera with an external microphone or tripod. This ensures a smoother, professional-looking broadcast when live streaming from an iPhone.
iPhone Live Streaming for Businesses: Use Case Examples
Event coverage (conferences, fundraisers)
Businesses often use live streaming with iPhone camera setups to share real-time moments from conferences and charity events. It’s a great way to reach remote attendees and keep partners engaged. With tools like Dacast, it’s simple to stream from iPhone to a professional platform.
Retail promotions or product launches
Streaming iPhone video during a product reveal lets brands connect with audiences instantly. Whether it’s in-store or online, live stream from iPhone devices makes launches more personal and interactive.
Internal town halls and CEO broadcasts
Companies use live streaming on iPhone for leadership updates and team communication. It’s an easy way to broadcast directly to staff without a big setup. You can also record live stream on iPhone for later viewing.
Mobile journalism and influencer marketing
For fast, on-the-go content, livestream iPhone setups are perfect. Influencers and journalists use iPhone broadcasting to share stories as they unfold, with professional quality and minimal gear.
iPhone Streaming Setup
Setting up your iPhone streaming setup for a smooth live streaming experience is simple with the right tools. Here’s a checklist of must-haves:
- iPhone: Ensure your device is updated to the latest iOS version for optimal performance.
- Streaming App: Download the app for your platform (YouTube, Facebook, Twitch, etc.). Make sure it supports how to stream on iPhone.
- Strong Internet Connection: Use Wi-Fi or a reliable 4G/5G network to prevent interruptions.
- Permissions: Allow the app to access your camera and microphone when prompted for smooth video and audio capture.
- Stabilization Tools: A tripod or gimbal will help stabilize your iPhone while you stream video from your iPhone.
- External Equipment (optional): Consider an external microphone or lighting for better quality.
- Recording Setup: If you want to how to record a live stream on iPhone, check that your app offers recording features or use screen recording in iOS settings.
This setup ensures you can stream and record your content with ease.
Best Practices and Gear
To achieve professional live streams from your iPhone in 2025, start with the right gear. MagSafe gimbals like the Insta360 Flow 2 Pro offer smooth stabilization and quick setup. For lighting, compact LED cube lights such as the JOBY Beamo provide bright, adjustable illumination. Pairing your setup with a wireless lavalier microphone, like the Movo EDGE-DI or Godox Cube, ensures clear audio without cables.
Live Streaming Quality Tips
To ensure a smooth and professional live stream from your iPhone in 2025, consider the following tips:
- Bitrate and Resolution: For Full HD (1080p) streaming, set your video bitrate between 1900 and 4500 kbps. If your network is less stable, opt for 720p with a bitrate of 1200 to 1900 kbps. Always use a constant bitrate (CBR) and the H.264 codec for optimal compatibility.
- Prevent Overheating: Live streaming can cause your iPhone to heat up, which may affect performance. Remove any phone case during streaming and close unnecessary apps to reduce CPU load.
- Optimize Network Conditions: Before going live, perform a speed test to ensure your upload speed meets the requirements for your chosen resolution. A minimum upload speed of 3 Mbps is recommended for stable streaming.
- Use Adaptive Bitrate Streaming: Enable adaptive bitrate streaming in your app settings to allow the stream quality to adjust automatically based on network conditions, minimizing buffering for viewers.
- Secure Your Stream: Utilize RTMPS (RTMP over SSL/TLS) to encrypt your live stream, ensuring that your content is securely transmitted to your audience.
Choosing the Right Accessories for Different Environments
Choosing the right accessories ensures a smooth live-streaming experience, whether you’re indoors or outdoors.
Outdoor and Indoor Setups
For outdoor events, prioritize noise-reduction mics like shotgun microphones, which focus on sound from a specific direction, filtering out background noise. Use portable LED lighting for consistent brightness, especially in changing light conditions. For indoors, softbox or ring lights provide even lighting. Always test connectivity; consider a mobile hotspot for poor Wi-Fi areas to avoid interruptions.
Audio Gear
In noisy spaces, wireless microphones with lapel (lav) options are ideal for clear audio while moving. For stationary setups, shotgun mics excel at focusing on the speaker’s voice. Indoors, condenser microphones deliver professional-quality sound in quieter settings.
Portable Power Solutions
Long sessions demand reliable power. Use high-capacity power banks or battery extenders to prevent interruptions. Models with multiple USB ports are ideal for charging your phone and accessories simultaneously, ensuring a seamless and professional stream anywhere.
AI Tools for Smarter iPhone Live Streaming
Apple continues to raise the bar for live streaming from iPhone, especially with AI-powered features in iOS 17 and newer. These tools help you create more polished, professional broadcasts—without needing extra gear or apps. Whether you’re hosting an iPhone live broadcast for a product launch or field update, these features work behind the scenes to enhance every frame and word.
Auto-framing with iOS 17+
Auto-framing uses the iPhone’s ultra-wide lens and AI to keep you centered as you move. This helps maintain a stable, focused shot during your iPhone live video, making it ideal for interviews, walkthroughs, or dynamic content.
Real-time voice isolation using the Neural Engine
This feature filters out background noise to keep your voice clear. When streaming live video from iPhone, it’s perfect for busy locations or remote updates.
Live Captions via Apple’s accessibility settings
Enable live captions to display real-time subtitles during your iPhone livestream. Great for accessibility, global audiences, or viewers watching without sound.
Comparison Table: iPhone vs. External Streaming Cams
Here’s a handy comparison table that highlights how the iPhone 15 Pro stacks up against popular webcams like the Logitech StreamCam and Sony ZV-E10, focusing on features that matter for live streaming:
| Feature | iPhone 15 Pro | Logitech StreamCam | Sony ZV-E10 |
|---|---|---|---|
| Resolution | 4K at 60fps (rear), 1080p (front) | 1080p at 60fps | 4K at 30fps / 1080p at 120fps |
| Bitrate Flexibility | High with RTMP apps (e.g., Dacast) | Limited (fixed via USB) | High (via HDMI or capture card) |
| Ease of Use | Very easy (built-in camera + apps) | Plug-and-play via USB-C | Moderate (requires external setup) |
| Streaming Latency | Low with optimized apps and 5G/Wi-Fi | Low (USB connection) | Low with capture card, higher wirelessly |
| Portability | Extremely portable | Portable but tethered | Less portable, designed for stationary use |
| Audio Quality | High-quality built-in mics, spatial audio | Decent built-in mic | Professional audio options (external mics) |
| Connectivity Options | 5G, Wi-Fi 6E, Lightning/USB-C | USB-C only | HDMI output (requires capture device) |
| Third-Party App Support | Wide (Dacast, Larix, Switcher Studio) | Limited customization | Broad support via external software |
| Ideal Use Case | Mobile streaming, live events, field work | Casual creators, desktop streaming | Pro-level video production |
How to Record a Live Stream on iPhone
To record a live stream on your iPhone, start by ensuring you have the Screen Recording feature enabled. Go to Settings > Control Center, then add Screen Recording. When ready to record your live stream, swipe down from the top-right corner (or up on older models), tap the record button, and start your live stream using your chosen app. This method is helpful if you’re learning how to live stream on an iPhone and want to save content for later.
To restream the recorded video, transfer the file to a streaming platform or apps like YouTube, Twitch, or Facebook. Many apps, such as Streamlabs or Prism Live Studio, also support restreaming. Upload your recording, adjust the title and settings, and stream it again. Restreaming allows you to reach new audiences while repurposing existing content for better engagement.
Choosing the Right Accessories for Different Environments
Considering how to record a live stream on an iPhone in different environments, here’s a table showing how these accessories are designed to enhance your content creation experience, providing flexibility and professional quality across various environments.
| Accessory Type | Recommended Gear (2025) | Ideal Environments |
|---|---|---|
| MagSafe-Compatible Gimbal | Aerbeis MagSafe Adapter for DJI OM 6 This adapter allows seamless attachment of MagSafe-enabled iPhones to the DJI OM 6 gimbal, ensuring stable footage during mobile shoots. | Urban environments, travel vlogs, and dynamic shooting scenarios where quick setup and stabilization are crucial. |
| Wireless Lavalier Microphone | Sennheiser Profile Wireless Kit A versatile system featuring clip-on transmitters that can function as handheld or tabletop mics, with a wireless range of over 800 feet and 7-hour battery life. | Interviews, podcasts, and on-the-go content creation requiring high-quality audio capture. |
| LED Cube Light | Treedix LED Cube Light DIY Kit An addressable RGB LED cube that offers customizable lighting effects, ideal for creating ambient lighting or dynamic visual displays. | Studio setups, product photography, and events where controlled lighting enhances visual appeal. |
In-Depth App Comparison
When choosing a streaming app for your iPhone, it’s important to consider the unique features and limitations of each option. Here’s a comparison of Larix, Wirecast Go, and other popular streaming apps:
| App/Tool | Multi-Streaming | Bitrate Control | Dacast Integration | AI-Enhanced Tools | Pricing (2025) |
|---|---|---|---|---|---|
| Larix Broadcaster | No | Yes | Yes (via RTMP) | No | Free |
| Wirecast Go | Yes (Wirecast Studio required) | Yes | Yes (via RTMP) | No | $5.99/month basic; Studio extra |
| Prism Live Studio | Yes | Yes | Yes (via RTMP) | Yes (filters, auto captions) | Free |
| Camo Studio Mobile | No | Limited (tied to camera settings) | No | Yes (auto framing, exposure) | Free basic / $4.99/month Pro |
| Switcher Studio | Yes | Yes | Yes (Dacast direct support) | Yes (camera switching, auto layout) | $49/month |
| Restream Mobile | Yes | Limited | Yes (via RTMP) | Yes (chat overlays, titles) | Free basic / $19+/month Pro |
| OBS Camera App | No | Yes | Yes (via OBS + Dacast RTMP) | No | $15 one-time |
Best for Different Use Cases:
- Beginners: Larix offers straightforward functionality at no cost, making it ideal for newcomers.
- Advanced Users: Wirecast Go provides robust features but may require an upgrade for full access.
- Multi-Streaming: Prism Live excels in its ability to stream to multiple platforms simultaneously.
This comparison will help you choose the best app for your streaming needs.
Troubleshooting Common Issues
When live streaming on your iPhone, you may encounter a few common issues. Here are some troubleshooting tips:
- Dropped connections: If your stream disconnects, check your Wi-Fi or cellular data connection. Ensure you have a strong signal. If on Wi-Fi, try moving closer to the router or switching to a different network. You can also enable Airplane Mode and then reconnect to Wi-Fi to stabilize the connection.
- Low-quality stream in low-bandwidth areas: In weak signal areas, adjust your bitrate settings. Lowering the bitrate can help maintain a stable stream when bandwidth is limited, though it might reduce video quality slightly. Many streaming apps allow you to tweak these settings.
- Overheating: Long streams can cause your iPhone to overheat. Remove the case to allow better airflow. Consider using an external fan accessory designed for phones, or enable power management settings to reduce energy consumption. Limiting background app usage can also help keep your phone cool during extended streams.
Streaming Quality Optimization
To ensure professional quality live streams on your iPhone, it’s important to optimize both your resolution and frame rate settings. The right choices depend on your streaming goals and your internet connection.
- Resolution: For a high-quality stream with crisp visuals, choose 4K resolution if your internet connection supports it. However, if you’re in a low-bandwidth area, opt for 720p or 1080p to ensure a smoother experience with less buffering. This will help maintain a stable stream without compromising too much on quality, making it easier to stream content without interruptions.
- Frame Rate: A frame rate of 30 fps is sufficient for most streams, but if you want a more professional-looking live stream, you might consider 60 fps for smoother motion, especially in fast-paced content like gaming or sports.
In terms of network settings, always prioritize Wi-Fi networks over LTE for a more stable connection. Consider using Wi-Fi boosters to extend your signal range, or invest in a portable hotspot device to improve connectivity during streams. This can help ensure you maintain a high-quality stream even when traveling or in areas with weak Wi-Fi.
Streaming with iPhone Over 5G in 2025
In 2025, 5G technology has significantly enhanced live streaming capabilities on devices like the iPhone 15 Pro. Its low latency ensures that live broadcasts are smoother and more stable, which is crucial for businesses conducting mobile events, product launches, or field marketing. This advancement allows for near real-time interactions, making live streaming with iOS apps for business more effective.
However, challenges can arise in areas with high user density, such as stadiums or large events. In these situations, network congestion may occur, potentially affecting stream quality. To address this, some venues are implementing private 5G networks to provide dedicated bandwidth and reduce congestion. citeturn0search0turn0search2
For optimal performance, it’s advisable to test your streaming setup in advance and consider using a reliable RTMP streaming app compatible with your iPhone. Additionally, platforms like Dacast offer robust solutions for mobile RTMP streaming, ensuring your broadcasts remain professional and uninterrupted.
Practical and Advanced Tips for Live Streaming from Your iPhone
Before going live, it’s essential to test your setup to avoid issues during your stream. Check the apps, connectivity, and lighting to ensure everything works smoothly. A checklist can help: verify your internet connection, test the camera and microphone, and adjust lighting for clarity.
For better audience engagement, use features like live chat or polling apps to interact with viewers in real time. These tools help keep your audience engaged and make your stream more interactive.
Finally, keep legal and copyright considerations in mind. If you’re streaming live events, music, or other protected content, ensure you have the necessary permissions to avoid violations. Always respect copyright laws and seek approval for any content that may be copyrighted.
Tips for Securely Live Streaming Internal Meetings from Your iPhone
If you’re wondering how to stream with iPhone 15 Pro for private internal meetings, there are a few simple steps you can take to keep your stream safe and restricted to the right people. Whether you’re using Dacast for live streaming with iOS apps for business or just need a quick iphone streaming setup, these tips will help protect sensitive information.
- Use Dacast’s password protection feature to ensure only authorized staff can view the stream
- Turn on geo-blocking to restrict access by country or region
- Disable public embed codes to prevent external sharing
- Test your stream on a private link before going live
- Use a secure Wi-Fi network, not public connections
These steps apply whether you’re figuring out how to stream on iPhone or how to stream from iPhone with confidence and privacy.
Accessibility Tools for Live Streams
Accessibility is now built right into the way we stream on mobile. If you’re wondering how to stream with iPhone 15 Pro and keep your audience engaged, adding live captions is a simple step that makes a big difference. Many live streaming with iOS apps for business now support real-time captions or auto-subtitles, improving access for viewers with hearing challenges.
You can also use Siri voice commands for hands-free stream control while on the go. This is great for multitasking or adjusting settings without touching the screen—perfect for field teams using iPhone streaming setups in busy environments.
Interactive Elements
Adding interactive elements is a great way to make your iPhone live stream more engaging. During mobile streams, you can use third-party overlay tools like Streamlabs Mobile or Restream Studio to display live polls, Q&A prompts, or even call-to-action buttons.
These tools work well with the best RTMP streaming app iPhone 2025 users rely on, especially when using the Dacast platform. Whether you’re learning how to livestream on iPhone or how to stream with iPhone 15 Pro, adding interactive features can increase viewer engagement and retention—ideal for business use, product launches, or field marketing with your iPhone streaming setup.
Comparative Analysis with Other Devices
When comparing live streaming on iPhone vs. Android, both devices offer strong features, but with key differences. iPhone devices often have superior camera quality, especially with newer models that include advanced stabilization and better low-light performance. iOS also has unique features like Continuity Camera, allowing users to use their Mac’s camera as a secondary streaming device. In terms of app options, both platforms offer major streaming apps, but iPhones often provide smoother integration with iOS-based apps, offering a more seamless experience.
However, iPhones have limitations, such as stricter app permissions and occasional compatibility issues with system updates. To overcome these, manage your permissions carefully by granting access to the camera and microphone when prompted. If an update causes problems, check for patches or consider rolling back to a stable version. For battery management, consider using low-power mode or connecting your iPhone to an external power source to ensure a smooth, uninterrupted stream.
How to Live Stream with Dacast from Your iPhone
In 2025, live streaming from your iPhone is more accessible than ever, thanks to Dacast’s support for both browser-based WebRTC and RTMP-compatible apps. Whether you’re using the iPhone 15 Pro or another model, you can start streaming directly from your device without the need for extra gear. Furthermore, ebRTC allows you to broadcast live through your mobile browser, while RTMP-compatible apps like Larix Broadcaster offer more control and features.
To explore these options, sign up for Dacast’s 14-day free trial and find the method that best suits your business needs.
Here we will explain the best way to live stream from an iPhone using Dacast. Just follow these seven simple steps to learn how to use Dacast to stream live video from your iPhone.
1. Download An App for Live Streaming from the App Store
When you want to do live streaming with Android devices or iOS devices, an essential step is choosing a live streaming app that works with your iPhone, and a live streaming platform, in this case, would be Dacast.
You want the app you choose to be easy to use and contain all the tools you need to support your broadcasting goals.
To help you choose an app to stream live from your iPhone, we’ll give you a quick rundown of the top apps available:
- Larix Broadcaster
- Wirecast Go
- Air Solo
- NanoStream
- BroadcastMe
- Dacast Browser-based streaming
These are all easy-to-work-with apps best tools that make iPhone live streaming easy.
Larix Broadcaster
If you use Dacast, the Larix Broadcaster is the best app to start live streaming from your iPhone. The Larix app is free to download from the App Store. You can use it to stream for free from your iPhone.
It is an excellent option because it supports the following:
- RTMP ingest streaming
- AAC audio codec
- H.246 video codec
These are three non-negotiables for all-device streaming for Dacast and other online video platforms.
Here are some of the features that make Larix Broadcaster an excellent option for live streaming using an iPhone:
- You can pause your live stream and just long tap on the screen to start again
- Switch between landscape and portrait modes live
- Supports Dual/Triple cameras in newer iPhones
- You can design separate overlay images for live broadcasts, pause, and standby
- It supports live streams from iPhone to Facebook Live, YouTube Live, Twitch, Restream.io, Dacast, and many more.
Check out our dedicated guide to live streaming with mobile devices using Larix for additional information on streaming with the app.
Wirecast Go
Wirecast Go is an app from Telestream. It is a highly reputable video streaming software and video encoder, and live streaming platform compatible with streaming with Dacast.
The app is also free in the App Store but has in-app purchases.
A few other things to know about the Wirecast Go iPhone live stream app are
- It has a user-friendly interface and is beginner-friendly. However, you’ll need to read the guidelines for features you might not have used before.
- It has many editing features, such as text overlays and adjusting logos. It also supports multiple camera inputs, and you can connect your USB cable while streaming without interrupting the stream.
- One of the drawbacks of the Wirecast Go live stream IOS app is that its connection with the server could be better. As a result, your stream might glitch.
You can stream for free to YouTube with Wirecast Go, but you must upgrade to support RTMP ingest for streaming with platforms like Dacast. In addition, to get the most professional iPhone live stream experience, you must pay for access to professional tools.
Solo Airmix
Solo Airmix, previously known as LIVE: Air Solo is a mobile streaming app from Teradek, a company primarily known for its trusty hardware encoders.
The app boasts the ability to give inexperienced broadcasters a professional broadcasting experience. In addition, it has tools that allow you to edit your videos in real-time, add transitions, color filters, and more.
You should use Solo Airmax to live stream from your iPhone because
- The interface is touchscreen-based, so you can zoom in and out on the screen while streaming.
- It supports multiple camera inputs, and you can switch as often as possible. There are numerous transition options, such as cut, zoom, dissolve, and slide. You can connect multiple cameras with USB input or wirelessly.
- It switches the audio, too, when you switch cameras (if you turn on this feature).
- It has multiple overlay options, such as scoreboards, texts, customized graphics, and titles.
Dacast does not currently support Solo Airmix, but we are working on reinstating that compatibility.
nanoStream
nanoStream is a live video encoding software used for streaming from mobile devices, and nanocosmos powers it.
The nanoStream app is free in the App Store, but you need a subscription to the full version of the software to use it. No prices are published on the nanocosmos website, so you must contact their sales team for additional information.
Dacast does support nanoStream but in a limited capacity. However, it’s an excellent option for those using a different online video platform.
Some of the attractive features of the app include
- White-label services so you can add customized branding while streaming using an iPhone
- Audience analytics to track your video’s performance
- Session recording feature so you can upload the content on various platforms and repurpose it for future use
- Multi-streaming on several platforms at the same time
- Audience engagement options such as chats and polls. So you can use the app to conduct auctions, webinars, and interactive learning sessions.
BroadcastMe
BroadcastMe is a free app that you can use for mobile live streaming with an iPhone camera. If you want the white-label, free version, you can purchase it from Streamaxia.com. Streamaxia SRL created it.
You can go live on YouTube and Twitch straight from the settings menu. Using the RTMP setting option, you can also use a professional broadcasting tool like Dacast.
For iOS, we recommend Wirecast Go iOS for maximum compatibility. It costs $5.99, and you use their iOS RTMP streaming app to broadcast live to any destination. You can also use the BroadcastMe app.
Some things to know about the app are:
- The design is attractive and easy to use
- It’s a budget-friendly app, so the features aren’t as great as the other options on the list. For instance, even though it offers the feature to flip your camera while streaming, users report that the app crashes when they use this functionality.
- Unfortunately, the app currently has more flaws than uses, so it should be your last option.
Dacast Browser-based streaming
If you don’t want to download any app to go live from your iPhone, it’s entirely possible with Dacast’s browser-based streaming (WebRTC) feature. All you have to do is head to your browser and log in to Dacast. Then, head to live streams and create one by selecting the audio and video input channels. You’ll then be able to see when your stream goes live and will have the option to record your screen as well.
The best part about this feature is that you don’t need to download anything on your iPhone. All you have to do is give your browser permission to access your camera and microphone when prompted.
You should use Dacast’s browser-based streaming because:
- It doesn’t require any downloads
- You can use it even with the 14-day free trial
- It’s easy to set up your livestream and get started
- You get complete control over your stream
2. Open Your Dacast Account and Find Your Stream URL
Dacast offers the highest quality streaming solutions available at the most competitive pricing.
To connect Dacast and your mobile lives streaming app, you’ll need to locate your live streaming URL and other credentials.
To locate this information, go to your Dacast account and click “Encoder Setup.” Next, select the “Other RTMP Encoder” tab. Here is a link to our guide for setting up your RTMP encoder.
You will need the “Stream URL” and “Stream Name,” so keep these credentials handy. Take note of your login and password details, too. You may need the information later on.
3. Open Your Chosen iPhone Live Streaming App
Depending on the iPhone streaming app you’ve chosen, you’ll need to enter either the “Stream URL” and “Stream Name” or only the “Stream URL.” Some apps will also require the username and password mentioned in the previous step.
Let’s use Larix Broadcaster as an example.
Go straight to the Connections section to manually configure your stream based on the Dacast live channel you will stream at:

Clicking on New connections (to establish a one-time connection) or Manage connections (to save the given stream details moving forward) will work.
However, you will be redirected to the stream settings part upon clicking. These are called Outgoing connections:

In this example, we chose a new connection:

These are based on the Dacast live channel encoder setup.
Please note that the Stream URL for HTML5 streaming will be different for everyone, and you need to put it manually. To do that, follow these steps:
STEP 1: Copy your unique “Stream URL” from Dacast (Example: rtmp://0736d04f-2f1c-b384-d89e-05ec581d0c52.dacastmmd.pri.lldns.net/dacastmmd)
STEP 2: Open the “Connection” tab on the Larix Broadcaster App.
STEP 3: Paste the “Stream URL” from Dacast as prompted.
STEP 4: Copy your unique Stream Name from Dacast (Example: dclive_1_150@XXXXXX).
STEP 5: Add it after the Stream URL.
(The final result will look something like: rtmp://0736d04f-2f1c-b384-d89e-05ec581d0c52.dacastmmd.pri.lldns.net/dacastmmd/dclive_1_150@XXXXXX)
STEP 6: Fill in the “Username” and “Password” fields with the credentials from the Encoder Setup” page on Dacast.
STEP 7: Choose “Limelight Networks” as your target type.
STEP 8: Click “Save” to finalize the connection.
To ensure optimal quality when streaming live from iPhone and similar devices, ensure your audio and video settings are configured to use the H.264 video codec and AAC audio codec. For a complete list of encoder settings, please check out our guide to encoder configurations.
You need to know these instructions to stream from your iPhone with Dacast.
4. Grant Permissions
When using a streaming app on your iPhone, you’ll be prompted to grant permission for the app to access your camera, microphone, and possibly your location. These permissions are necessary for live streaming, allowing the app to capture video and audio. To proceed, simply tap “Allow” when prompted. You can manage these settings later by going to your iPhone’s Settings > Privacy > Camera or Microphone. Ensuring proper permissions helps ensure a smooth streaming experience.
5. Secure a Stable Internet Connection
Streaming live from an iPhone requires a strong connection speed to create high-quality video content and viewing experiences. In addition, you must use mobile data or a Wi-Fi network because you can’t use a wired internet connection.
Ideally, you’ll want to use a wireless internet network instead of using the data on your mobile device. Try to get as close to the router as possible for the most robust connection. If you don’t have access to a wireless internet network, use a WiFi hotspot instead.
In the live streaming industry, it is commonly accepted to maintain a connection speed of at least 750 KBPS at the absolute minimum. In addition, professionals recommend a minimum of 2 MBPS for high-quality streaming.
It is also generally recommended that your upload speed be twice as fast as the bitrate you want to stream at. You can test your internet speed for secure video upload at testmy.net to gauge your connection at your present location.
A strong internet connection will help you create a quality iPhone live feed.
Using mobile data, such as 5G or LTE, should be a last resort.
6. Start Recording From Your Camera and Microphone
If you followed the above steps correctly, your live stream should work now. Within 30 to 60 seconds, the live stream should appear from your iPhone camera.
That means you’re ready to stream live from your iPhone to your viewers. Now you fully know how to create live streams from your iPhone.
7. Broadcast Live!

Are you ready to broadcast live from your iPhone smartphone?
Once your camera has started recording, and your event or report is about to start, it is time to begin your broadcast.
To ensure optimal video quality when streaming live from your iPhone, make sure that your audio and video settings are as follows:
- H.264 video codec
- AAC audio codec
- Audio channel to stereo
- Audio sample rate of 44100 Hz
These settings will guarantee that your video is high quality in your Dacast channel; when you start iPhone live streaming.
We recommend testing it out before your event so that you know what to expect since things will move quickly. You don’t want any avoidable hiccups in front of your live audience.
Testing your live stream from your iPhone before going live with your entire audience will help ensure your success.
Advanced Live Streaming Tips
If you’re wondering how to go live on an iPhone with advanced features, these tips will elevate your iPhone live stream setup:
Multi-Platform Streaming
To stream live video from iPhone to multiple platforms simultaneously, use tools like Restream or Streamlabs. These platforms let you broadcast to services like YouTube, Facebook, and Twitch at once. Set up Restream on your computer, link your platforms, and use your iPhone to stream via their app or by connecting to the Restream dashboard. Apps like Prism Live Studio also support direct multi-platform streaming from iPhone, simplifying the process.
Using OBS with iPhone
For a professional iPhone for a live streaming experience, connect your iPhone to OBS Studio. Use software like NDI HX Camera or plug your iPhone into your computer for screen capture. In OBS, adjust encoding settings to 1080p at 30fps for smooth, high-quality streams. Enable “Dynamic Bitrate” to prevent interruptions if your network fluctuates. OBS also supports overlays, transitions, and detailed customization for a polished broadcast.
Continuity Camera Setup
With Apple’s Continuity Camera, you can turn your iPhone into a webcam for platforms like Zoom, StreamYard, or OBS. Ensure your iPhone and Mac are on the same Wi-Fi network. During a video call, select your iPhone as the camera in the app settings. Use a stable mount for steady video and adjust lighting for professional results. This feature is perfect for live streams requiring top-tier video quality.
Additional Tips for Creating a Quality Live Stream from Your iPhone
The quality of your video is essential since your users’ experience greatly depends on it.
By leveraging the right mobile live streaming accessories, here are a few practices you can implement on your iPhone stream to level up its quality:
- Use an accessory like a tripod for stability. Or get a Gimbal if you’re live-streaming while walking around or vlogging.
- Determine if your audience prefers landscape (horizontal) videos or portrait (vertical) ones, and orient your phone accordingly. For example, if you wish to stream directly to apps such as Facebook and Instagram, which have a vertical orientation, you must stream in vertical mode. On the other hand, if your live stream lasts for hours and most of your audience uses a desktop or laptop to view it, then you should go with a horizontal video.
- Use audio accessories like a lapel microphone if you have a reporter on screen. Keep the microphone close to you, especially if your room is set up so your voice echoes too much. A lapel microphone is great for yoga instructors who might have music in the background but still need their voice to be clear or DJs.
- Set up an audio mixer accessory if you’ll be relatively stationary.
- Get good lighting accessories such as ring lights, LED, or natural sunlight. Viewers lose interest quickly if the videos or their background isn’t interesting. Make sure the light source is in front of the subject in the live stream and not behind it.
- Don’t have WiFi and mobile data turned on simultaneously while streaming on the iPhone. That’s terrible for high-quality video streams, as this will lower your video quality and interrupt the stream.
- Prevent your phone from overheating. Mobile live streaming consumes a lot of phone batteries and generates heat. Remove the phone cover if you have one, and place a fan behind the phone to cool it while streaming.
- Do trial runs every time there’s a new iOS update. For example, users often complain about the iPhone live streaming quality or the audio not working after updating their iOS. There are usually quick fixes for such issues on Apple Community Pages, but it’s still wise to conduct a test live stream before the actual show.
- Keep your apps updated. These include the ones you’re using for uploading streams (such as Larix and Wirecast Go) and the platforms you’re uploading the streams to (Facebook, Twitch, and YouTube). Older versions cause issues with recognizing wifi and maintaining video quality.
The commonality between these tips and accessories is that they are all about creating a professional-grade high-quality live stream with a consumer-grade device. With these tips and accessories, you can create a professional live stream from your iPhone.
FAQs
1. What is needed for mobile streaming?
Some of the things you need for mobile streaming include:
- External microphone
- Lighting
- High-speed internet
- Live streaming app
- Accessories like tripods and gimbals
2. Can I livestream from my mobile?
Yes, it’s entirely possible to livestream from your mobile. All you need is a live streaming app on your smartphone and a high-speed internet connection to get started. You could also consider getting a microphone for superior audio quality. The key is to ensure your smartphone has a good camera.
3. Can I use my iPhone camera to stream on Twitch?
Yes, it’s very much possible to use your iPhone camera as a webcam to stream on Twitch. This way, you can stream both your game phone’s camera and face on the platform to engage your viewers. However, if you want to stream both your game and camera on the iPhone together, it’s not possible.
4. How do I use my iPhone as a streaming camera with OBS?
To start using your iPhone as a streaming camera on OBS Studio, here’s what you need to do:
- Get the iOS OBS Camera plugin
- Open OBS Studio on your laptop
- Connect your iPhone to your laptop with the lightning cable
- Add new “iOS Camera” source for video
- Your device’s video will show up
5. Can I use my iPhone as a webcam for StreamYard?
Yes, you can use your iPhone as a webcam on StreamYard with its new continuity camera feature. However, your iPhone must be updated beyond iOS 16 to get access to this feature. The best part here is that you can connect it wirelessly to your phone or laptop and just need to ensure that it’s in close proximity.
6. Can I stream on multiple platforms from my iPhone?
Yes, you can use apps like Streamlabs or Prism Live Studio to stream on multiple platforms at once, such as YouTube, Twitch, and Facebook Live. These apps allow you to manage streams for multiple accounts simultaneously.
7. Can I monetize my iPhone live stream on Dacast?
Yes, Dacast supports pay-per-view, subscriptions, and ad-based monetization even for mobile RTMP streams from your iPhone.
8. How secure is mobile RTMP streaming in 2025?
Mobile RTMP streaming is highly secure in 2025, with support for end-to-end encryption, tokenized access, and HTTPS-based stream delivery.
9. How can I improve my internet connection for live streaming on my iPhone?
To improve your connection, ensure you’re using a stable Wi-Fi network with a strong signal. If using cellular data, make sure you have a good 4G or 5G signal. If possible, move closer to the router or use a wired connection via a mobile hotspot for more stability.
10. How do I troubleshoot live streaming on iPhone?
1. Error: “Connection Lost” or “Stream Disconnected”
- Cause: This typically happens due to a poor internet connection.
- Solution: Ensure you have a strong Wi-Fi or cellular data signal. If on Wi-Fi, try moving closer to the router or switch to a different network. If using cellular data, check your data connection and consider switching to a more stable network.
2. Error: “Video Codec Incompatible”
- Cause: The app may not support the video codec your iPhone is using.
- Solution: Ensure the app you’re using supports your iPhone’s native video format. Try adjusting settings within the app or use a third-party streaming app that handles various codecs, like Streamlabs.
3. Error: “Low Bitrate” or “Buffering”
- Cause: Insufficient bandwidth can lead to video buffering or low-quality streams.
- Solution: Lower the bitrate in your streaming app settings to accommodate limited bandwidth. You may also want to close background apps to free up data.
4. Error: “Overheating”
- Cause: Prolonged streaming can cause your iPhone to overheat.
Solution: Remove the case, use an external fan accessory, and limit other running apps. Also, enable power-saving settings to manage heat during longer streams.
Conclusion

Live streaming on your iPhone is easy and convenient when you choose the right OVP and iOS app duo.
Streaming live from your iPhone can be an exciting experience as you share everything you see in real time. So the next time you think a heavy video camera limits you, think again. Your iPhone is a worthy replacement as you broadcast live to the world.
For example, you can use your iPhone to stream live video to your website easily via your chosen iOS live streaming app and video hosting platform, like Dacast.
We hope this guide makes it easier for you to set up your live broadcast. As highlighted above, you only need a reliable app, a good internet connection, a unique Stream URL (RTMP link above), and an iPhone.
With this streaming setup, you can stream live from your iPhone and other iOS devices wherever you are.
Check out our live streaming platform, with our 14-day free trial for live events. Access all of our professional broadcasting features by signing up today. No credit card is required.