


How Do I Stream Using Wirecast?

Video Tutorial: How to Live Stream with Wirecast encoder
Written Tutorial: How to Live Stream with Wirecast encoder
To ensure your system is compatible, check out our post on the minimum Wirecast system requirements. Before reviewing the walkthrough to encode your live stream with Wirecast, let’s take a look at what exactly an encoder is and the purpose it serves for live streaming.
What is an Encoder?
Video encoding is a process used to convert the RAW video files captured by a camera into digital files suitable for live streaming over the internet. Wirecast is an example of a software encoder that uses RTMP-enabled encoding for live streaming. This means that the encoder feeds digital video files to the streaming platform using RTMP (real-time messaging protocol) server technology to ingest streams in real-time.
Required Encoder Settings
The following encoder settings are required for live streaming with Dacast, regardless of your selected resolution and bitrate:
| VIDEO CODEC | H.264 (x264 may work) |
| FRAME RATE | 25 or 30 |
| KEYFRAME INTERVAL | 3 secs (or 3x frame rate) |
| SCANNING | Progressive |
| ENCODING BITRATE | Constant (CBR) |
| AUDIO CODEC | AAC |
| AUDIO BITRATE | 128 kbps |
| AUDIO CHANNELS | 2 (Stereo) |
| AUDIO SAMPLE RATE | 48 kHz (48,000 Hz) |
How to stream with Dacast using Wirecast
1. Steps Within Dacast
Log in to your Dacast account and select your stream by clicking the pencil icon under “Edit.”

Once you’re inside the live stream settings, click on Encoder Setup.

By default, the “Generic RTMP Encoder” will be selected, showing to you the following information:
- URL
- Backup URL (in case of Server/Stream URL does not work on the encoder)
- Username
- Password
- Stream Name or Key
Note that Wirecast uses different terminologies; that is why we offer you the possibility to select “Telestream Wirecast” directly in the RTMP Encoders dropdown as shown below:

Clicking on the page icon on the right side of the corresponding credentials will automatically copy it. All you need to do is paste it to Wirecast.
2. Steps With Wirecast
To begin, open Wirecast and open the OUTPUT SETTINGS window. To do so you can:
- Press the keys CONTROL + Y on PC
- Press the keys COMMAND + Y on Mac.
Once the window opens, you next need to “Select an Output Destination.” The destination should be identified as “RTMP Server.”
Adding the First Stream and Credentials
To add your first stream, enter the stream URL and the stream name as shown below. Please make sure that the stream is correctly set up for HTML5. To do this, click on the clockwork icon near the ENCODING dropdown and choose “EDIT” or “NEW PRESET:” This window will then appear for the PRESETS: 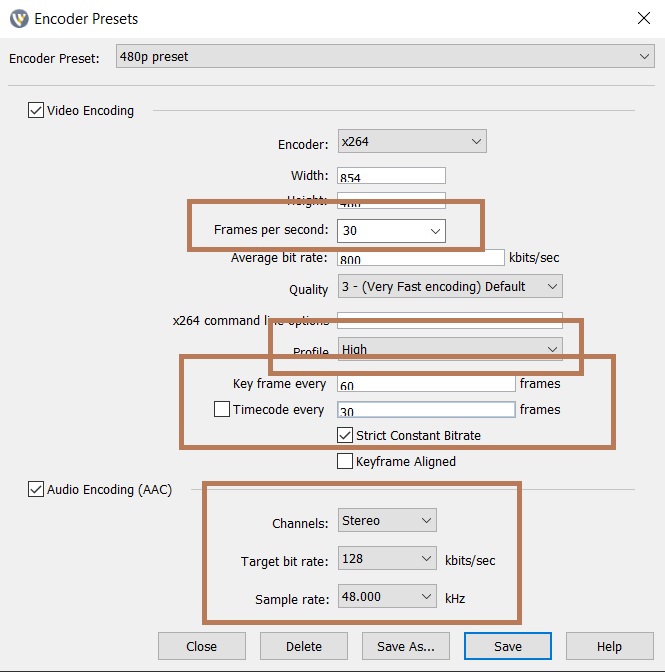
Please make sure to use our Dacast’s Live Encoder Settings guide to correctly configure the encoder. We firmly believe that by using these suggested settings, you will have no issues when it comes to functionality and playback with your live stream. If you plan to use NVENC, then 720p60 + NVENC is the option you should select.
Next, click on Save As… or Save. Afterward, you will be redirected back to the Output settings, where you will now paste the credentials found under the encoder setup window of your Dacast live stream.
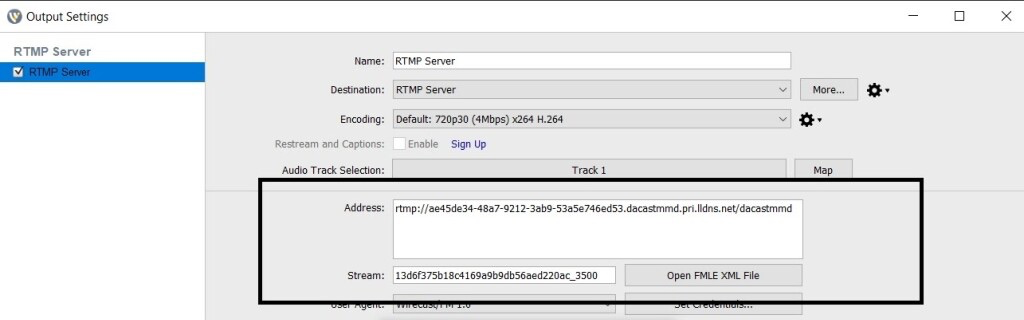
Enter both of the address and stream keys on Wirecast. You may refer to the image below:
Enter the credentials (6-digit login and password) by pressing set credentials. 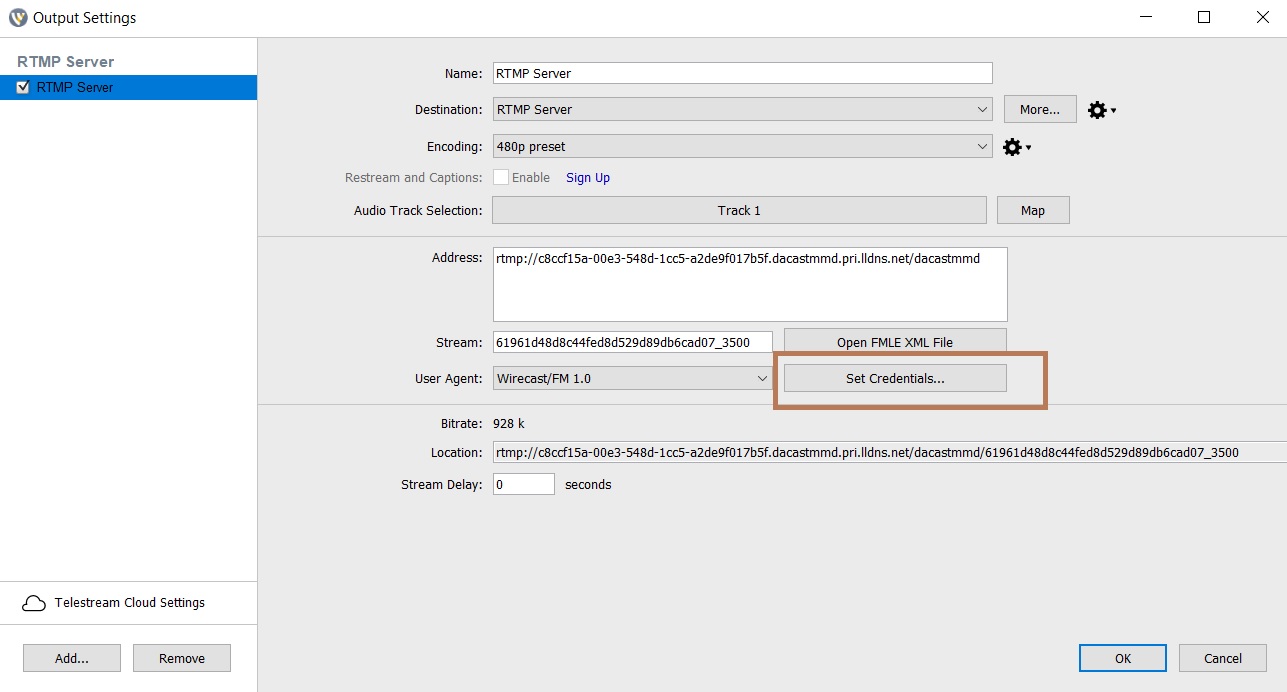
Click “OK,” and when you are ready to stream:

Click “STREAM”:

Any questions or need help/access to this feature? Please contact us.
Not yet a Dacast user, and interested in trying Dacast risk-free for 14 days? Sign up today to get started.
Additional Resources
- Required Encoder Configuration
- Top Software Encoders for Live Streaming
- Hardware Encoder Alternatives
- Is Wirecast (or Another Encoder) Necessary to Use the AAC Stream Format?
- Wirecast: What to Do When You Get an Error Publishing Stream
- Multi-Bitrate Streaming with vMix and Wirecast: What You Need to Know
- How Do I Broadcast My Screen With Microphone Audio on Wirecast?
- Spanish Tutorial: How Do I Broadcast My Screen With Microphone Audio On Wirecast?
- How to Use Wirecast and OBS Studio with Multiple Video Sources
- Wirecast: What to Do When You Get an Error Publishing Stream