


Live Stream Not Working? The Ultimate 2025 Guide to Troubleshooting Live Streaming Issues

When it comes to live streaming, there are many moving parts. Broadcasters need a workflow for filming the live event, encoding or transcoding the files, delivering the video to users, and allowing playback by viewers. While a modern live streaming platform makes it simple to get started, issues can still pop up, and that’s why it’s important to know how to troubleshoot live stream issues.
Even though only 2.6% of live streams fail to start—the biggest problem with live video now—businesses can still lose viewers when streams have issues. If something goes wrong, therefore, broadcasters must respond with error handling best practices for streaming.
That’s why we’ll take a deep dive into how to troubleshoot video streaming issues immediately. Our suggestions follow a typical streaming workflow from video encoding to delivering and playback.
Let’s see what you can do if your audio or video live stream is not working correctly. Let’s get right into it so you can troubleshoot your live streaming issues confidently.
Table of Contents
- Why Isn’t My Live Streaming Working?
- Environmental and Equipment Issues to Watch
- AI Tools and Diagnostics in Live Stream Troubleshooting (2025 Edition)
- 10 Ways to Troubleshoot Live Streaming Issues
- How to Troubleshoot with Dacast
- FAQs
- Conclusion
Why Isn’t My Live Streaming Working?
Before you dive into fixes, start by checking these common causes of live streaming issues. Use this checklist to spot problems fast and jump to the right section of this live stream troubleshooting guide for 2025:
- Using the wrong hardware or software?
Double-check your camera, mic, encoder, and streaming platform setup. Learn how to choose the right broadcasting tools. - Low upload speed or unstable internet?
Run a speed test. You’ll need consistent upload bandwidth to avoid buffering. See how to fix bitrate and bandwidth issues. - Audio and video out of sync?
Sync issues often stem from encoder misconfigurations or weak connections. Here’s how to fix AV sync problems. - Encoder settings misconfigured?
Wrong bitrate, resolution, or codec can cause stream failure. Learn the best encoder settings for HEVC and HLS. - OBS or other encoder crashing?
If your OBS stream is not working, restart the app and double-check inputs. Learn how to troubleshoot OBS and encoder issues. - Playback issues on certain devices?
Some CDN or HLS settings may cause errors on specific browsers or regions. See how to fix HLS playback and CDN issues. - AI or automation misfiring?
If you’re using AI-powered live stream diagnostics tools in 2025, make sure settings are properly trained. Learn more about AI in stream troubleshooting. - Haven’t tested your stream?
Always run a test stream to catch problems before going live. Here’s how to test a live stream professionally.
If you’ve run through this checklist and the live stream is still not working, explore our full live streaming troubleshooting guide for 2025 or see how Dacast’s tools can help.
Environmental and Equipment Issues to Watch
1. Not Testing Your Equipment
One common live streaming mistake is not testing your equipment before going live. That can be a costly mistake, especially if you’re using new or rented equipment.
To troubleshoot live streaming problems, always test your equipment before going live. A good rule of thumb is to conduct a test live stream and use it as an opportunity to understand where any problems are occurring. You can then troubleshoot any potential audio or video file issues through this test stream and ensure your live stream won’t be harmed.
That way, you can identify and fix any potential issues. The same goes for software. For instance, if you’re using a new live streaming platform like Dacast, it’s important to try it out, learn the ins and outs, and test it with your equipment before going live.
2. Weather Issues
No matter what country you live in, the weather can always be a potential issue. For example, if you’re live streaming an outdoor event and it starts raining, you need to have a plan in place. The last thing you want is your equipment damaged due to bad weather conditions.
You need to listen to weather reports in the days leading up to your live streaming event and plan accordingly. If it’s windy outside, make sure your equipment is properly secured. If it’s raining, have a plan to keep your equipment dry.
7. Unintended Eavesdropping
What’s worse than live streaming not working? Having your surroundings create unexpected audio and video problems to troubleshoot. When live streaming, you have to be aware of your surroundings. That’s because anything – and anyone – near your live streaming setup can be picked up by the video camera and microphone.
For example, if you’re conducting an interview and someone walks by and starts talking loudly, the microphone and broadcast will pick up audio from your viewers. To avoid this problem, you need to be aware of your surroundings and, if possible, have a dedicated area for your live streaming setup.
3. Power Outages
No matter how well you prepare, there’s always the potential for a power outage. Between 2011 and 2021, the annual number of power outages caused by bad weather increased by nearly 80%. When the power goes out, your audio or video live stream will go down too.
So, it’s important to have a backup plan in an emergency. For example, you can use a battery-powered UPS (uninterruptible power supply) to keep your live streaming equipment running for a few hours. You can also use a generator to power your equipment if the power is out for an extended period.
This is especially important if you’re an enterprise or OTT platform that’s launching a paid live stream to a massive audience. The last thing you want is to be troubleshooting your issues when the stream has already started. So, make sure you’re prepared for such issues beforehand.
AI Tools and Diagnostics in Live Stream Troubleshooting (2025 Edition)
AI has become a game-changer in how broadcasters troubleshoot live streaming issues in 2025. Today’s tools can flag problems before they disrupt your stream. AI-powered diagnostics, like StreamMetrics and automated encoder log analysis, detect errors early—whether it’s bad encoder settings for live streaming, low bitrate warnings, or CDN video delivery troubleshooting. These systems track patterns from past broadcasts, analyze real-time performance, and recommend fixes before the viewer even notices a hiccup.
Live streaming platforms like Dacast now offer built-in tools that use AI to help you test a live stream before broadcasting professionally. From identifying upload speed vs bitrate mismatches to alerting you about sync issues in audio video streaming, these tools simplify how to troubleshoot live streaming at every step.
Bandwidth and 5G
5G and edge computing have improved live stream stability with faster speeds and lower latency. However, fluctuating signal strength and network hand-offs can still cause stream buffering—even with fast internet. Understanding bandwidth and bitrate issues in this context is essential to fix live stream lag.
CDN and Edge Nodes
Modern CDN for live video now includes edge delivery, which brings content closer to viewers. But edge nodes can still introduce location-based playback errors. Tools that monitor CDN health help you fix live stream problems before they affect your audience.
10 Ways to Troubleshoot Live Streaming Issues
When live streaming, your environment may cause some issues. But as we all know, live streaming technical difficulties can give you a much stronger headache. So, how can you decrease the chances of a live stream not working and troubleshoot problems?
Here are ten ways to troubleshoot live streaming issues:
1. Check Encoder Settings
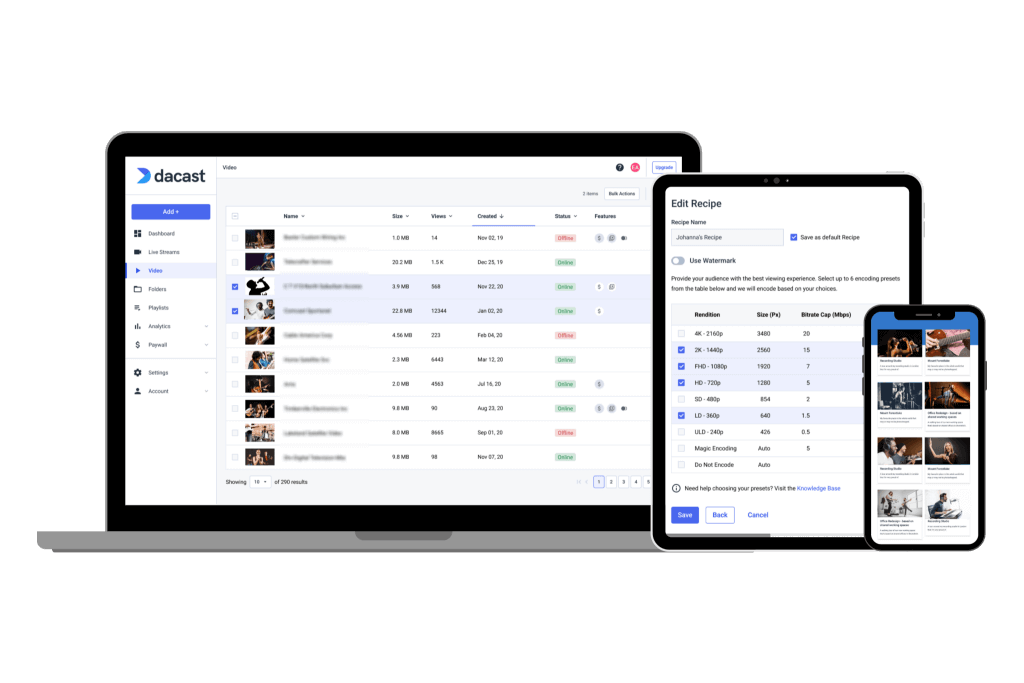
Most live streams require a hardware or software encoder to convert RAW video files into a format suitable for streaming. Without an encoder, you may struggle with compatibility, size, and video quality issues. Modern encoders, however, have a lot of settings to choose from, and an improper configuration could cause issues.
That’s a common live stream problem, so we always suggest you double-check your encoder settings if your live stream isn’t working correctly to troubleshoot this problem.
VIDEO CODEC
H.264 (x264 may work)
FRAME RATE
25 or 30
KEYFRAME INTERVAL
2 secs (or 2x frame rate)
SCANNING
Progressive
ENCODING BITRATE
Constant (CBR)
AUDIO CODEC
AAC
AUDIO BITRATE
128 kbps
AUDIO CHANNELS
2 (Stereo)
AUDIO SAMPLE RATE
48 kHz (48,000 Hz)
These settings are a baseline requirement for a live streaming setup with Dacast. That’s because they’re ideal for ensuring compatibility with the Dacast video platform and a wide range of user devices.
If you don’t see a message that indicates the encoding hardware or software is streaming to primary, there could be an issue with your encoder settings.
First, you’ll want to ensure your live stream encoder is pointed at your streaming server, which delivers the stream to end-users. The encoder’s “Stream Name” and “Stream URL” should match the values provided by your Online Video Platforms (OVPs).
If the encoder only has a single URL field, you’ll need to use the ‘Backup URL’ under the ‘Other RTMP encoders’ section of Dacast’s encoder software setup page.
If you’re using encoding software that’s not integrated with Dacast, you may also need to enter a login and password during configuration. That information—different from your Dacast account—will also appear on the Dacast encoder setup page.
When multi-bitrate streaming, some encoders require specific names for each stream. However, the requirements may be different, depending on which encoder you’re using. If there still seems to be an issue with your encoder, we recommend trying another option, like OBS Studio.
If an encoder software error occurs while audio or video streaming, try the steps above to address the issue and troubleshoot it.
AV1 vs. H.264
In 2025, many broadcasters are exploring AV1 for its superior compression and video quality at lower bitrates. However, AV1 can put a heavy load on your CPU and may not work reliably across all devices or platforms. If your live stream is not working or buffering on certain viewers’ screens, switching back to H.264 can help ensure better compatibility, especially for legacy devices and lower-powered systems. H.264 remains the most universally supported option for live streaming and is often the safest fallback when troubleshooting live streaming issues.
HEVC, or H.265, is another popular option that offers better efficiency than H.264, but it requires precise configuration. Encoder settings for HEVC can lead to problems like audio-video sync issues, dropped frames, or streaming error codes if your bitrate, keyframe interval, or resolution settings are mismatched. In particular, using high-efficiency settings without adequate upload bandwidth may cause stalling or degraded playback quality. If you’re not sure how to troubleshoot encoder issues in live streaming, test your setup at different resolutions, check for CDN video delivery delays, and make sure your encoder is updated. With tools like Dacast’s AI-powered live stream diagnostics in 2025, you can quickly identify and fix these issues before going live.
2. Confirm Bandwidth Availability
When you want to troubleshoot live streaming issues, you must also check the bandwidth availability. The bandwidth refers to the overall capacity of your server, including how much traffic and live streaming video data it can process.
Bandwidth measures the data transfer rate, which varies depending on streaming quality, viewers, and more. That means some streams will use more traffic than others, and you’ll need to analyze your bandwidth usage and availability if you’re experiencing live streaming problems.
Every Dacast plan has a limited amount of bandwidth available for streaming. Once you’ve hit the limit, your stream will stop unless you’ve set up overage protection. You can also upgrade your video bandwidth anytime, but it won’t go into effect mid-stream.
That is why it is important to check and ensure you have enough bandwidth before starting your live stream to troubleshoot this streaming issue.
You can check if you’ve hit the limit by viewing the “Upgrade my plan” option within your Dacast account. You can also use our calculator to determine which plan matches your bandwidth requirements based on broadcast frequency, viewers, stream length, and quality.
3. Compare Upload Speed & Bitrate

You can also troubleshoot live streaming challenges by comparing the upload speed of your video file with the bitrates. The bitrate of a stream is a measurement of the number of bits required to be transmitted per second. Transferring the stream to your OVP needs to be at least as fast as the video stream’s bitrate. Streams with bitrates that exceed bandwidth could suffer from lags, buffering, or outages.
If you’re using adaptive bitrate (ABR) streaming, your total bitrate is the sum of every bitrate you’re streaming simultaneously. We recommend keeping this amount at less than half of your upload speed because network conditions often fluctuate throughout the day. It can help you troubleshoot this issue.
You can test your upload speed using https://testmy.net/upload. If your stream’s unable to maintain a stable broadcast, you should compare your upload speed to the total bitrate. Then, adjust the bitrates included in your streaming profile to see if it helps.
You can also improve your upload speed by using a wired connection, increasing your internet plan, moving your encoder closer to the router, or limiting the WiFi usage of other devices on the network. To do this, you need to check with your Internet service provider.
You should adjust your total bitrate and upload speed until you find a balance that offers high-quality streams without issues.
Getting the right bitrate set-up will help you troubleshoot quality issues when live streaming. As always, it helps to have faster internet speeds that can enable you to broadcast your live stream at the best possible audio and video quality.
4. Turn Live Channel On
When broadcasting with Dacast, you’ll need a live channel turned on and configured properly. The channel settings determine the enabled features, viewer restrictions, the video player’s branding, and more.
For example, set up a channel to stream to a HTML5 video player, a low-latency live channel, or a playlist channel for a continuous series of videos. Channels give broadcasters full control over how their video content reaches end-users.
You’ll need to create a live channel within the Dacast dashboard to deliver your encoded video stream to users. Live channels are set to off by default, so a simple mistake is forgetting to enable them before the stream starts.
If the encoder is running, but the video preview is black, you can troubleshoot live streaming issues by making sure you’ve turned the correct live channel on within the Dacast dashboard.
To create the live channel, click “Add +” or “Live stream” on your Dacast dashboard and follow the instructions.
That is an easy streaming problem to troubleshoot!
5. Open Streaming Ports & Firewall
One of the most overlooked reasons your live stream may not be working is that a firewall or closed network ports are silently blocking it. This can happen on both personal computers and larger corporate networks. Even if your encoder settings for live streaming are correct, your content might never reach your viewers if key ports are shut.
In most cases, live streaming platforms like Dacast require port 1935 to be open for RTMP to work properly. If that port is blocked, your stream may try to fall back to ports 80 or 443. These are commonly used for web traffic and are more likely to be open, but not guaranteed, especially on corporate firewalls. Always ensure all three are accessible.
For those using WebRTC-based workflows or HLS, technologies like TURN and STUN servers help establish backup connectivity when direct peer-to-peer or CDN video delivery is interrupted. This is especially useful in restrictive networks.
In enterprise setups or multicast environments, you may also need to open specific firewall ports like 1234, 554, or 8554, depending on your protocol and encoder configuration. Check with your IT team if you’re unsure which ports your corporate firewall allows.
Here are a few real-world scenarios to help identify if you’re dealing with a firewall or port issue:
- OBS stream not working: Look for encoder messages like “Failed to connect to server” or “Encoding overloaded.”
- CDN error 403 (Forbidden): This may point to blocked port traffic or incorrect stream key/authentication settings.
- HLS playback issues: A misconfigured firewall can interrupt segment delivery or block chunked file downloads entirely.
To test your setup:
- On Mac, open Network Utility, enter your IP, and scan for open TCP ports.
- On Windows, open Command Prompt and type netstat -a. Ports marked LISTENING are open.
- Use Dacast’s built-in testing tools or AI-powered live stream diagnostics to simulate your stream and flag any delivery issues before you go live.
If you find ports are closed, you’ll likely need to contact your network administrator to open them manually. This is especially important when preparing a live stream for a hybrid event or professional webcast across restrictive networks.
6. Review CDN Status
If you want to troubleshoot live streaming issues, you must verify your CDN status. A content delivery network (CDN) is a set of worldwide servers used to distribute content. These servers cache the video content (or other data) close to users to shorten the transfer distance or last-mile delivery. That can greatly reduce the latency of live-streamed videos and television broadcasts.
Using a content delivery network improves your raw video data by reducing file size. It can increase load speed by up to 50% or even more, which improves the overall quality of your live stream delivery.
While content delivery networks (CDNs) are meant to improve streaming video performance, they can still have issues. Some CDNs, like Cloudflare, have experienced outages in the past.
Once video content is sent to the Dacast platform, it’s automatically transferred to a CDN and distributed among its servers. That means Dacast users have little to worry about when it comes to managing the CDN.
You can check Down Detector or a similar site if your viewers in certain regions are experiencing issues, as there could be CDN servers down. If you believe the CDN is down or it’s not functioning correctly, contact us, and we can investigate the issue. It’s not a common streaming issue, but it can occur.
7. Verify Embed Code For Video Player
When using an OVP like Dacast, it’s usually straightforward to embed videos across the Internet on websites or within social media posts. For most broadcasters, copying and pasting the embed code provided within the Dacast dashboard is all it takes to share video content. However, it could easily go wrong if you don’t copy and paste the correct embed code.
There are two types of embed codes available: iFrame and JavaScript. You can insert either of these into HTML to integrate live streaming nearly anywhere on the web.
You can verify that the embed code was copied correctly by checking the page source code. Right-click on the page and choose ‘View Page Source’, then search for ‘Dacast’ within the markup. Compare this to the embed code within the Dacast dashboard and recopy it if necessary.
That’s an easy live streaming issue to fix by following the directions above.
8. Ensure Video Player Compatibility
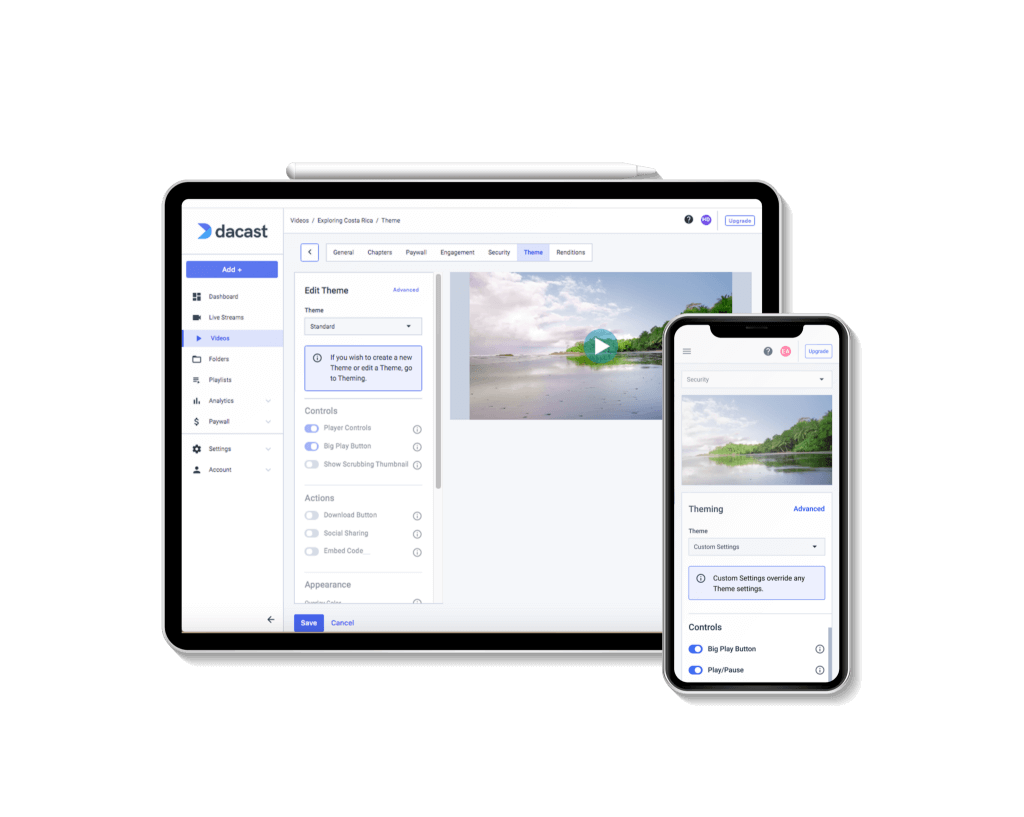
Today’s viewers watch live streams across various devices with different video player implementations. That means you need to use streaming protocols that are compatible with a wide range of video players and devices.
For most broadcasters, that means using HTTP live streaming (HLS), which is compatible with any HTML5 or Video.js-based video player. That includes Dacast’s video player, which is also ready for nearly any device.
In addition, most browsers are phasing out the Flash Player, so if you’re streaming over the RTMP protocol, some users may not be able to watch. If you’re getting user complaints, check which browser and device they use to access your stream.
Ensure your streaming profile is compatible with the video players that your viewers use so that you’re capable of reaching your entire audience.
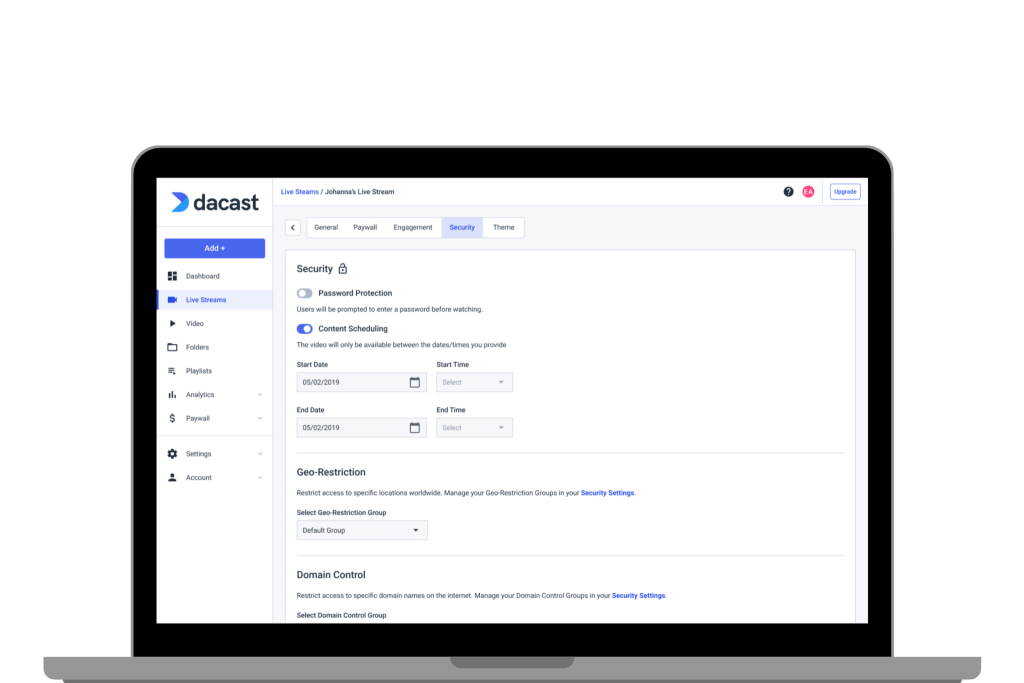
9. Inspect Viewer Restrictions
Sometimes, the reason why you’ll need to troubleshoot live streaming issues is due to viewer restrictions. Geographical or domain-specific restrictions are critical for preventing piracy and complying with regulations in a particular region. For example, broadcasters can limit where the stream is viewed and which websites can embed the video.
If viewers can’t see your live stream, they should be able to, but you should ensure your restrictions are configured properly. You may be inadvertently preventing your audience from accessing the stream.
Within Dacast, all countries can access a stream unless you create a list of countries you want to receive the broadcast. So, make sure you haven’t left off any country your target audience may be viewing from.
Similarly, you’ll want to confirm that any sites you want to display the live stream are included on the list of allowed referrers within Dacast. It’s also important to note that these restrictions only work with JavaScript players and not with iFrame embeds.
If a viewer can’t see your content in a particular country, but other viewers can access it, viewer restrictions are most likely the streaming issue they are encountering.
10. Switch Streams

If you’ve tried all other methods of troubleshooting live streaming issues with no positive results, you can try switching the live stream. Switching between current and backup streaming channels is an ideal way to improve the entire video and audio quality of your professional-grade broadcast.
If none of the previous solutions fix your live broadcast, we recommend trying a backup stream or creating a new one from scratch.
Dacast provides a backup stream URL nearly identical to the primary URL, but there’s ‘b’ at the beginning instead of ‘p.’ Replace this in your embed codes and test the backup stream’s playback again.
We suggest creating a new stream from scratch if the backup live stream’s not working. Sometimes, you may notice settings that you misconfigured the first time.
Finally, if all your live streaming troubleshooting doesn’t help, feel free to contact technical support, which is available to Dacast users 24/7. The Starter Plan includes chat support, while the Pro and Premium Plans also provide phone support.
How to Troubleshoot with Dacast
When your live stream runs into issues, quick and effective troubleshooting is key. Use this checklist to identify common problems, apply smart fixes, and keep your broadcast running smoothly with Dacast’s powerful tools and support.
- Run a Pre-Broadcast Test
Use Dacast’s built-in testing tools to check encoder settings, bitrates, and connection stability before going live.

- Use AI-Powered Diagnostics
Let Dacast’s AI tools detect common issues like sync errors, frame drops, and bitrate mismatches in real time. - Check Edge Delivery Status
Monitor global CDN performance and edge node health to reduce buffering and improve regional reliability. - Review Error Logs and Alerts
Access detailed error codes and alerts directly in your Dacast dashboard for quick diagnosis of playback or HLS stream failures. - Adjust Encoder Settings
Dacast supports the best encoder settings for HEVC/AV1. Make real-time adjustments to avoid common problems like audio/video desync. - Verify Viewer Experience
Test your stream on multiple devices and geographies with Dacast’s playback validation tools. - Get 24/7 Support
Contact Dacast’s expert support team anytime—even during your stream—for immediate help with technical issues.
FAQs
Why is my live streaming not working?
Common causes include wrong technology, insufficient bandwidth, audio/video sync issues, untested equipment, power outages, weather problems, or security risks like unintended eavesdropping.
How do you diagnose streaming problems?
Check encoder settings, bandwidth, upload speed vs bitrate, live channel status, open ports/firewalls, CDN health, embed code, player compatibility, viewer restrictions, and try switching streams.
How do I check live streaming?
View your stream in the app, test it on another device, confirm sufficient bandwidth, monitor CDN status, and check quality across multiple devices.
How do I enable live streaming?
Use proper tools, set bandwidth correctly, ensure stable internet, decide viewer access methods, and use reliable equipment.
How can I stream live for free?
Use free social platforms like YouTube Live, Instagram Live, or Facebook Live, or choose a streaming platform with a free or freemium plan.
How to troubleshoot common live streaming issues
Check encoder setup, bandwidth limits, upload speed vs bitrate, correct live channel, open ports/firewalls, CDN status, embed code accuracy, device/player compatibility, remove viewer restrictions, and switch to a backup stream if needed.
Which app is used for live streaming?
Popular apps include nanoStream, BroadcastMe, Twitch, Facebook Live, Tango, Instagram Live, SwitcherStudio, and Streamlabs.
Why is my live stream not working even though I’m live?
You might be live but experiencing issues due to poor encoder settings, bandwidth limits, CDN problems, or playback errors on viewer devices.
What are common encoder issues and how do I fix them?
Common issues include incorrect bitrate, wrong codec, dropped frames, and audio/video sync problems. Adjust settings, update software, and test regularly.
How can I check upload speed vs bitrate for live streaming?
Use online speed tests to measure upload speed, then set your stream bitrate lower than your upload speed to ensure smooth streaming.
What are AI tools for live stream diagnostics in 2025?
AI tools analyze stream quality in real time, detect errors like lag or sync issues, and offer automated fixes or alerts to prevent failures.
How do I fix live streaming issues on OBS?
Check encoder settings, lower bitrate if needed, update OBS, ensure proper firewall/port settings, and test your stream before going live.
How can I tell if a CDN is down or misconfigured?
Monitor your CDN dashboard for outages, check stream availability in different regions, and use third-party status tools to confirm CDN health.
How do viewer restrictions (geo/domain) affect stream visibility?
Restrictions block viewers in certain locations or domains, causing them to be unable to access your stream depending on set rules.
What’s the best way to test a live stream before going live?
Use your streaming platform’s test mode or preview features, check playback on multiple devices and networks, and monitor bitrate and latency.
Why is my audio and video out of sync during a broadcast?
Sync issues can result from encoder delays, network lag, or incorrect buffering. Adjust audio delay settings or optimize your encoder configuration.
Conclusion
Live streaming can be unpredictable. If you started this guide wondering, “Why is my live stream not working?” we hope you now feel more confident handling common problems—whether it’s figuring out how to fix live stream lag, diagnosing encoder issues, or resolving HLS playback errors.
In 2025, live streaming troubleshooting goes far beyond guesswork. With edge streaming, AI-powered live stream diagnostics tools, and real-time alerts, platforms like Dacast make it easier than ever to identify and fix problems before they disrupt your broadcast. Whether you’re working with HEVC, testing upload speed vs bitrate, or sorting sync issues in audio video streaming, having the right tools and knowledge matters.
Dacast helps broadcasters troubleshoot faster with:
- Built-in streaming error codes and solutions
- Support for the best encoder settings for HEVC streaming
- Tools to test live stream stability before going live
- AI in live streaming diagnostics to catch issues early
- Global CDN with edge delivery to reduce buffering, even with fast internet
A reliable workflow means fewer surprises. With the right preparation, you can avoid issues like your live streaming not working on certain devices or countries. You can also solve common challenges like HLS stream buffering, audio delay, or misconfigured bitrate settings, before your viewers notice anything is wrong.
Need help troubleshooting your Dacast stream? Get 24/7 expert support — even mid-broadcast.
Want to prevent live streaming issues before they happen? Download our 2025 Live Streaming Health Checklist to run smooth, professional broadcasts every time.
For regular live streaming tips and exclusive offers, join our professional broadcaster’s LinkedIn group.
Thanks for reading, and good luck with your troubleshooting efforts!